# I Built an AI Influencer for $0 and Started Monetizing Her in the First Week.
**作者**: 0xTria
**日期**: 2026-06-08T11:53:52.000Z
**来源**: [https://x.com/0xTria/status/2063952648533897291](https://x.com/0xTria/status/2063952648533897291)
---
Most AI avatar tutorials stop at one pretty face. That is not a business. I wanted to build a repeatable system: same person, same style, same voice, product videos, lifestyle clips, and a workflow anyone can copy without paying for an AI avatar platform.
The goal was simple: not to create one image, but to create a character I could use again and again. If she looked different in every post, the whole thing was useless. If the videos felt like AI demos, nobody would watch them. If the workflow required a paid avatar platform, it was not worth copying.
So I built the system from zero: face, identity, voice, photos, product clips, short videos, and final edits.
Here is the exact workflow.
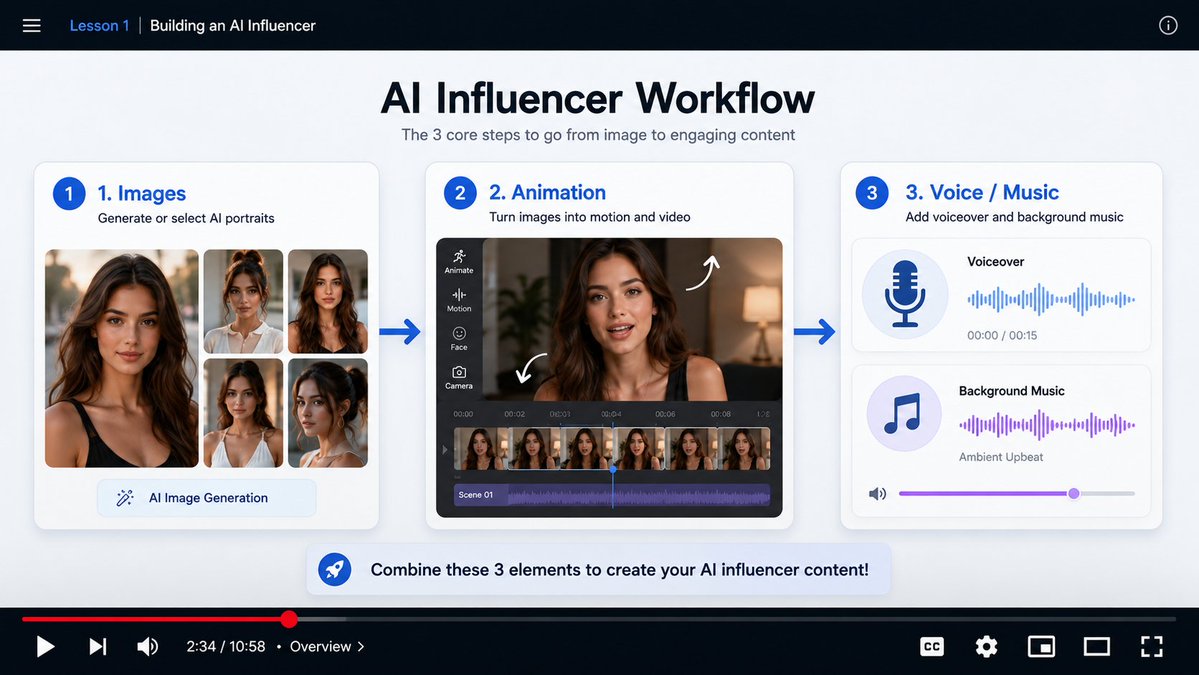
## Step 1 — Don’t start with a prompt. Start with identity.
Most AI influencers fail because they are built from one vague prompt:
```
pretty realistic ai girl, influencer, 9:16
```
That gives you the same average face everyone else gets.
Instead, build the person from references.
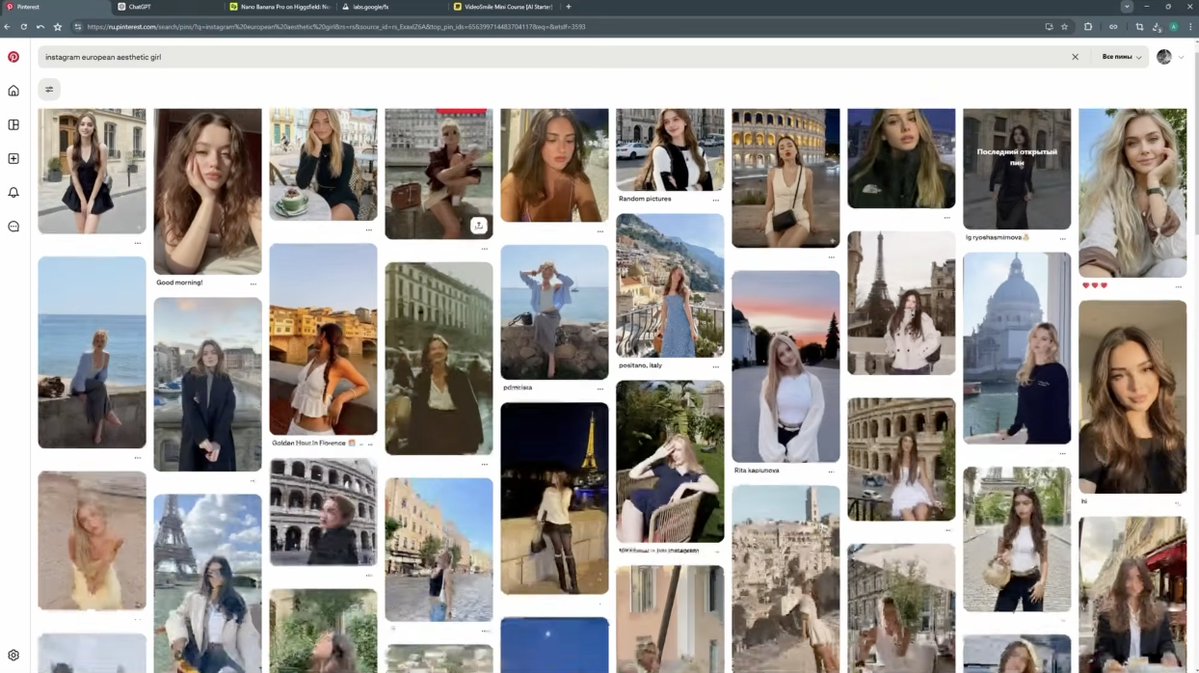
Use Pinterest to collect 2–3 faces, then decide what each reference is responsible for:
- Reference 1: hair color and haircut
- Reference 2: face shape and eyes
- Reference 3: lips, style, vibe, or expression
The goal is not to copy a real person.
The goal is to mix separate traits into a new, consistent synthetic character.
## Step 2 — Make ChatGPT analyze before it writes.
This is the trick most people skip.
Do not ask ChatGPT to write the final image prompt immediately.
First, upload the references and force ChatGPT to describe each girl separately: face shape, hair, eyes, brows, lips, skin, style.
Then ask it to number them: Girl 1, Girl 2, Girl 3.
Only after that, decide which features you want from each reference.
This prevents random “AI beauty” and turns the avatar into something controlled.
```
You are an expert in visual description and prompt creation for image generation.
Your task: when the user uploads photos of girls, you must:
1. First, analyze the appearance of each girl in detail: face shape, facial features, hair color and texture, eyes, eyebrows, lips, skin, and overall style. Briefly describe each one in 2–3 sentences per photo and number them as “Girl 1”, “Girl 2”, “Girl 3”.
2. Do not create the final prompt immediately. Instead, ask the user clarifying questions: which exact features they want to take from each girl, such as eyes, nose, lips, face shape, hair, and style. Suggest your own recommended mix, but wait for the user’s final answer before creating the prompt.
3. After the user answers, create a hybrid prompt that combines the selected features into one unified character description.
The final prompt must be a detailed English text, no longer than 150 words, and must include:
- the character’s physical appearance;
- a white studio background;
- clothing: black T-shirt;
- soft professional lighting;
- photorealistic style, visible skin texture, high detail.
```
The final image prompt should be in English, under 150 words, and include:
- physical features
- white studio background
- black T-shirt
- soft professional lighting
- photorealism and visible skin texture
## Step 3 — Generate the base portrait.
Once the hybrid prompt is ready, generate the first vertical 9:16 portrait.
Do not move forward until the face works.
If the hair, face structure, skin, and overall vibe are wrong at this stage, everything later becomes harder: body shots, outfits, videos, lip sync, and motion transfer.
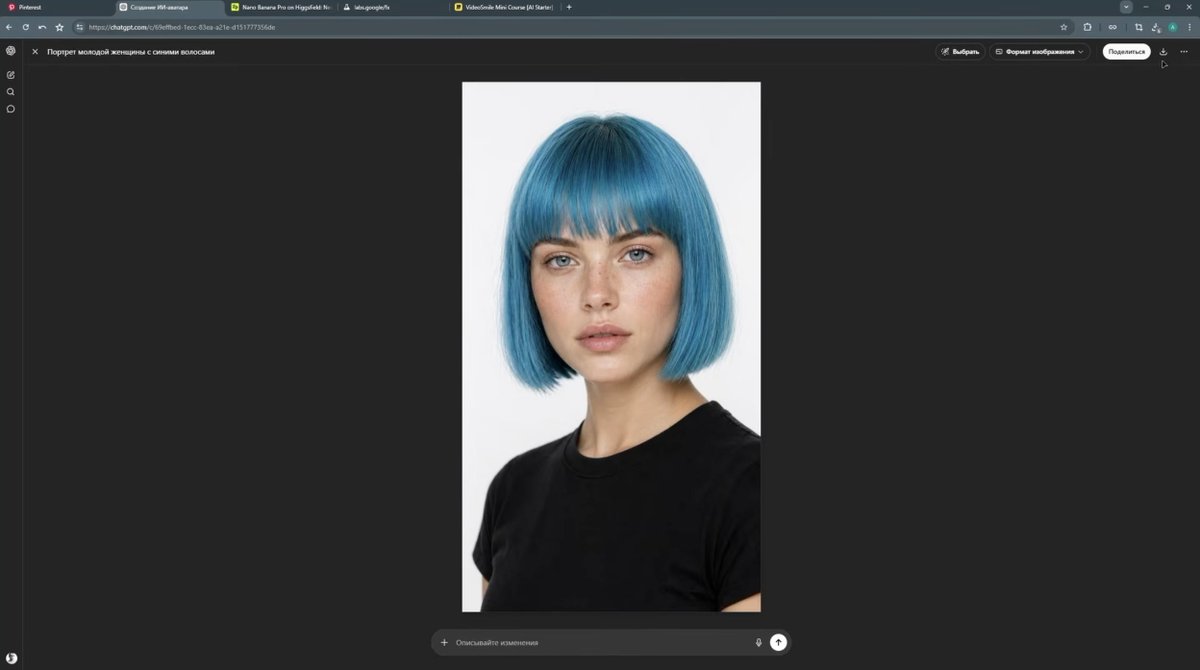
When you get a good result, save it as the main identity reference.
This image becomes the “source of truth” for the entire character.
## Step 4 — Build a mini character sheet.
One portrait is not enough.
The model needs to understand the same person from different angles.
In Google Flow, upload the portrait and generate:
1. a waist-up shot
2. a full-body shot
3. any extra angle you will use later
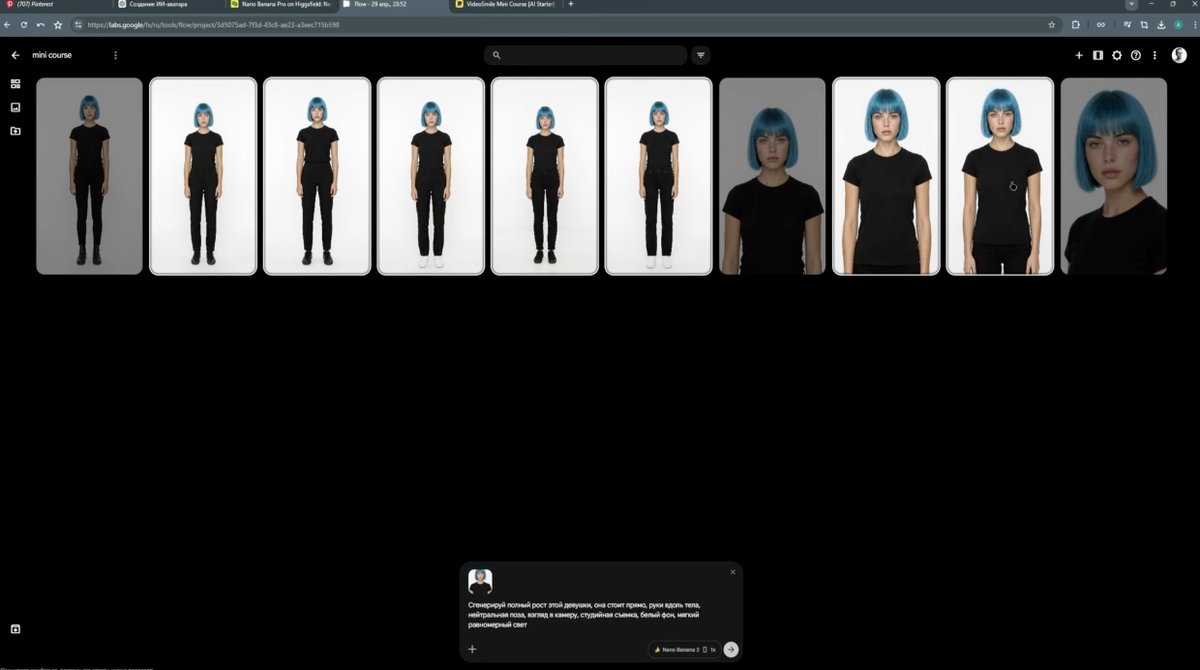
Do not expect the first generation to be perfect.
A good result may take 3–6 attempts. That is normal.
Your goal is not quantity. Your goal is identity consistency.
## Step 5 — Lock the identity before every new scene.
When you place the avatar into a new location, AI models love to “improve” her.
They change the hair, smooth the skin, alter the face, fix asymmetry, or accidentally make her a different person.
So every scene prompt starts with an identity lock:
```
Use exactly the same synthetic person from the attached reference image. Preserve the exact facial structure, body proportions, natural skin tone, and authentic asymmetry. Do not beautify or change the appearance. Hair must remain identical in color and haircut.
```
After the lock, describe the scene:
- what she is doing
- where she is
- what she wears
- how the camera sees her
- what the lighting feels like
- what should stay static
## Step 6 — Create scenes like a mini-vlog, not random images.
The workflow builds three lifestyle shots:
1. city selfie-vlog
2. skincare / face cream shot
3. TikTok-style dance setup
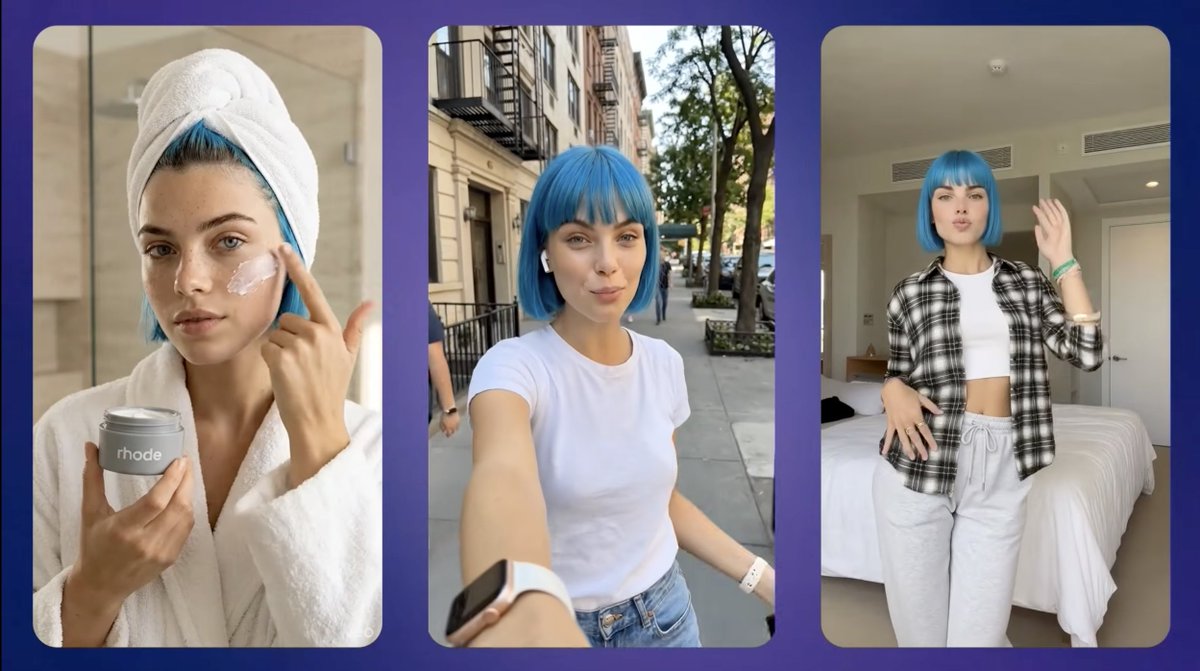
The mindset is simple:
You are not generating one pretty image.
You are building a sequence that can be edited into a story.
Morning routine → outfit → TikTok → city walk.
## Step 7 — Write video prompts like a director.
For animation, a pretty prompt is not enough.
Use this structure:
1. Subject
2. Action
3. Location
4. Camera / angle
5. Lighting / atmosphere
6. Visual style
7. Small movements
[SCREENSHOT 10: Lesson 2, 01:20–03:41 — the 7-part video prompt formula.]
Bad prompt:
```
Girl walking in the city.
```
Better prompt:
```
A young woman walks down a sunny city street while filming herself on the front camera of an iPhone. Vertical handheld selfie-vlog shot, natural walking motion, subtle head movements, blinking, realistic lip sync, soft daylight, casual lifestyle vlog style.
```
One important rule: give the model one main action.
If she walks, jumps, laughs, turns, waves, and talks in one prompt, the model gets confused.
## Step 8 — Animate the shots.
In Google Flow, switch from image mode to video mode, use vertical 9:16, and generate the city selfie-vlog.
The result should feel like a normal front-camera iPhone video: handheld, imperfect, casual, and alive.
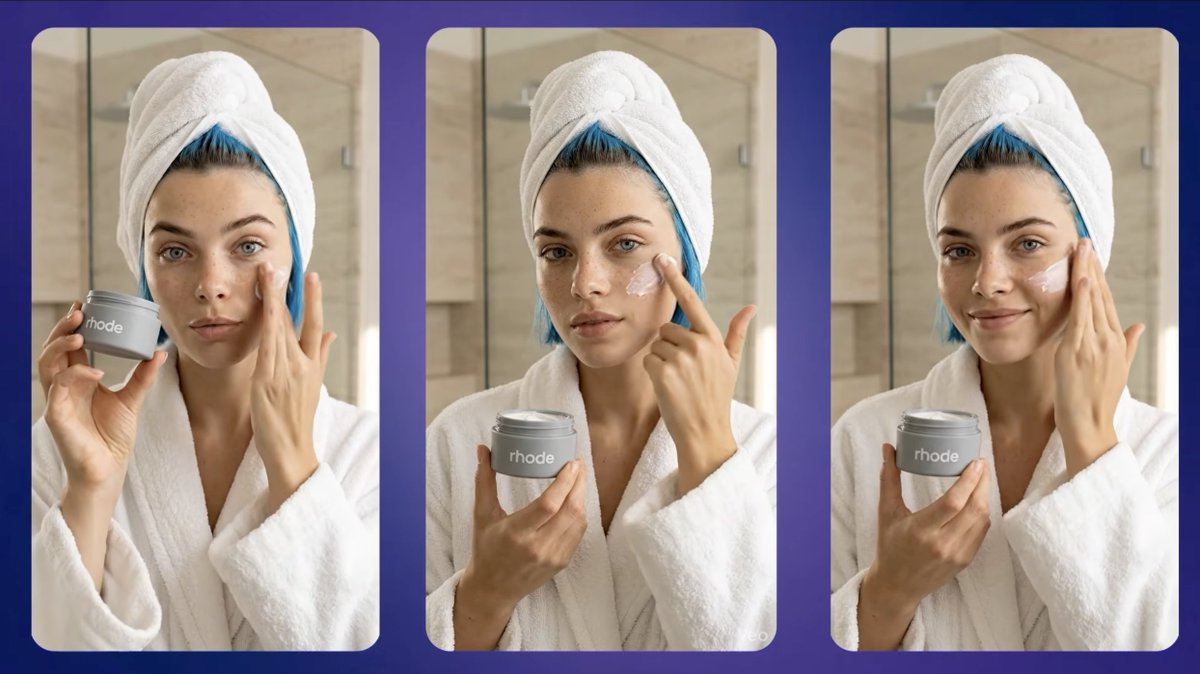
For the cream scene, repeat “static camera” twice.
Why?
Because video models sometimes ignore “static shot” if it only appears once.
```
Static front-camera iPhone shot. The camera remains completely static.
```
That one detail can save failed generations.
## Step 9 — Use Motion Control for TikTok.
For TikTok-style content, do not invent movement from scratch.
Use a reference video.
Upload:
- the reference dance video
- your AI character image
- the matching starting frame
Then enable Character Orientation Match Video and generate in 720p.
The closer the pose, silhouette, and outfit are to the reference, the fewer artifacts you get.
## Step 10 — Voice and music make it feel real.
Without sound, it is just a synthetic montage.
The final layer is ElevenLabs:
1. Write a short voiceover
2. Pick a soft female voice
3. Use Enhance for emotional direction
4. Add pauses, whispers, and mood tags manually
5. Generate instrumental background music
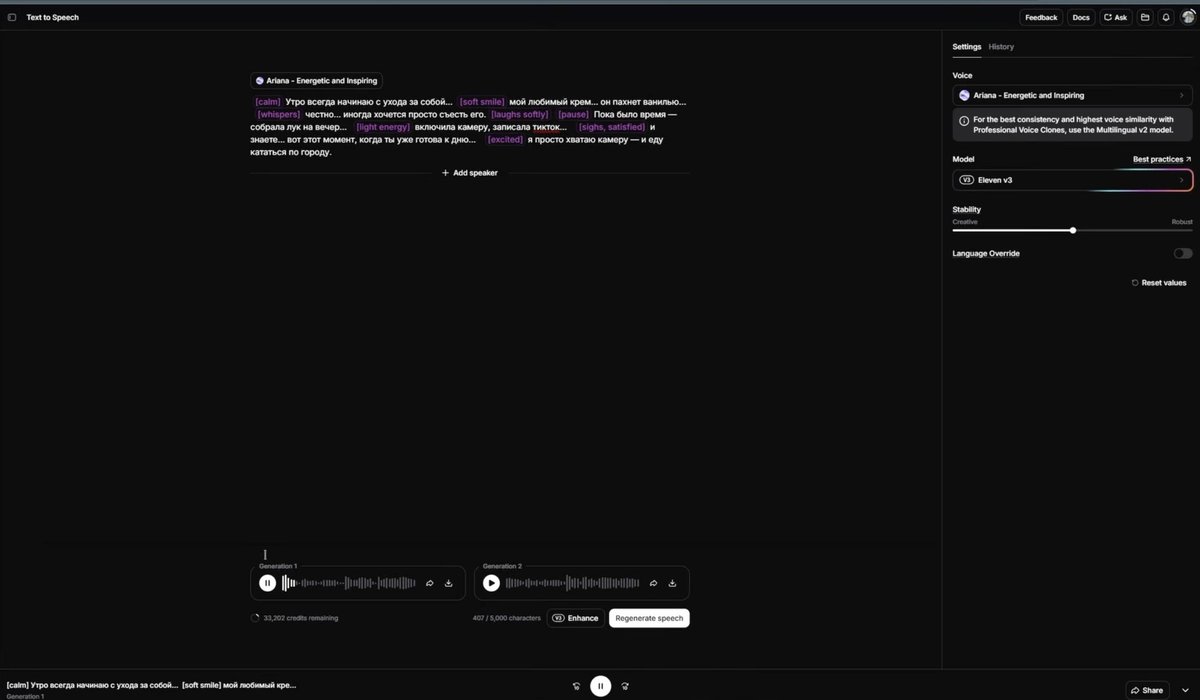
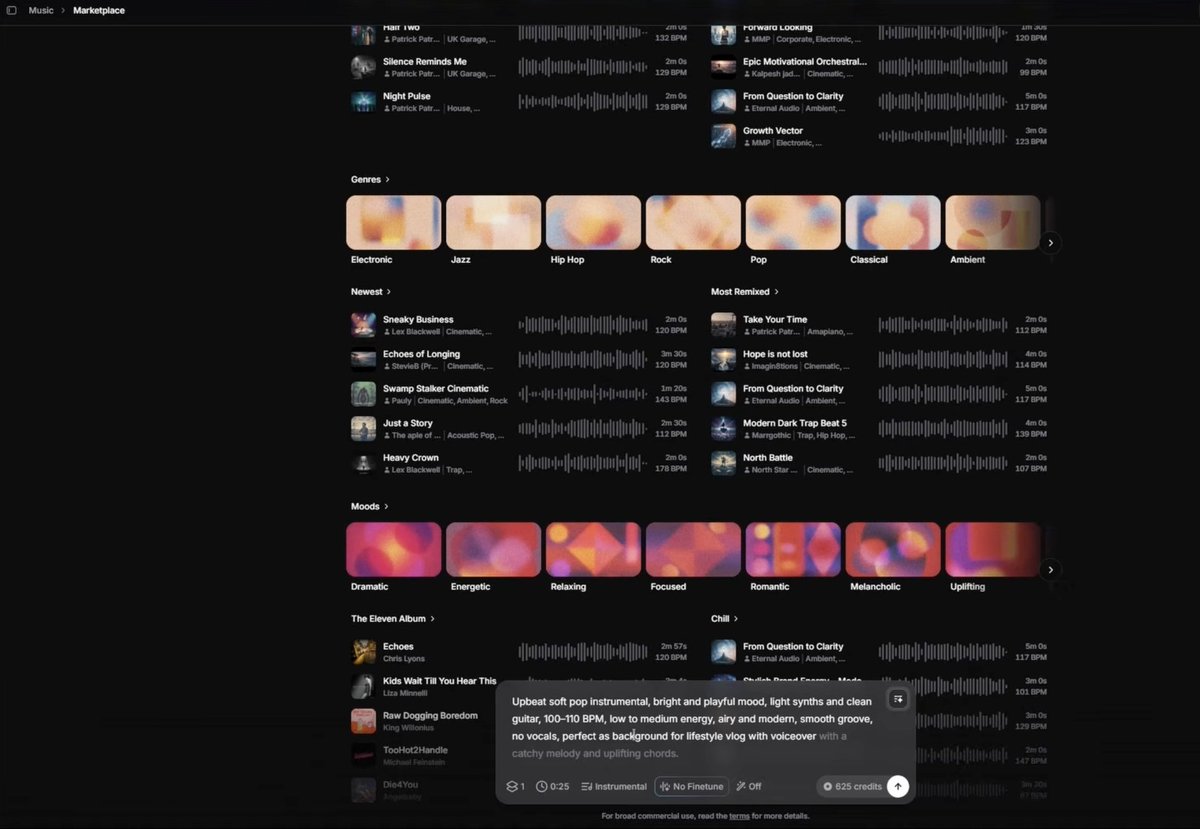
The voiceover turns random clips into a character.
The music glues the scenes together.
The final output is a short “My Day” AI lifestyle vlog with face, body, motion, voice, and mood working together.
## The full funnel
References → ChatGPT identity prompt → base portrait → character sheet → scene images → video animation → Motion Control → ElevenLabs voiceover → instrumental music → final edit.
The real lesson:
AI influencers are not made by one magic prompt.
They are made by a system that protects identity at every step.
## 相关链接
- [0xTria](https://x.com/0xTria)
- [@0xTria](https://x.com/0xTria)
- [394K](https://x.com/0xTria/status/2063952648533897291/analytics)
- [Upgrade to Premium](https://x.com/i/premium_sign_up)
- [7:53 PM · Jun 8, 2026](https://x.com/0xTria/status/2063952648533897291)
- [394.1K Views](https://x.com/0xTria/status/2063952648533897291/analytics)
- [View quotes](https://x.com/0xTria/status/2063952648533897291/quotes)
---
*导出时间: 2026/6/17 15:30:59*
---
## 中文翻译
# 我以零成本打造了一个 AI 影响者,并在第一周实现了变现
**作者**: 0xTria
**日期**: 2026-06-08T11:53:52.000Z
**来源**: [https://x.com/0xTria/status/2063952648533897291](https://x.com/0xTria/status/2063952648533897291)
---

大多数 AI 虚拟形象的教程都止步于一张漂亮的脸蛋。那不是生意。我想建立一个可重复的系统:同样的人、同样的风格、同样的声音、产品视频、生活片段,以及任何人都能无需付费使用 AI 虚拟形象平台就能复现的工作流。
目标很简单:不是创作一张图片,而是创作一个我可以反复使用的角色。如果她在每篇帖子中看起来都不同,那这一切就没有意义了。如果视频看起来像 AI 演示,没人会看它们。如果工作流需要付费的虚拟形象平台,那就不值得复刻。
所以我从零开始构建这个系统:脸、身份、声音、照片、产品片段、短视频和最终剪辑。
这就是确切的工作流。

## 第一步 —— 不要从提示词开始。从身份开始。
大多数 AI 影响者之所以失败,是因为它们是建立在一个模糊的提示词之上的:
```
漂亮的写实 AI 女孩,影响者,9:16
```
这会让你得到和其他人一样的平庸面孔。
相反,要通过参考图来构建这个人物。
使用 Pinterest 收集 2-3 张脸,然后决定每张参考图负责什么:
- 参考 1:发色和发型
- 参考 2:脸型和眼睛
- 参考 3:嘴唇、风格、氛围或表情
目标不是复制一个真实的人。
目标是将不同的特征混合成一个全新的、一致的合成角色。

## 第二步 —— 让 ChatGPT 在写作之前先进行分析。
这是大多数人跳过的一步。
不要立即要求 ChatGPT 编写最终的图像提示词。
首先,上传参考图并强迫 ChatGPT 分别描述每个女孩:脸型、头发、眼睛、眉毛、嘴唇、皮肤、风格。
然后要求给她们编号:女孩 1、女孩 2、女孩 3。
只有在那之后,再决定你想从每个参考图中提取哪些特征。
这能防止出现随机的“AI 式美感”,并将虚拟形象转变为可控的东西。
```
你是视觉描述和图像生成提示词创建方面的专家。
你的任务:当用户上传女孩的照片时,你必须:
1. 首先,详细分析每个女孩的外貌:脸型、面部特征、发色和发质、眼睛、眉毛、嘴唇、皮肤以及整体风格。每张照片用 2-3 句话简要描述一个,并将她们编号为“女孩 1”、“女孩 2”、“女孩 3”。
2. 不要立即创建最终提示词。相反,向用户提出澄清性问题:他们想从每个女孩身上提取哪些具体特征,例如眼睛、鼻子、嘴唇、脸型、头发和风格。建议你自己的推荐混合方案,但在创建提示词前等待用户的最终答复。
3. 用户回答后,创建一个混合提示词,将选定的特征组合成一个统一的角色描述。
最终提示词必须是一段详细的英文文本,不超过 150 个单词,并且必须包含:
- 角色的身体外观;
- 白色摄影棚背景;
- 服装:黑色 T 恤;
- 柔和的专业布光;
- 照片级写实风格,可见的皮肤纹理,高细节。
```
最终的图像提示词应该是英文的,不超过 150 个单词,并包括:
- 身体特征
- 白色摄影棚背景
- 黑色 T 恤
- 柔和的专业布光
- 照片级写实和可见的皮肤纹理
## 第三步 —— 生成基础肖像。
一旦混合提示词准备就绪,生成第一张竖屏 9:16 的肖像。
在脸部效果达标之前,不要继续进行。
如果在这个阶段发型、脸型结构、皮肤和整体氛围不对,后续的一切都会变得更困难:半身照、服装、视频、对口型和动作迁移。

当你得到一个满意的结果时,将其保存为主要身份参考图。
这张图片将成为整个角色的“事实来源”。
## 第四步 —— 建立一个迷你角色设定集。
一张肖像是不够的。
模型需要从不同角度理解同一个人。
在 Google Flow 中,上传肖像并生成:
1. 一张半身照(腰部以上)
2. 一张全身照
3. 任何你稍后会用到的额外角度

不要指望第一次生成就是完美的。
一个满意的结果可能需要 3-6 次尝试。这是正常的。
你的目标不是数量。你的目标是身份一致性。
## 第五步 —— 在每个新场景之前锁定身份。
当你把虚拟形象放入新地点时,AI 模型喜欢“改进”她。
它们改变头发、磨皮、改变脸型、修复不对称,或者不小心把她变成了另一个人。
所以每个场景提示词都要以身份锁定开头:
```
使用附件参考图像中完全相同的合成人物。保留确切的脸部结构、身体比例、自然肤色和真实的不对称性。不要美化或改变外观。头发的颜色和发型必须保持完全一致。
```
在锁定之后,描述场景:
- 她在做什么
- 她在哪里
- 她穿什么
- 相机如何看她
- 光线感觉如何
- 什么应该保持静止
## 第六步 —— 像制作迷你 Vlog 一样创作场景,而不是随机的图片。
该工作流构建三张生活照:
1. 城市自拍 Vlog
2. 护肤 / 面霜镜头
3. TikTok 风格的舞蹈场景

心态很简单:
你不是在生成一张漂亮的图片。
你在构建一个可以剪辑成故事的序列。
晨间例程 → 穿搭 → TikTok → 城市漫步。
## 第七步 —— 像导演一样编写视频提示词。
对于动画,仅仅有一个漂亮的提示词是不够的。
使用这个结构:
1. 主体
2. 动作
3. 地点
4. 相机 / 角度
5. 光线 / 氛围
6. 视觉风格
7. 微小的动作
[截图 10:第 2 课,01:20–03:41 — 7 部分视频提示词公式。]
糟糕的提示词:
```
在城市里行走的女孩。
```
更好的提示词:
```
一位年轻女子走在阳光明媚的城市街道上,同时用 iPhone 的前置摄像头拍摄自己。竖屏手持自拍 Vlog 镜头,自然的行走动作,微妙的头部转动,眨眼,逼真的对口型,柔和的日光,休闲的生活方式 Vlog 风格。
```
一个重要规则:给模型一个主要动作。
如果她在一个提示词里走路、跳跃、大笑、转身、挥手和说话,模型会感到困惑。
## 第八步 —— 为镜头制作动画。
在 Google Flow 中,从图像模式切换到视频模式,使用竖屏 9:16,并生成城市自拍 Vlog。
结果应该感觉像是一个正常的前置摄像头 iPhone 视频:手持的、不完美的、随意的和生动的。
对于面霜场景,重复两次“静态相机”。
为什么?
因为如果“静态镜头”只出现一次,视频模型有时会忽略它。
```
静态前置摄像头 iPhone 镜头。相机保持完全静止。
```
那一个细节可以挽救失败的生成。
## 第九步 —— 使用动作控制功能制作 TikTok。
对于 TikTok 风格的内容,不要凭空创造动作。
使用参考视频。
上传:
- 参考舞蹈视频
- 你的 AI 角色图像
- 匹配的起始帧
然后启用“角色方向匹配视频”并以 720p 生成。

姿势、剪影和服装越接近参考图,产生的伪影就越少。
## 第十步 —— 声音和音乐让它感觉真实。
没有声音,这只是一个合成蒙太奇。
最后一层是 ElevenLabs:
1. 写一段简短的旁白
2. 选择柔和的女性声音
3. 使用“Enhance(增强)”功能进行情感指导
4. 手动添加停顿、耳语和情绪标签
5. 生成器乐背景音乐


旁白将随机片段变成了一个角色。
音乐将场景粘合在一起。
最终输出是一个简短的“我的一天”AI 生活 Vlog,脸、身体、动作、声音和情绪协同工作。
## 完整漏斗
参考图 → ChatGPT 身份提示词 → 基础肖像 → 角色设定集 → 场景图像 → 视频动画 → 动作控制 → ElevenLabs 旁白 → 器乐音乐 → 最终剪辑。
真正的教训:
AI 影响者不是由一个神奇的提示词创造出来的。
它们是由一个在每一步都保护身份的系统创造出来的。
## 相关链接
- [0xTria](https://x.com/0xTria)
- [@0xTria](https://x.com/0xTria)
- [394K](https://x.com/0xTria/status/2063952648533897291/analytics)
- [升级到 Premium](https://x.com/i/premium_sign_up)
- [下午 7:53 · 2026年6月8日](https://x.com/0xTria/status/2063952648533897291)
- [39.4万次观看](https://x.com/0xTria/status/2063952648533897291/analytics)
- [查看引用](https://x.com/0xTria/status/2063952648533897291/quotes)
---
*导出时间: 2026/6/17 15:30:59*