# The harness is all you need (mostly)
**作者**: GitHub
**日期**: 2026-07-28T20:28:35.000Z
**来源**: [https://x.com/github/status/2082201573976056245](https://x.com/github/status/2082201573976056245)
---

## A practical GitHub Copilot workflow for prototyping, planning, implementing, and reviewing software - without chasing every new AI tool.
By @burkeholland
If you’re feeling overwhelmed by AI right now, you’re not alone.
Every day it seems there is a new tool, new MCP, new model, new skill, new workflow, new feature, new social post that is some form of “Hey look! I have completely figured out AI with this one weird prompt.”
I…don’t believe you.
I work with AI every single day, and what I’m finding is that less is way more. It’s not about what I install or configure or trick the agent into doing that makes any real difference. That stuff is interesting, but at the end of the day it feels like gimmicks.
I see the biggest gains in my productivity from how I use the harness and how well I understand it.
So in this post, I’m sharing you a simple workflow that you can use to drastically improve your effectiveness with AI just by using existing features of GitHub Copilot. No weird prompts. No skill everyone else seems to know about. Just the harness. The harness is all you need - mostly.
## Disclaimers
I’m using the term “harness” interchangeably with “GitHub Copilot.” The point of this post is to keep things simple, so just know that GitHub Copilot is an agent harness.
I don’t mean to insinuate that you won’t ever need any skills or MCPs or instructions or custom agents, etc. In fact, those things will become quite important as you progress and need to define complex workflows and automate things for your teams. In fact, I use a few throughout this blog post!
What I am pointing out here is that you do not need any of those things to be highly successful with AI.
Also, there is a lot of slop out there. If you don’t believe that, ask the agent to create a skill to do anything at all. It will happily oblige. Whether or not that generated skill actually works, it can be easily published to any number of skill or MCP registries.
## 1. Pick a tool, any tool
This is an obvious one, right? Pick a tool! It’s so easy!
But even within the GitHub Copilot family, there are a lot of options. These include the CLI, the new GitHub Copilot app, VS Code, Visual Studio, and JetBrains, just to name a few.
The good news is that these experiences are increasingly being centralized on the same harness. The details can differ by tool, but the core workflow is consistent. Learn the harness once, use it everywhere.
That said, I do believe that learning the harness is key, and the best way to learn it is to be as close to it as possible. So if you are just starting out, I’d recommend beginning with the GitHub Copilot CLI. It’s a terminal interface, which means it’s just text. There isn’t much UI to learn. You enter a prompt. The agent does things. But the interaction is more direct, immediate, and, frankly, very satisfying.
For this demonstration, I’ll be using the new GitHub Copilot app. But the harness that app uses is the exact same thing you’ll be using if you are using the GitHub Copilot CLI, Visual Studio Code and many other places you can find GitHub Copilot.
## 2. Turn on YOLO mode
YOLO mode is also known as “Allow All.” This lets the agent execute any command without asking permission. This can vary depending on the tool you are using, but for most it is simply an /allow-all command in the chat. Otherwise, the agent is going to stop and wait for your approval every single time it needs to do some work.
Agents need autonomy for you to see an increase in productivity. If you have to approve everything the agent does, you might as well just do it yourself. Besides, that’s a miserable user experience. Nobody wants to be relegated to sitting at a desk pressing the “Approve” button all day. And pressing “Approve” over and over just trains you not to read what you are being asked to approve, which defeats the purpose.
You want to be safe with agents, though. Bad things happen to good people. When using YOLO mode, you don’t want to run the agent on your local machine. This is especially true when you are using them at work - data is private on your organization’s systems, and mistakes can be costly.
Fortunately there are a bunch of options for running agents in sandboxes. An easy one to get started with is GitHub Codespaces or development containers.
## 3. Start with a prototype
One of the most magical things about AI is that you can easily prototype anything and everything up front. Historically, this was not the case. Prototyping was a full phase of a project, and were often a luxury. Now, you can make one with a prompt.
Let’s look at a few examples.
Let’s say we want to build a date picker web component. That seems straightforward, but it’s actually quite complex. Think of all the different things you might want to do with it.
- How do you navigate within the component?
- What does the selected date look like?
- What does a selected range look like?
- How does the user navigate between days, months, and years?
Start with a simple prototype and get several variations. I usually start with something like this:
> Give me 20 mocks for a date picker web component. Put them all in an HTML file so I can compare.
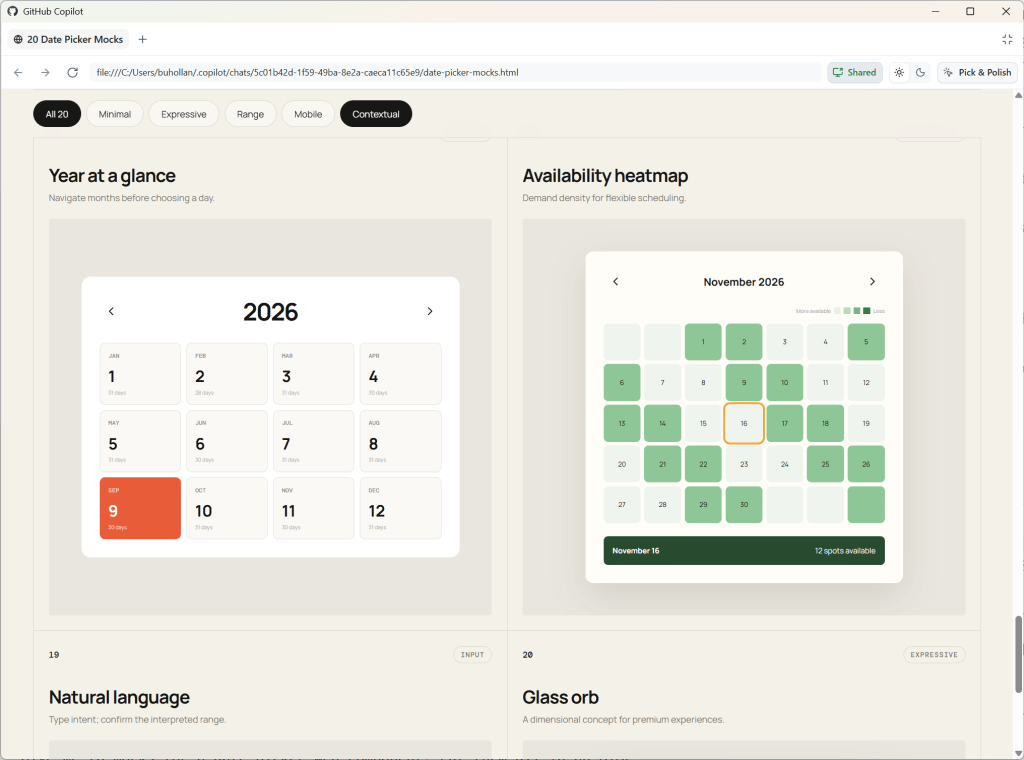
Twenty date picker prototypes generated in a single HTML file.
In this case, the AI generated a bunch of different layouts, but one of them is a mock where it starts with the year view. That’s interesting. I would like my date picker to enable the user to zoom out to the year, then into the month, and finally to the day. These are the kinds of things you don’t consider until you see them.
As humans, we process sensory-rich models like images, shapes, and tangible layouts much faster than dense text. Creating low-effort prototypes early on helps make complex concepts immediately intuitive.
And this applies to non-visual tasks as well.
For instance, if I want to add a new API endpoint, I’ll still create a visual prototype to understand the requirements and constraints before diving into the implementation.
> Create a visual mockup of the API for this project. Add five options for how we could handle a new API endpoint that allows the user to download their analytics data.
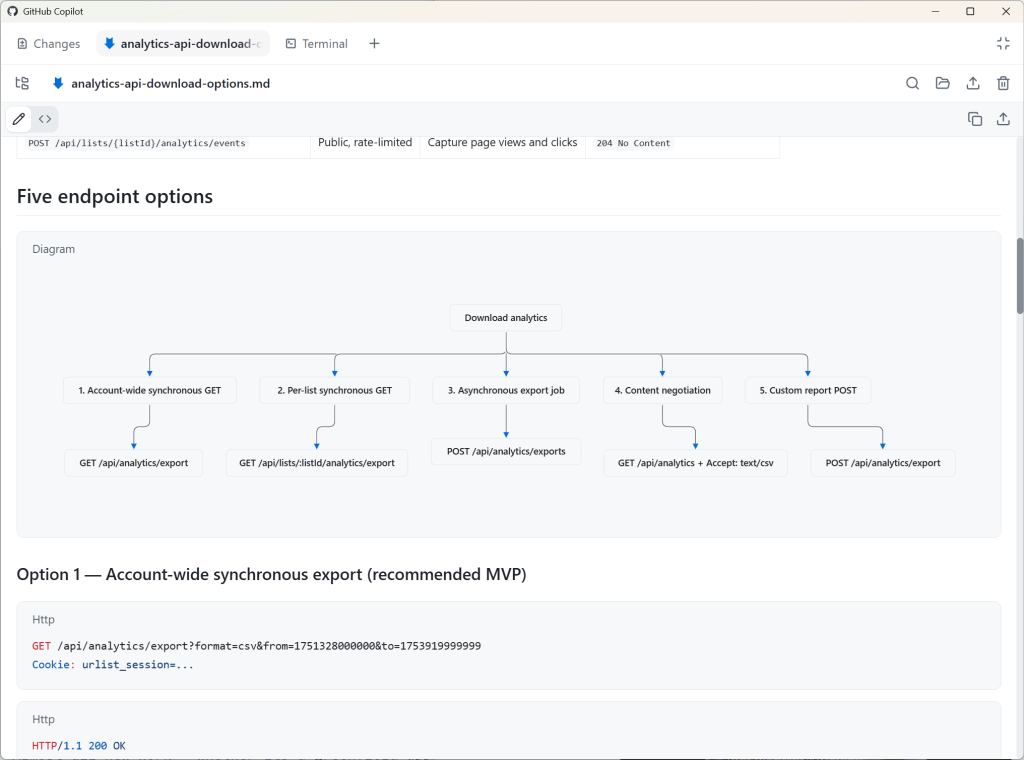
A Mermaid diagram comparing approaches for an analytics export API endpoint.
Since the GitHub Copilot app supports Mermaid diagrams, the agent renders this as Markdown, mapping out five different ways we could implement this API endpoint.
When working with agents, it’s easy to forget that everything is nuanced. Prototyping helps uncover the nuances up front, so you avoid spending valuable time and tokens on rework.
I recommend using a medium-sized model, such as GPT 5.6 Terra or Claude Sonnet, on medium reasoning for most work. I also recommend you stick with whatever model you choose here for the duration of this particular feature, bug, or enhancement. Prompt caching will save you tokens. As long as you don’t switch to a different model or reasoning level, your previous chats remain cached with the model, giving you a discount on future requests.
## 4. Plan methodically
Now that you know what you actually want versus what you initially thought you wanted, it’s time to plan out the implementation.
Switch to plan mode in GitHub Copilot without starting a new session.
> /plan Build a date picker web component. I want the user to be able to zoom in and out of years, months, and days.
That’s a pretty vague prompt, and you’ll likely have more context for the model than I do here, but this is just a demonstration. If you don’t have more context, it’s OK. That’s exactly what this step is for.
In theory, you can get a model to one-shot anything if you compose the perfect prompt with the perfect context in the perfect order. In theory.
But none of us can do that. Planning helps you get closer to that ideal, though, by asking all of the questions that you would need to answer yourself along the way if you were to build this out by hand:
- Can the start and end date be the same?
- Are partial selections valid?
- Should users be able to clear the date?
- Should “today” always be a visible option?
- Is manual entry allowed?
- What format is the date stored in?
- Should pasting in dates be allowed?
The list goes on and on. You cannot possibly think of all of these edge cases, but the model can help you identify many of them.
You can make plan mode even more aggressive in the sheer number of questions and edge cases it asks about by installing the “grill-me” skill from Matt Pocock.
> /plan /grill-me Build a date picker web component. I want the user to be able to zoom in and out of years, months, and days.
This planning step is critical. The point is not for you to just accept every suggestion from the AI. If you do that, you are negating the value of this planning process. The point is for you to deeply engage with the problem and guide the model. This is where your expertise comes into play.
You can also ask the model questions back. In the screenshot below, it asks me about “non-contiguous dates.” I’m pretty sure I know what the model means here, but I’m going to ask for clarification so we’re on the same page.
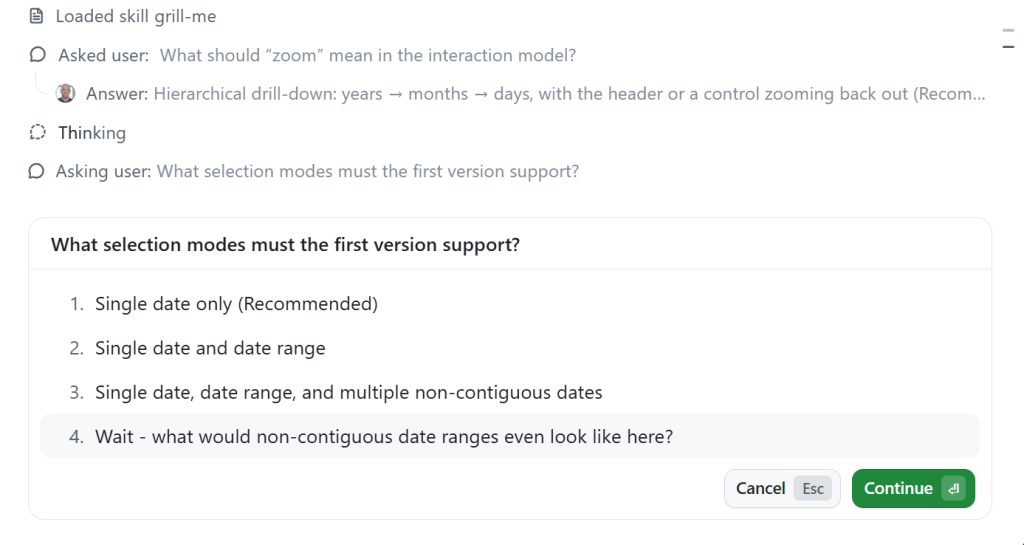
GitHub Copilot plan mode asking clarifying questions about a date picker.
The planning process will keep going even if you interrupt to ask clarifying questions, etc.
## 5. Implement with Autopilot
Once the plan is finished, GitHub Copilot will likely prompt you to switch to Autopilot and start implementing the plan.
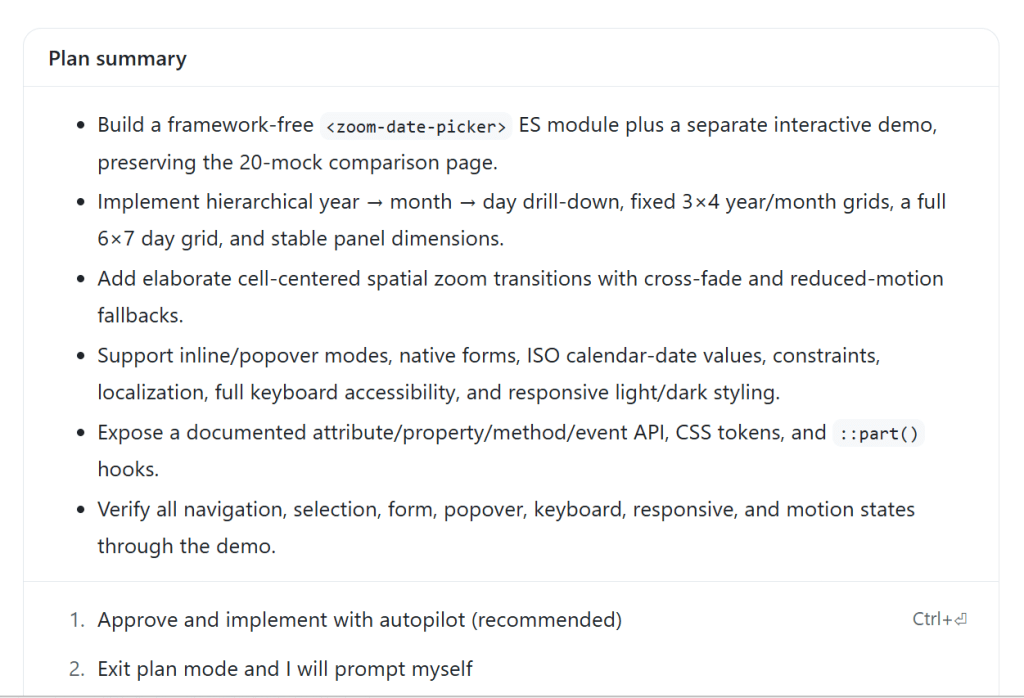
GitHub Copilot Autopilot implementing a plan.
Autopilot is a built-in loop. It forces the model to continue working by ensuring that it has actually done what it said it would do - which in this case is completing every item in the plan.
GitHub Copilot will automatically act as an orchestrator during this phase. If it needs to read files in the codebase, it will use the “Explore” subagent with a small model. If it deems an action relatively complex, it will likely choose the “General Purpose” subagent with a larger model. While you can get fine-grained control over orchestration in GitHub Copilot with custom agents and instructions, you don’t need to do anything special to get the advantages of subagents and multimodel workflows. This works out of the box, even if you did not know that any of these things existed.
## 6. Human review and iteration
This is where you get your dopamine hit. You get to see what the AI has created.
But it’s likely that you won’t get exactly what you wanted. That’s normal and expected. The model cannot read your mind, and it is error-prone. Iterate with the model until you get what you actually want. Whether that’s just code or an improved UI, this is the part where your taste will decide the quality of the final product.
For instance, here’s the date picker that GitHub Copilot gave me.
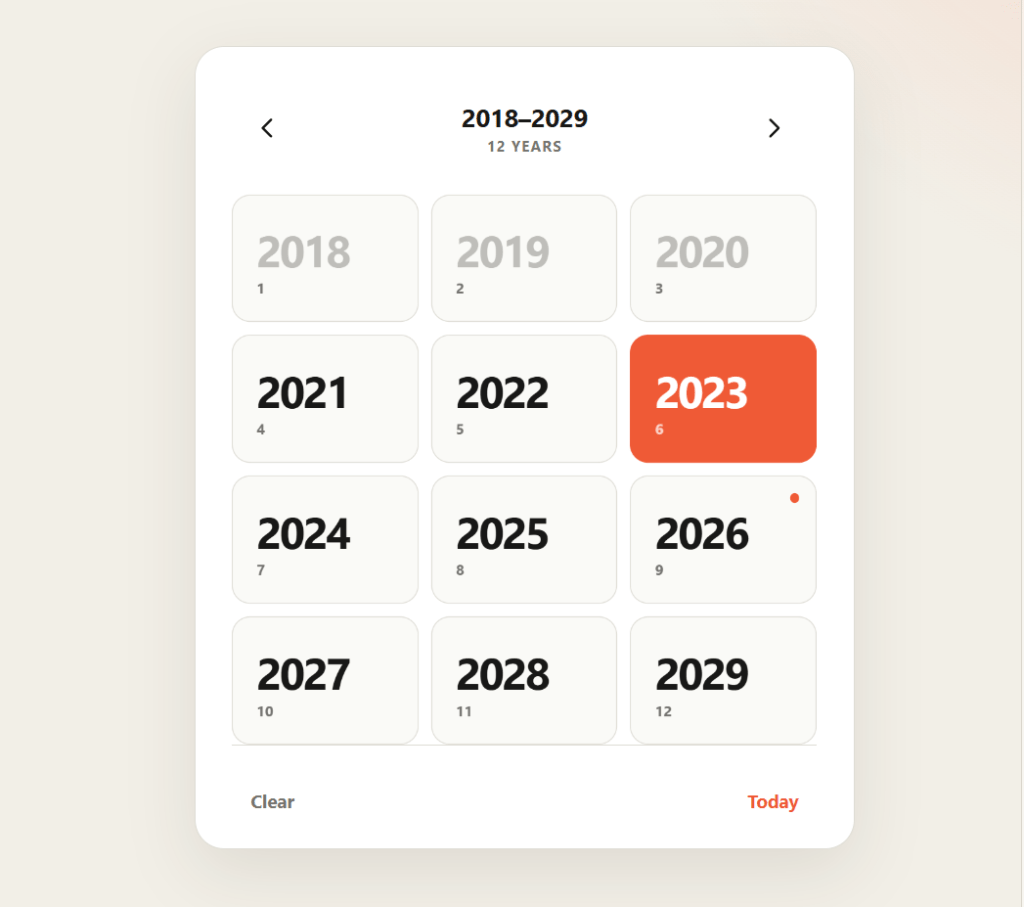
Initial date picker result. It shows 12 boxes with years to select from 2018-2029.
Already I can see it has some issues:
- Animations are inconsistent
- Text is unreadable when hovering over a selected date because of color contrast
- It doesn’t need to say “12 YEARS” at the top.
- When I click “Today”, it doesn’t take me to the day if I’m in the month or year view.
Also, I don’t love the design. It looks a little too much like it was created by AI - because it was!
So here we’re just in follow-up mode. I’m going to use a CSS framework I created called Postrboard. I add it as a skill that just points to the CSS and tells the agent how to use it. You can feel free to install it yourself if you’d like to use it, or you can pick any other CSS framework out there that you like. Giving the model some design guidance is quite helpful, and often a CSS framework is all you need.
> ok - we don't need a landing page here - just the component, output and settings panel in a minimal setting. Use the /postboard skill for the design and colors.
> For the date picker, when I click on the day, it tries to zoom in, but can’t because there is nothing to zoom to. There should be no zoom there.
> It doesn’t need to say “Zoom Out” at the top
> When I mouse over a month or year that contains the selected day, I cannot read the hover text.
> When I click “Today” it should take me to that day view, even if I’m on the month or the year.
> The months don’t need numbers under them and they don’t need to be in boxes
> Same goes for years. And it doesn’t need to say “12 years” at the top.”
Notice how conversational this is. Don’t overthink it. When you’re fixing a bunch of small things like this, just give it to the model. If you’ve got the context, you’ve got the prompt.
The most important thing is not to settle for AI output that is “good enough.” Insist on quality. Be ruthless about it. That part is still your responsibility, and knowing what a quality result is from something that isn’t is the value that you bring. No AI will ever replace your human touch and creativity.
Here’s what my final date picker looks like. Scroll to the end of this post to see it in action.
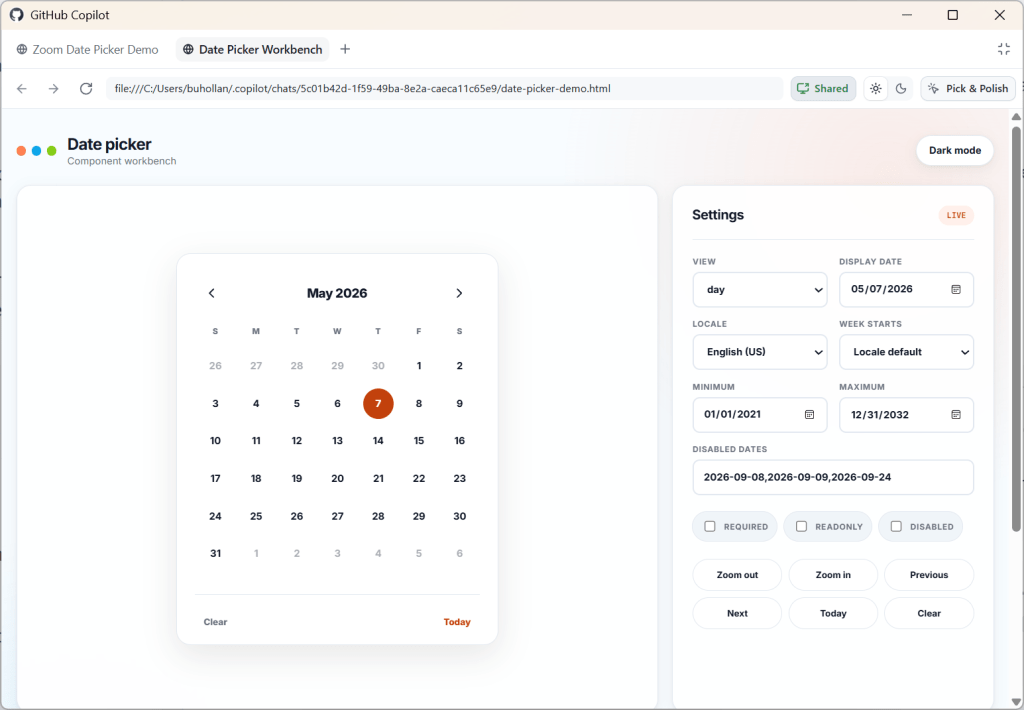
Final date picker result. It shows a monthly calendar on the left and a view settings on the right.
## 7. Rubber duck the result
After you’ve iterated and are happy with what you’ve created, it’s time to do a final review.
Request a Rubber Duck review from GitHub Copilot. You can do this just by asking for it:
> Perform a rubber duck review on this date picker component implementation
In a Rubber Duck review, GitHub Copilot will request a review from a model of a different AI family. For instance, since I was using GPT 5.6 Terra, it requested a review from Sonnet. Different models were trained on different data, so they have different blind spots. A Rubber Duck review helps identify potential issues that might be missed by a single model.
Note that you can use this at any point in this workflow. You can rubber duck prototypes. You can rubber duck plans. It all just depends on if you want a second AI review on something.
And if you want to take this a step further, you can combine rubber duck with Autopilot to get the models to work together in a loop to improve the final result.
> /autopilot rubber duck this date picker implementation. When you have the result, review it carefully and make any necessary adjustments. Repeat the rubber duck review until both you and the reviewing model agree that the only items that remain have diminishing returns.
After this step, you will have an even more refined result than before and will have likely identified many extra edge cases. This step does cost more tokens, but you are really battle-hardening the code. Think of it as an investment in your future self who won’t have to deal with these issues because you caught them now.
## 8. Profit
At this point, you’re ready to stage and commit, or move on to the next feature you want to add along with this pull request.
I’d recommend starting a new chat session for anything you do next that doesn’t have to do with this date picker. You can think of chat sessions as being topical; if you start to diverge too much from the main topic, it’s probably time for a new session.
Here’s the final result from my workflow building the date picker for this post.
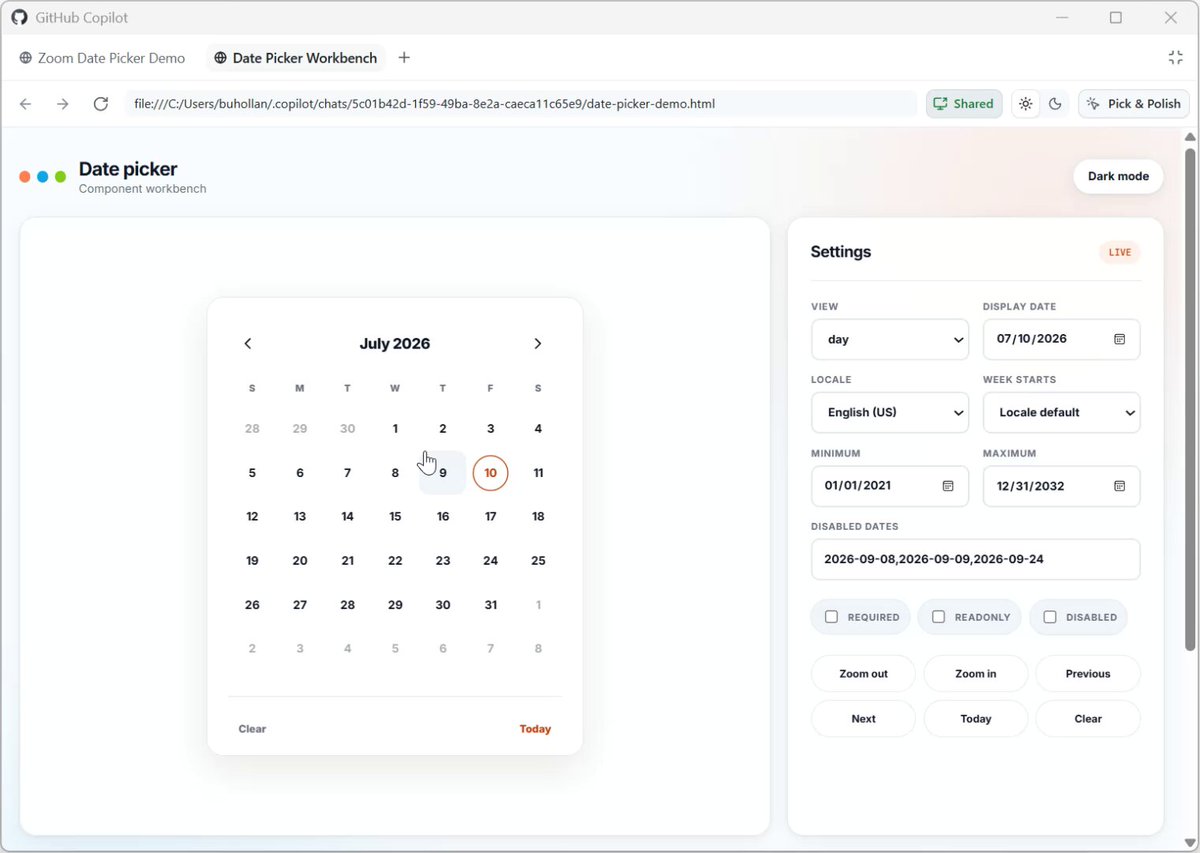
I realize that this is a bit of a contrived example, but can we all just pause for a moment and marvel at what we’re able to pull off with AI now? Building a date picker used to be one of the hardest things you could try to do. Just ask any of the heroes out there who have built them.
## Things don’t have to be complicated
This simple workflow will be enough for most people. The simplicity also helps you multitask. It’s easier to reason about what agent is in what state and what you were doing last when you keep things simple. Your context window is limited too.
There is so much happening in the AI space right now. There is no upper limit on the things that you can build and experiment with. You can add MCP servers, skills, instructions, and custom agents. You can set up workflows and loops, create agents that prompt agents, and stand up entire virtual dev teams.
But keep in mind that nobody really knows what they are doing right now. We’re all figuring this out as we go. A lot of what is today’s magical incantation for AI will be tomorrow’s anti-pattern.
Just focus on getting a repeatable, high-quality result in the simplest way that you can. Learn the harness and you’ll be just fine.
## 相关链接
- [GitHub](https://x.com/github)
- [@github](https://x.com/github)
- [37K](https://x.com/github/status/2082201573976056245/analytics)
- [@burkeholland](https://x.com/@burkeholland)
- [GitHub Copilot](https://github.com/features/copilot)
- [CLI](https://docs.github.com/copilot/github-copilot-in-the-cli)
- [GitHub Copilot app](https://docs.github.com/copilot/concepts/agents/github-copilot-app)
- [VS Code](https://code.visualstudio.com/)
- [JetBrains](https://www.jetbrains.com/)
- [GitHub Copilot app](https://gh.io/app)
- [Allow All](https://docs.github.com/en/copilot/how-tos/copilot-cli/use-copilot-cli/allowing-tools)
- [Bad things happen to good people](https://x.com/mattshumer_/status/2075666403596612010)
- [GitHub Codespaces](https://docs.github.com/codespaces/overview)
- [development containers](https://containers.dev/)
- [Mermaid diagrams](https://docs.github.com/copilot/tutorials/copilot-cookbook/communicate-effectively/creating-diagrams)
- [“grill-me”](https://www.skills.sh/mattpocock/skills/grill-me)
- [Autopilot](https://docs.github.com/copilot/concepts/agents/copilot-cli/autopilot)
- [custom agents](https://docs.github.com/copilot/how-tos/copilot-cli/customize-copilot/create-custom-agents-for-cli)
- [instructions](https://docs.github.com/copilot/how-tos/copilot-cli/customize-copilot/add-custom-instructions)
- [Postrboard](https://burkeholland.github.io/postrboard-design)
- [Rubber Duck review](https://docs.github.com/en/copilot/concepts/agents/copilot-cli/rubber-duck)
- [Upgrade to Premium](https://x.com/i/premium_sign_up)
- [4:28 AM · Jul 29, 2026](https://x.com/github/status/2082201573976056245)
- [37.2K Views](https://x.com/github/status/2082201573976056245/analytics)
- [View quotes](https://x.com/github/status/2082201573976056245/quotes)
---
*导出时间: 2026/7/29 09:02:41*
---
## 中文翻译
# 控制台(Harness)是你唯一需要的(大部分时候)
**作者**: GitHub
**日期**: 2026-07-28T20:28:35.000Z
**来源**: [https://x.com/github/status/2082201573976056245](https://x.com/github/status/2082201573976056245)
---

## 一个实用的 GitHub Copilot 工作流,用于原型设计、规划、实现和审查软件 —— 无需追逐每一个新的 AI 工具。
By @burkeholland
如果你现在对 AI 感到不知所措,你并不孤单。
似乎每天都有新工具、新 MCP、新模型、新技能、新工作流、新功能,以及某种形式的新社交媒体帖子,内容无非是“嘿看!我用这个奇怪的新提示词完全搞懂了 AI。”
我……不信。
我每天都在与 AI 打交道,我发现少即是多。真正能带来实质性差异的,不是我安装、配置或诱导智能体去做的事情。那些东西虽然有趣,但归根结底感觉像是花招。
我发现生产力最大的提升来自于我如何使用控制台以及我对它的理解程度。
因此,在这篇文章中,我将分享一个简单的工作流,你只需利用 GitHub Copilot 的现有功能,就能大幅提高使用 AI 的效率。不需要奇怪的提示词。不需要那种别人似乎都知道的技能。只需要控制台。控制台是你唯一需要的 —— 大部分时候。
## 免责声明
我在文中交替使用“控制台”和“GitHub Copilot”这两个词。这篇文章的主旨是保持简单,所以你只需要知道 GitHub Copilot 就是一个智能体控制台。
我并不是在暗示你永远不需要任何技能、MCP、指令或自定义智能体等。事实上,随着你的进步,以及需要为团队定义复杂的工作流并实现自动化时,这些东西将变得非常重要。事实上,我在整篇博文中也使用了一些!
我想指出的是,你不需要任何这些东西也能在 AI 的使用上取得巨大的成功。
此外,现在有很多粗制滥造的东西。如果你不相信这一点,就让智能体创建一个技能来做任何事情。它会乐此不疲。无论那个生成的技能是否真的有效,它都可以很容易地发布到无数的技能或 MCP 注册表中。
## 1. 选一个工具,随便哪个
这很明显,对吧?选一个工具!太简单了!
但即使在 GitHub Copilot 家族中,也有很多选择。包括 CLI、新的 GitHub Copilot 应用、VS Code、Visual Studio 和 JetBrains,仅举几例。
好消息是,这些体验正日益集中到同一个控制台上。细节可能因工具而异,但核心工作流是一致的。一次学会控制台,随处使用。
话虽如此,我确实认为学习控制台是关键,而学习它的最好方法就是尽可能接近它。所以,如果你刚刚起步,我建议从 GitHub Copilot CLI 开始。它是一个终端界面,这意味着它只是文本。没有太多 UI 需要学习。你输入提示词。智能体去执行。但这种交互更直接、更即时,坦率地说,非常令人满意。
在这个演示中,我将使用新的 GitHub Copilot 应用。但该应用使用的控制台与你在使用 GitHub Copilot CLI、Visual Studio Code 以及许多其他可以找到 GitHub Copilot 的地方所使用的完全相同。
## 2. 开启 YOLO 模式
YOLO 模式也称为“全部允许”。这允许智能体在未经许可的情况下执行任何命令。这可能因你使用的工具而异,但对于大多数工具来说,只需在聊天中输入 `/allow-all` 命令即可。否则,智能体每次需要做一些工作时都会停下来等待你的批准。
智能体需要自主权才能让你看到生产力的提升。如果你必须批准智能体所做的每一件事,你还不如自己做。此外,这是一种糟糕的用户体验。没有人愿意被安排坐在桌子旁整天按“批准”按钮。而且,一遍又一遍地按“批准”只会训练你不去阅读你被要求批准的内容,这就违背了初衷。
不过,使用智能体时你还是要注意安全。好人也会遇到坏事。在使用 YOLO 模式时,你不要在本地机器上运行智能体。尤其是在工作中使用时 —— 数据在你组织的系统上是私有的,而且错误的代价可能很高。
幸运的是,有很多选项可以在沙盒中运行智能体。一个容易上手的选择是 GitHub Codespaces 或开发容器。
## 3. 从原型开始
AI 最神奇的事情之一是,你可以轻松地预先对任何事物进行原型设计。在历史上,情况并非如此。原型设计是项目的一个完整阶段,通常是一种奢侈。现在,你可以通过一个提示词制作原型。
让我们看几个例子。
假设我们要构建一个日期选择器 Web 组件。这看起来很简单,但实际上相当复杂。想想你可能想用它做的所有不同的事情。
- 你如何在组件内部导航?
- 选定的日期看起来是什么样的?
- 选定的范围看起来是什么样的?
- 用户如何在日、月和年之间导航?
从一个简单的原型开始,并获得几个变体。我通常从这样的开始:
> 给我 20 个日期选择器 Web 组件的模型。把它们都放在一个 HTML 文件里,这样我可以比较。

在单个 HTML 文件中生成的二十个日期选择器原型。
在这种情况下,AI 生成了一堆不同的布局,但其中一个是模型,它以年份视图开始。这很有趣。我希望我的日期选择器能够使用户缩小到年份,然后进入月份,最后到日期。这些是你直到看到它们才会考虑的事情。
作为人类,我们处理感官丰富的模型(如图像、形状和有形的布局)的速度比处理密集文本快得多。在早期创建低投入的原型有助于使复杂的概念变得直观。
这也适用于非可视化任务。
例如,如果我想添加一个新的 API 端点,我仍然会创建一个可视化原型来了解需求和约束,然后再深入实现。
> 为这个项目的 API 创建一个可视化模型。添加五个选项,用于处理允许用户下载其分析数据的新 API 端点。

一个比较分析导出 API 端点方法的 Mermaid 图表。
由于 GitHub Copilot 应用支持 Mermaid 图表,智能体将其渲染为 Markdown,绘制了我们可以实现此 API 端点的五种不同方式。
在使用智能体时,很容易忘记所有事情都是微妙的。原型设计有助于提前发现这些细微差别,从而避免在返工上花费宝贵的时间和令牌。
我建议在大多数工作中使用中等大小的模型,例如 GPT 5.6 Terra 或 Claude Sonnet,并使用中等推理能力。我还建议你在整个特定功能、错误或增强的过程中坚持使用你在这里选择的任何模型。提示词缓存将为你节省令牌。只要你没有切换到不同的模型或推理级别,你之前的聊天就会随模型保持缓存状态,从而为你未来的请求提供折扣。
## 4. 有条不紊地规划
既然你知道你真正想要的是什么,而不是你最初认为你想要的,那么是时候规划实现了。
在 GitHub Copilot 中切换到计划模式,而无需开始新会话。
> /plan 构建一个日期选择器 Web 组件。我希望用户能够放大和缩小年、月和日。
这是一个非常模糊的提示词,与我在这里相比,你可能拥有更多的模型上下文,但这只是一个演示。如果你没有更多的上下文,也没关系。这正是这一步的目的。
理论上,如果你以完美的顺序用完美的上下文组成完美的提示词,你可以让模型一次性搞定任何事情。理论上。
但我们没有人能做到这一点。不过,规划可以帮助你更接近那个理想,方法是询问所有如果你要手动构建这个过程中需要自己回答的问题:
- 开始日期和结束日期可以相同吗?
- 部分选择有效吗?
- 用户应该能够清除日期吗?
- “今天”应该始终是一个可见的选项吗?
- 允许手动输入吗?
- 日期以什么格式存储?
- 应该允许粘贴日期吗?
这个列表还可以一直列下去。你不可能想到所有这些边缘情况,但模型可以帮助你识别其中的许多情况。
你可以通过安装 Matt Pocock 的“grill-me”技能,使计划模式在它询问的问题和边缘情况的数量上变得更加激进。
> /plan /grill-me 构建一个日期选择器 Web 组件。我希望用户能够放大和缩小年、月和日。
这个规划步骤至关重要。重点不在于你只是接受 AI 的每一个建议。如果你那样做,你就否定了这个规划过程的价值。重点在于你深入参与问题并引导模型。这是你的专业知识发挥作用的地方。
你也可以反过来向模型提问。在下面的屏幕截图中,它问我关于“非连续日期”的问题。我很确定我知道模型在这里的意思,但我会要求澄清,以便我们达成共识。

GitHub Copilot 计划模式正在询问有关日期选择器的澄清问题。
即使你中断以询问澄清问题,规划过程也会继续进行。
## 5. 使用 Autopilot 实施
计划完成后,GitHub Copilot 可能会提示你切换到 Autopilot 并开始实施该计划。

GitHub Copilot Autopilot 正在实施计划。
Autopilot 是一个内置循环。它通过确保模型实际完成了它说它会做的事情 —— 在这种情况下是完成计划中的每一项 —— 来强制模型继续工作。
在此阶段,GitHub Copilot 将自动充当编排者。如果它需要读取代码库中的文件,它将使用带有小型模型的“Explore”子智能体。如果它认为某个操作相对复杂,它可能会选择带有大型模型的“General Purpose”子智能体。虽然你可以通过自定义智能体和指令在 GitHub Copilot 中获得对编排的细粒度控制,但你不需要做任何特殊的事情来获得子智能体和多模型工作流的优势。这是开箱即用的,即使你不知道这些东西的存在。
## 6. 人工审查和迭代
这是你获得多巴胺刺激的时候。你将看到 AI 创建了什么。
但你可能无法完全得到你想要的东西。这是正常的,也是预期的。模型无法读懂你的心思,而且它容易出错。与模型进行迭代,直到你真正得到你想要的东西。无论是代码还是改进的 UI,这都是你的品味决定最终产品质量的部分。
例如,这是 GitHub Copilot 给我的日期选择器。

初始日期选择器结果。它显示 12 个框,年份可从 2018-2029 年中选择。
我已经可以看到它有一些问题:
- 动画不一致
- 由于颜色对比度,悬停在选定日期上时文本不可读
- 它不需要在顶部说“12 YEARS”(12 年)。
- 当我点击“Today”(今天)时,如果我在月份或年份视图,它不会带我到那一天。
另外,我不喜欢这个设计。它看起来有点太像 AI 创建的 —— 因为它确实是!
所以在这里我们只是处于后续模式。我将使用我创建的一个名为 Postrboard 的 CSS 框架。我将其添加为一个技能,它只是指向 CSS 并告诉智能体如何使用它。如果你想使用它,可以随意自己安装,或者你可以选择任何其他你喜欢的 CSS 框架。给模型一些设计指导是非常有帮助的,而且通常一个 CSS 框架就足够了。
> ok - 我们这里不需要着陆页 - 只需要在极简设置中包含组件、输出和设置面板。使用 /postboard 技能进行设计和配色。
> 对于日期选择器,当我点击某一天时,它会尝试放大,但不能,因为没有可以放大到的东西。那里不应该有放大。
> 它不需要在顶部说“Zoom Out”(缩小)
> 当我将鼠标悬停在包含所选日期的月份或年份上时,我无法阅读悬停文本。
> 当我点击“Today”时,即使我在月份或年份视图,它也应该带我到那一天视图。
> 月份下面不需要数字,也不需要在框里
> 年份也是如此。而且它不需要在顶部说“12 years”。
注意这有多么对话化。不要想太多。当你正在修复一堆像这样的小事情时,只需把它交给模型。如果你有上下文,你就有提示词。
最重要的是不要满足于“足够好”的 AI 输出。坚持质量。对此要毫不留情。那部分仍然是你的责任,知道什么是高质量的结果而什么不是,这就是你带来的价值。没有任何 AI 能够取代你的个人触感和创造力。
这是我的最终日期选择器的样子。滚动到这篇文章的末尾,看看它的实际效果。

最终日期选择器结果。它在左侧显示月历,右侧显示视图设置。
## 7. 结果进行小黄鸭审查
在你完成迭代并对你创建的内容感到满意后,是时候进行最终审查了。
向 GitHub Copilot 请求小黄鸭审查。你可以通过直接要求来实现:
> 对这个日期选择器组件实现进行小黄鸭审查
在小黄鸭审查中,GitHub Copilot 将请求来自不同 AI 家族的模型进行审查。例如,由于我使用的是 GPT 5.6 Terra,它请求 Sonnet 进行审查。不同的模型在不同的数据上受过训练,所以它们有不同的盲点。小黄鸭审查有助于识别单个模型可能遗漏的潜在问题。
请注意,你可以在工作流的任何阶段使用它。你可以对原型进行小黄鸭审查。你可以对计划进行小黄鸭审查。这完全取决于你是否想要对某事进行二次 AI 审查。
如果你想更进一步,你可以将小黄鸭与 Autopilot 结合起来,让模型在一个循环中协同工作以改进最终结果。
> /autopilot 对这个日期选择器实现进行小黄鸭审查。当你得到结果时,仔细审查并进行任何必要的调整。重复小黄鸭审查,直到你和审查模型都同意剩下的项目只有递减的收益。
在这一步之后,你将拥有比以前更加完善的结果,并且很可能发现了许多额外的边缘情况。这一步确实会消耗更多的令牌,但你确实是在使代码经受实战考验。把它看作是对未来自己的一项投资,因为你现在发现了这些问题,所以他就不必处理这些问题了。
## 8. 收获
此时,你可以暂存并提交,或者继续处理你想随此拉取请求一起添加的下一个功能。
我建议你接下来做的任何与这个日期选择器无关的事情都开始一个新的聊天会话。你可以将聊天会话视为主题性的;如果你开始过多地偏离主要主题,那么可能是时候开始一个新的会话了。
这是我的工作流为这篇文章构建日期选择器的最终结果。

我意识到这有点人为设计的例子,但我们能不能停顿一下,惊叹一下我们现在用 AI 能够完成的事情?构建日期选择器曾经是你能尝试做的最难的事情之一。问问任何构建过它们的英雄就知道了。
## 事情不必复杂
这个简单的工作流程对大多数人来说就足够了。这种简单性也有助于你进行多任务处理。当你保持简单时,更容易推理哪个智能体处于什么状态以及你上次在做什么。你的上下文窗口也是有限的。
AI 领域现在正在发生很多事情。你可以构建和实验的事情没有上限。你可以添加 MCP 服务器、技能、指令和自定义智能体。你可以设置工作流和循环,创建提示智能体的智能体,并建立整个虚拟开发团队。
但请记住,现在没有人真正知道他们在做什么。我们都在摸索前进。今天的许多 AI 神奇咒语将是明天的反模式。
只需专注于以最简单的方式获得可重复、高质量的结果。学会控制台,你就会没事的。
## 相关链接
- [GitHub](https://x.com/github)
- [@github](https://x.com/github)
- [37K](https://x.com/github/status/2082201573976056245/analytics)
- [@burkeholland](https://x.com/@burkeholland)
- [GitHub Copilot](https://github.com/features/copilot)
- [CLI](https://docs.github.com/copilot/github-copilot-in-the-cli)
- [GitHub Copilot app](https://docs.github.com/copilot/concepts/agents/github-copilot-app)
- [VS Code](https://code.visualstudio.com/)
- [JetBrains](https://www.jetbrains.com/)
- [GitHub Copilot app](https://gh.io/app)
- [Allow All](https://docs.github.com/en/copilot/how-tos/copilot-cli/use-copilot-cli/allowing-tools)
- [Bad things happen to good people](https://x.com/mattshumer_/status/2075666403596612010)
- [GitHub Codespaces](https://docs.github.com/codespaces/overview)
- [development containers](https://containers.dev/)
- [Mermaid diagrams](https://docs.github.com/copilot/tutorials/copilot-cookbook/communicate-effectively/creating-diagrams)
- [“grill-me”](https://www.skills.sh/mattpocock/skills/grill-me)
- [Autopilot](https://docs.github.com/copilot/concepts/agents/copilot-cli/autopilot)
- [custom agents](https://docs.github.com/copilot/how-tos/copilot-cli/customize-copilot/create-custom-agents-for-cli)
- [instructions](https://docs.github.com/copilot/how-tos/copilot-cli/customize-copilot/add-custom-instructions)
- [Postrboard](https://burkeholland.github.io/postrboard-design)
- [Rubber Duck review](https://docs.github.com/en/copilot/concepts/agents/copilot-cli/rubber-duck)
- [Upgrade to Premium](https://x.com/i/premium_sign_up)
- [4:28 AM · Jul 29, 2026](https://x.com/github/status/2082201573976056245)
- [37.2K Views](https://x.com/github/status/2082201573976056245/analytics)
- [View quotes](https://x.com/github/status/2082201573976056245/quotes)
---
*导出时间: 2026/7/29 09:02:41*