# The Claude Design Workflow That Actually Works.
**作者**: Prajwal Tomar
**日期**: 2026-05-18T12:15:10.000Z
**来源**: [https://x.com/PrajwalTomar_/status/2056347864822083809](https://x.com/PrajwalTomar_/status/2056347864822083809)
---
Most people are still opening Figma.
Some are paying web designers thousands of dollars for landing pages that take two weeks to deliver.
And then there is a small group of builders who just figured out how to go from idea to fully responsive, high fidelity website design in under 10 minutes.
Claude Design is here. And the way websites get built just changed
I have been using Claude Design across real projects at @ignytlabs and I have figured out the exact workflow that gets you to a finished, on-brand, professional design on the first pass without the endless back and forth.
There are 4 steps. Most people skip the first three and wonder why the results are mediocre.
Here is the full breakdown.
## What Claude Design Actually Is
Quick context before we get into the workflow.
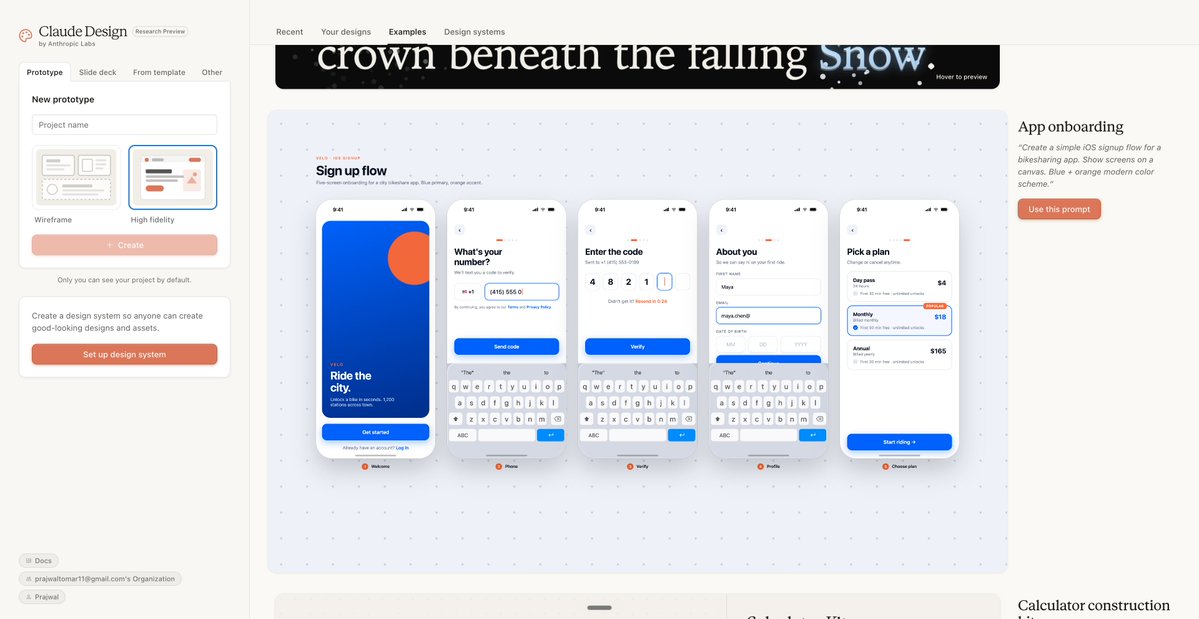
Claude Design lives inside your existing Claude subscription at claude.ai/design. You need at least a Pro plan to access it.
It is not just a website builder. It can produce:
→ Animated websites and landing pages
→ Slide decks and presentations
→ LinkedIn carousels and infographics
→ Sales proposals and one pagers
→ Onboarding guides and PDFs
→ Product UI and app designs
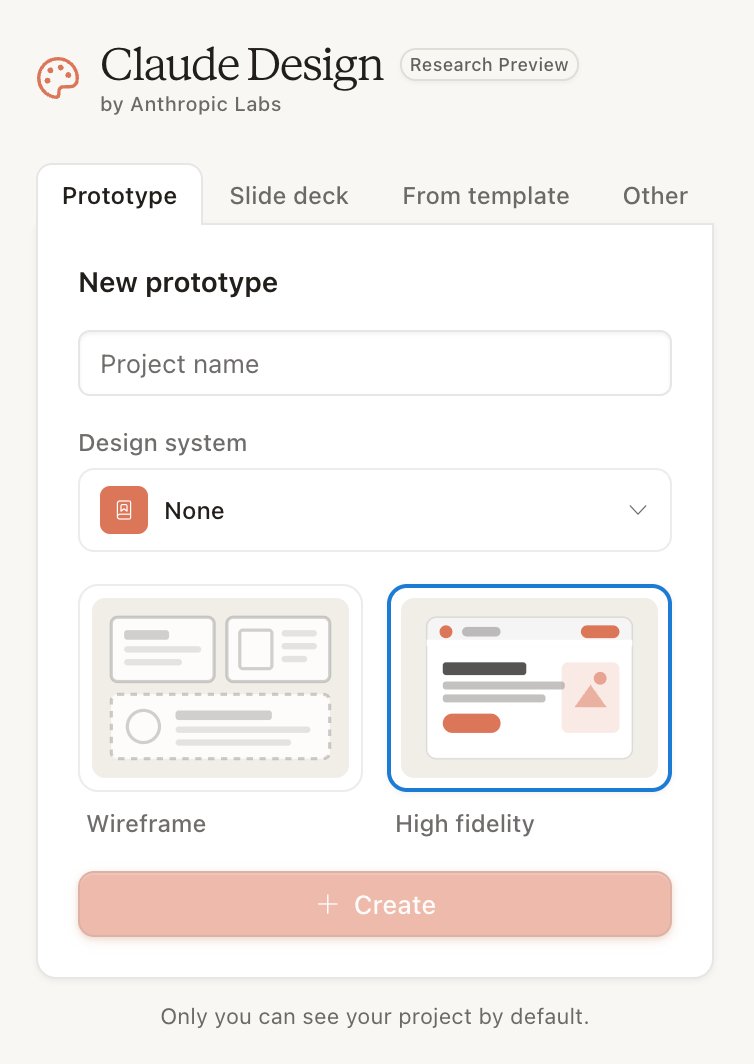
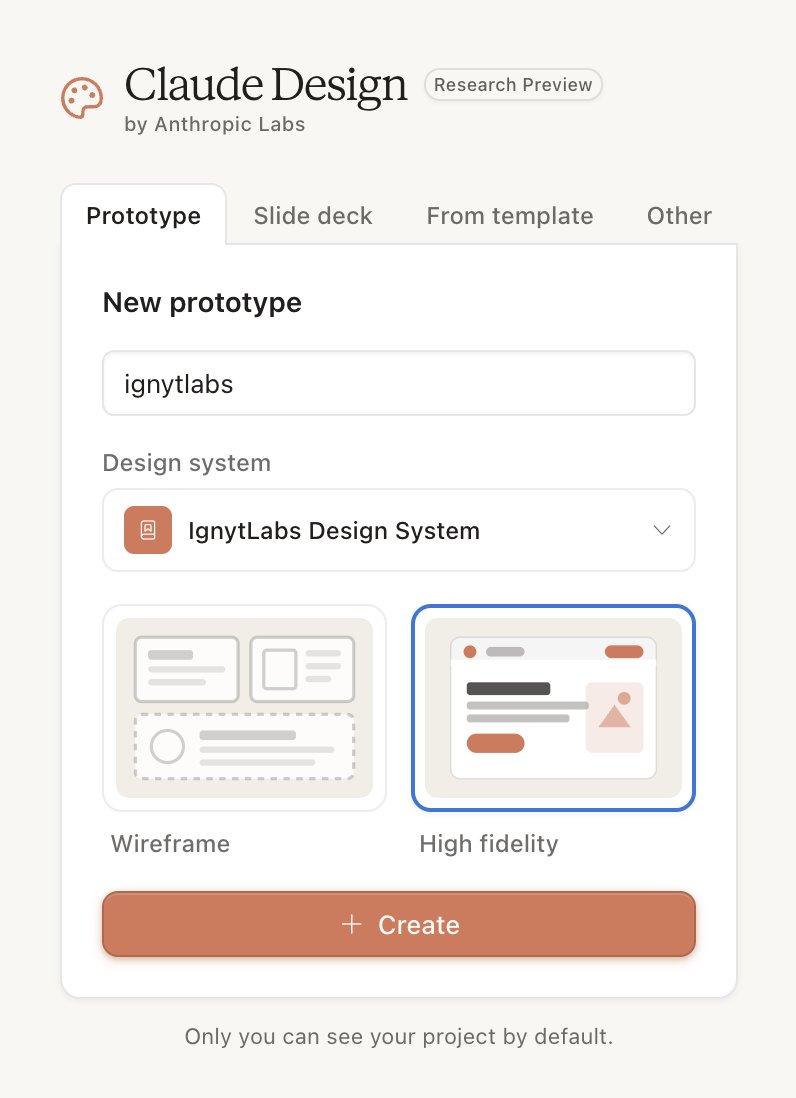
When you open it you get four modes:
→ Prototype - wireframe or high fidelity UI
→ Slide deck - describe it and Claude builds it
→ From template - start from a pre-built example
→ Other - anything custom
Inside Prototype you choose between Wireframe for rough structure and High Fidelity for a polished ready-to-refine design.
That is the tool. Now here is how to actually use it.
## The Problem With How Most People Use It
Here is what vibe designing looks like.
You open Claude Design. You type something like "build me a landing page for my AI agency." Claude gives you something. It looks okay but not quite right. You prompt again. And again. Each iteration burns tokens. The layout keeps shifting. The copy is generic. Two hours later you have spent half your weekly token allowance and you are still not happy with it.
This is the most common experience people have with Claude Design.
And it happens for one reason.
You are asking Claude to make too many decisions at once. The colors. The fonts. The layout. The copy. The structure. All of it in one prompt.
The fix is simple.
Pre-establish as much as possible before you ever open Claude Design.
The more you define upfront, the less Claude has to guess. The less Claude guesses, the better the first output. The better the first output, the fewer iterations you need.
That is the entire principle behind this workflow.
## Step 1 - Build Your Design System First. Always.
This is the step everyone skips. It is also the most important one.
Here is what a design system is in simple terms.
A design system is your brand's blueprint. Your specific colors. Your fonts. The way your buttons look. The spacing between elements. The overall style that makes something feel like it came from YOUR brand and not a random AI template.
Without a design system, every time you build something in Claude Design, Claude makes its own style choices. It might look good. But it does not look like you. And every project looks slightly different from the last one.
With a design system connected, everything you build is automatically on brand. Every landing page. Every presentation. Every carousel. Consistent every single time.
At @ignytlabs we build a design system for every single client before we touch a single page. It is the foundation of every project we take on. Claude Design just made that process dramatically faster.
Here is exactly how to build one:
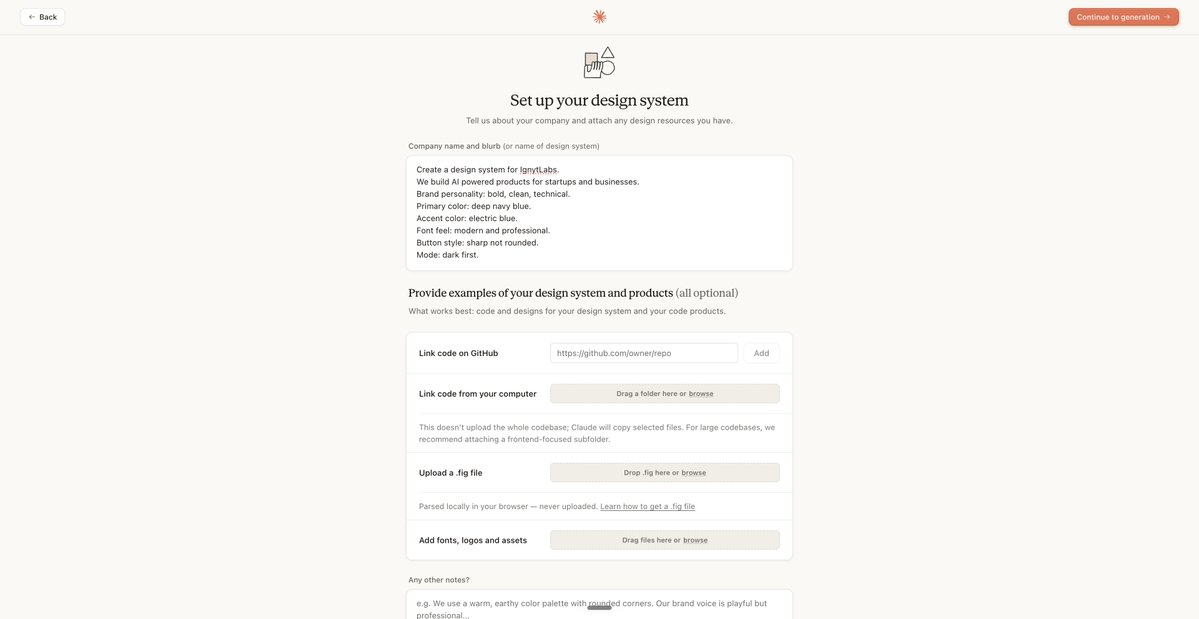
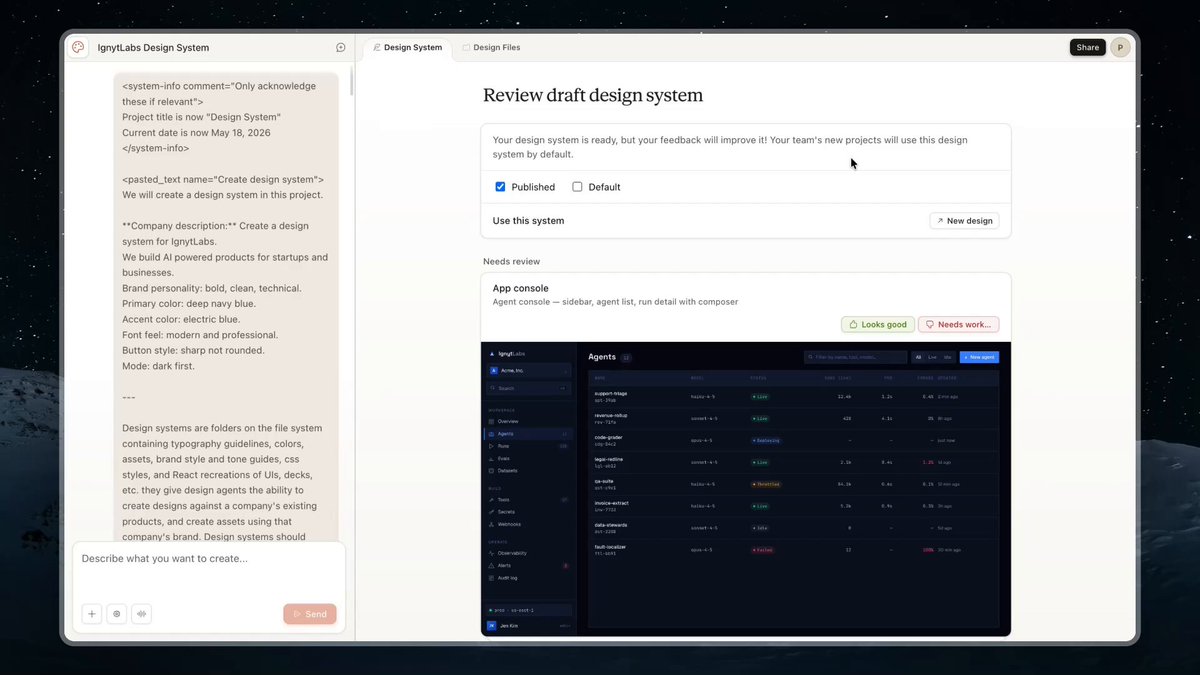
Go to the Design Systems tab
On the right side panel inside Claude Design click on the Design Systems tab. Click create new. Give it a name.
Describe your brand
Use this prompt structure:
> Create a design system for [your brand name].
> [One sentence about what the brand does.]
> Brand personality: [3 words that describe the feel.]
> Primary color: [your main color]
> Accent color: [your secondary color]
> Font feel: [modern/classic/bold/minimal]
> Button style: [sharp/rounded/outlined]
> Mode: [dark first/light first]
For @ignytlabs I used:
> Create a design system for IgnytLabs.
> We build AI powered products for startups and businesses.
> Brand personality: bold, clean, technical.
> Primary color: deep navy blue.
> Accent color: electric blue.
> Font feel: modern and professional.
> Button style: sharp not rounded.
> Mode: dark first.
Review and refine
Claude generates your design system showing brand colors with hex codes, typography choices, button styles, and spacing rules. If anything is off click needs work, give feedback, and it updates.
Connect it to every project
Every time you start a new project in Claude Design, select your design system before prompting anything. From that point forward every design Claude builds uses your brand automatically.
## Step 2 - Build Templates for Every Repeatable Use Case
Once you have a design system, the next step is templates.
A template pre-defines the layout, format, and structure of a specific type of design. Think of it as the skeleton that your design system then dresses up in your brand.
Without templates, every time you need a landing page or a carousel or a slide deck, Claude has to figure out the structure from scratch. Sometimes it gets it right. Sometimes it does not. Either way you end up iterating on layout which is one of the biggest token wasters in Claude Design.
With a template, the structure is already decided. Claude just fills it in with your brand and your content.
Here is how to build one:
Find layouts you like
Go to the Examples tab inside Claude Design. Browse the pre-built designs. Screenshot any layouts, sections, or structures you want to use. You can also find inspiration on sites like Dribbble, Framer, or Behance.
Build the template in Claude Design
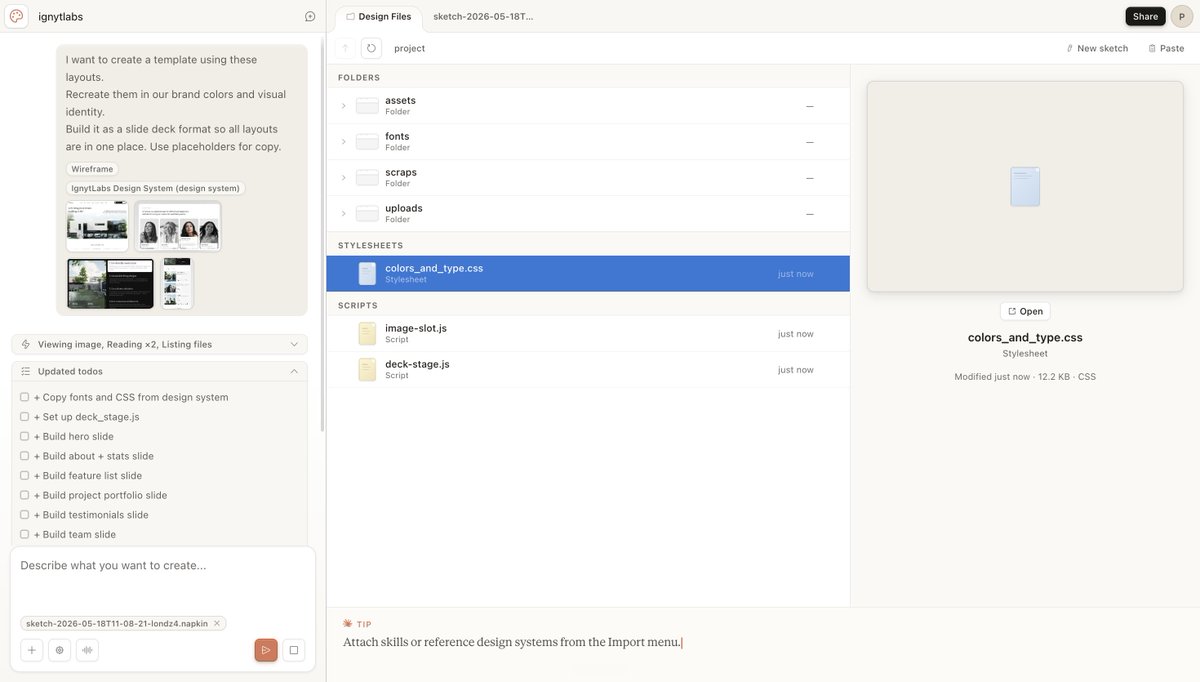
Open a new project with your design system connected. Add your screenshots and say:
I want to create a template using these layouts.
Recreate them in our brand colors and visual identity.
Build it as a slide deck format so all layouts
are in one place. Use placeholders for copy.
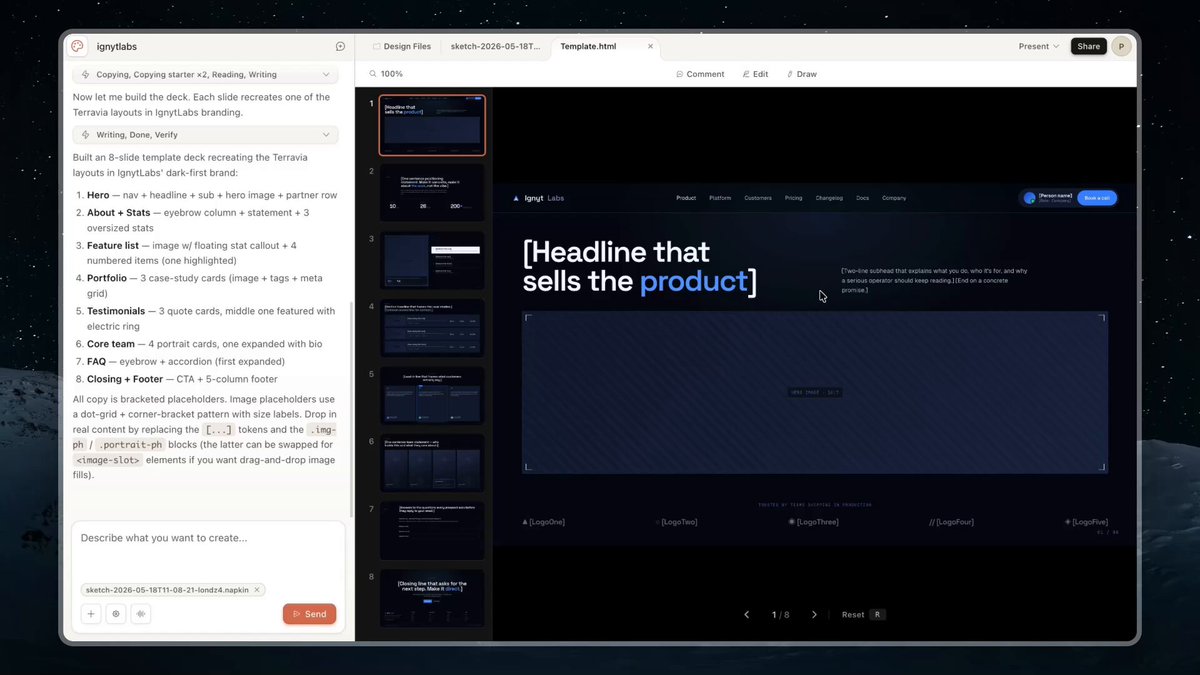
Claude recreates all the layouts in your brand style. You go back and forth to adjust anything you want to change. Add sections. Remove sections. Tweak spacing.
Save it as a template
Once you are happy with it, click Share and then Duplicate as Template. Claude Design saves it to your account.
Now every time you start a new project you go to From Template, select it, connect your design system, and your structure and brand are both applied automatically before you type a single word of copy.
At @ignytlabs we have templates for every deliverable we produce. Landing pages. Case studies. Client proposals. Onboarding guides. Every one of them has a pre-approved structure that we reuse across projects. This is what makes us fast.
## Step 3 - Use Skills to Pre-Define Your Copy
This is the unlock that takes the whole workflow from good to CRACKED.
Here is the problem with writing copy inside Claude Design.
Claude Design is a design tool. It is not optimized for copywriting. Every time you iterate on copy inside Claude Design you are burning design tokens on a writing task. That is expensive and inefficient.
The fix is to pre-define your copy before you ever open Claude Design.
You do this with a skill inside Claude Code or Claude desktop.
A skill is a saved workflow that Claude follows every time you invoke it. You build it once. You use it forever.
Here is how the copy skill workflow works:
Build your skill once
Inside Claude Code or Claude desktop, create a skill that knows:
→ Your brand voice and tone
→ Your template layouts and which ones to use for which content
→ Reference examples of copy you like from past projects
Run the skill before each new design
When you need a new design, run the skill first. Give it the brief or the context for what you are building. It does two things:
→ Decides which template layouts to use for each section
→ Writes the copy for each section with variations for you to choose from
At the end it gives you a full design prompt. Every section mapped to a template. Every piece of copy written and approved by you. Ready to paste directly into Claude Design.
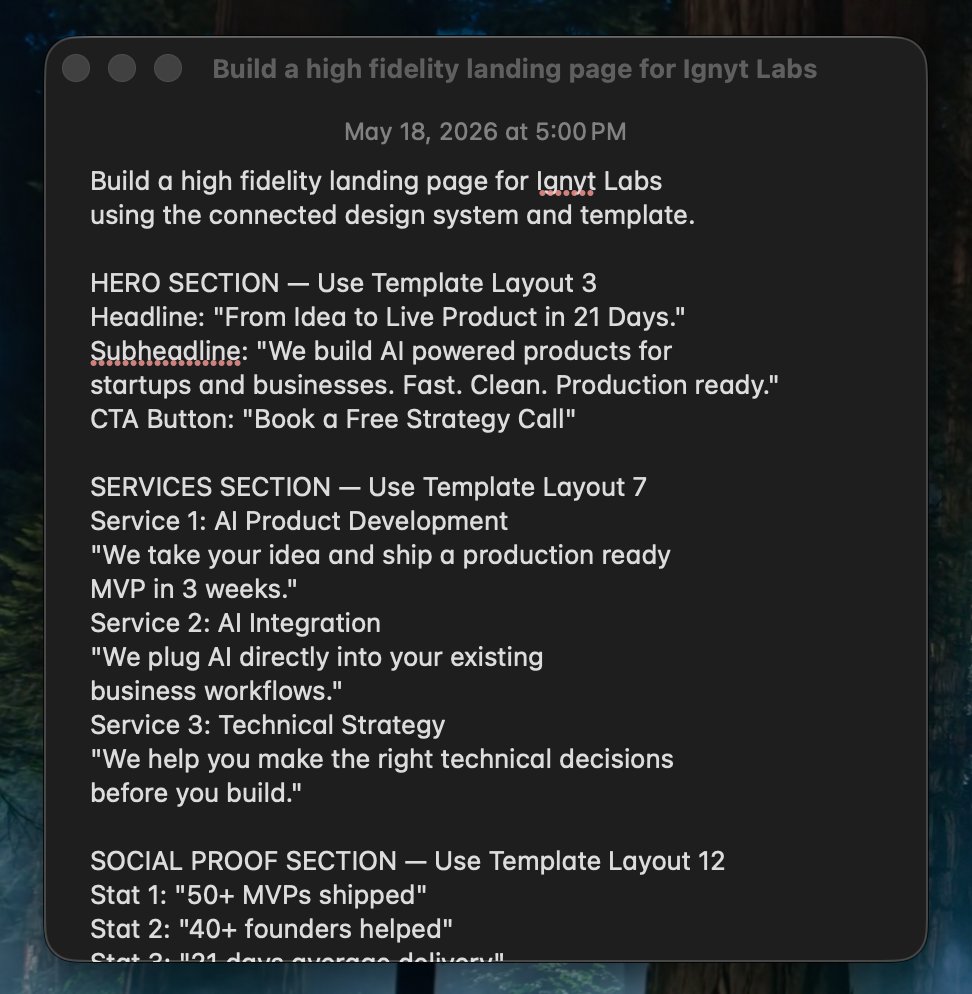
This is what your prompt looks like after Step 3.
Paste into Claude Design
Open Claude Design. Select your template. Connect your design system. Paste the prompt from your skill.
Because the structure is defined, the brand is defined, and the copy is defined, Claude Design can focus entirely on execution. The first output is 90% ready. You make two or three small tweaks and you are done.
That is the difference between vibe designing and actually having a system.
## Step 4 - Build in Claude Design
Now you actually open Claude Design. Everything is already set up.
Here is the exact sequence:
→ Go to claude.ai/design
→ Click From Template
→ Select your template
→ Connect your design system
→ Paste your skill prompt into the chat
→ Answer any clarifying questions or say "decide for me"
→ Review the output
What comes back on the first pass will be significantly better than anything you get from a cold one-shot prompt. The structure is right because you have a template. The brand is right because you have a design system. The copy is right because your skill wrote it.
You are not starting from scratch. You are finishing something that is already 70% done before Claude Design generates a single pixel.
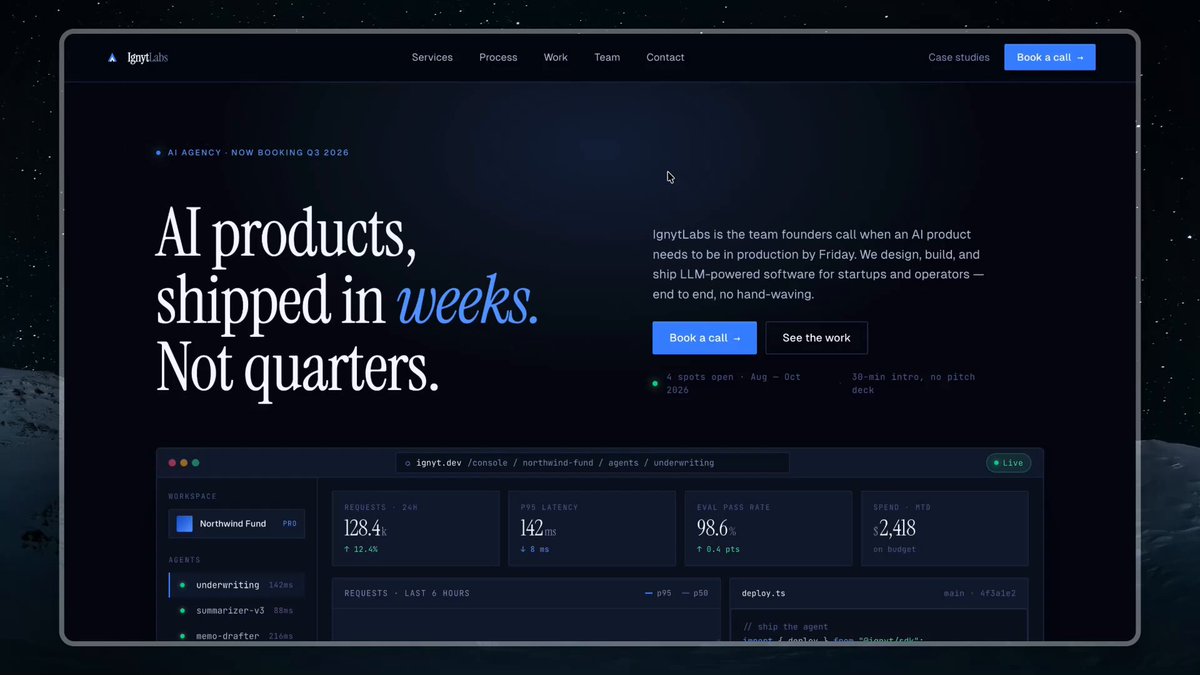
This is the landing page I got from just one prompt. From there, you can easily refine it further using different tools to add animations and polish the overall design.
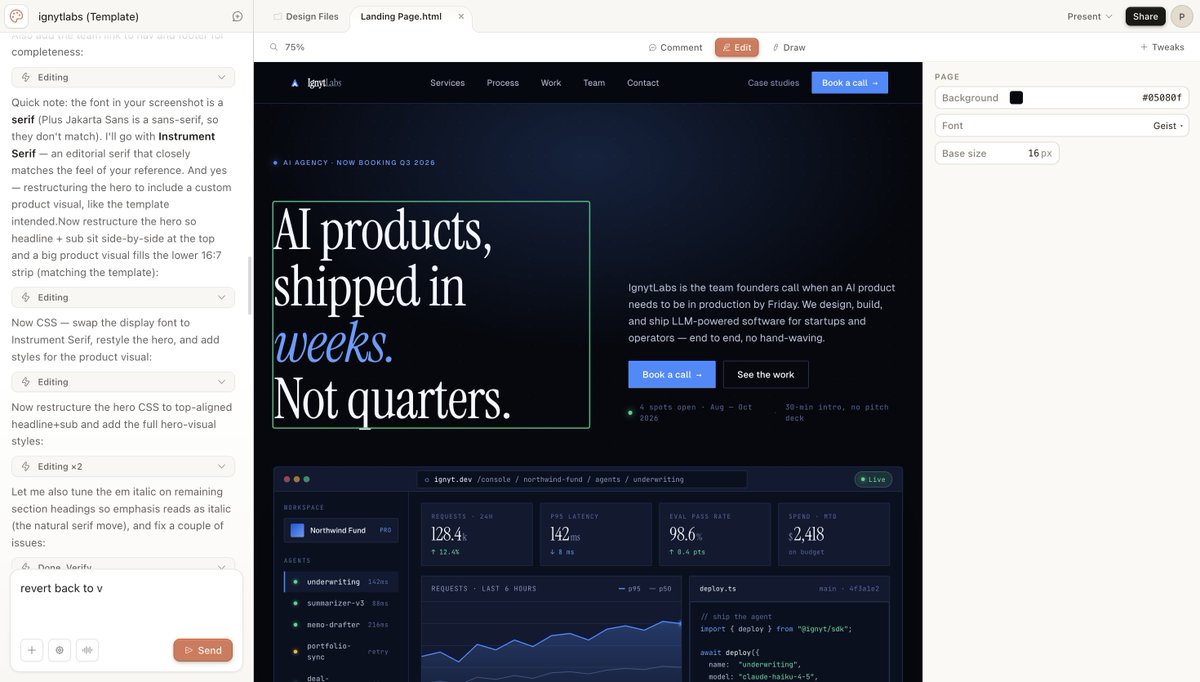
Making small tweaks
For anything that needs adjusting you have four tools:
→ Direct edit - click any text and change it manually
→ Comments - click a specific element and describe what you want changed
→ Draw - sketch directly on the canvas and Claude interprets it
→ Tweaks - change color schemes, dark/light mode, layout variations without prompting
The combination of these four tools means you go from first output to finished design in minutes not hours.
## The Handoff to Claude Code
Once your design is ready, you do not have to stop there.
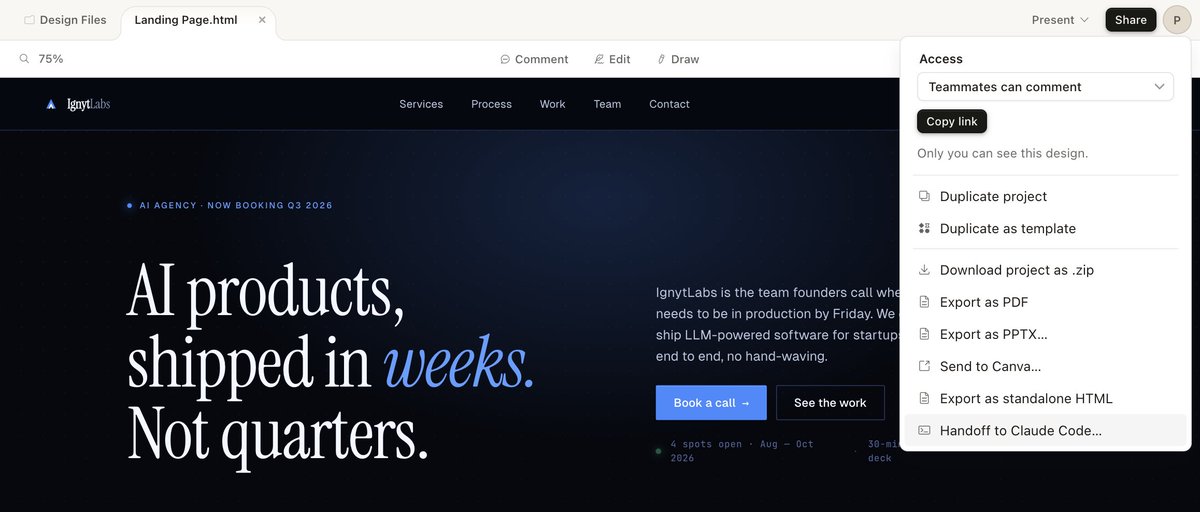
Click Share in the top right corner. Select the handoff to Claude Code option. Copy the command. Open Claude Code. Paste it.
Claude Code takes your design and turns it into a real working application. Database. User accounts. Payment processing. Forms that actually submit. Everything a real product needs on top of the design.
Claude Design makes it. Claude Code builds it.
This is the exact workflow we use at @ignytlabs for rapid client concepting. A client describes what they want. We run the 4-step workflow and have a high fidelity concept ready in under an hour. They approve it. We hand it off to Claude Code to build. The speed difference compared to the old way of working is significant.
## What to Watch Out For
A few honest flags before you run this.
Token usage burns fast.
Claude Design has its own separate weekly usage limit. It is not the same pool as your regular Claude usage. A single high fidelity design can use a significant chunk of your weekly allowance. Having your design system, templates, and copy pre-defined before prompting is not just good practice. It is how you protect your token budget.
It is still a research preview.
You will hit bugs. Text overlap. Weird rendering on certain layouts. It is improving fast but go in with realistic expectations.
Pre-establish everything before prompting.
If you skip Steps 1, 2, and 3 and go straight to Step 4, you will end up in the endless iteration loop. The workflow only works when you follow all four steps. The first three steps are what make Step 4 fast.
The 20% still matters.
Claude gets you 80% of the way there fast. The last 20% is where your taste, your judgment, and your understanding of your brand comes in. That 20% is what separates a good design from a great one. Do not skip it.
A quick shoutout before my final thoughts.
This 4-step workflow is based on a Claude Design video I came across on YouTube from Ben AI. I tested it across several projects and it worked really well. Well enough that it is now part of how we actually work. So huge shoutout to Ben for putting that together.
## What This Actually Means
Here is my honest take.
The bottleneck in design has never been creativity. It has always been production. Getting something from idea to finished asset used to take days. Briefing designers. Waiting on revisions. Going back and forth on copy. Paying for studio time.
That bottleneck just disappeared for anyone willing to set up the system properly.
A solo builder with a design system, a set of templates, and a copy skill can now produce in an afternoon what used to take a design team a week. Not because the AI is doing everything. But because the AI is handling the production while you focus on the judgment calls.
At @ignytlabs we are already seeing this in our client work. Concepts that used to take two weeks to produce are now ready in a day. That speed changes everything about how we pitch, how we onboard, and how fast we ship.
The builders who set this system up properly are going to move at a speed that feels unfair to everyone still doing it the old way.
2026 is going to be UNFAIR for builders who move early on this.
## TLDR
→ Stop vibe designing. Pre-establish everything before you prompt.
→ Step 1: Build your design system first. Always. This is the foundation.
→ Step 2: Build templates for every repeatable use case. Structure before style.
→ Step 3: Use a skill to pre-define your copy before opening Claude Design.
→ Step 4: Now open Claude Design. Select template. Connect design system. Paste prompt. Done.
→ Refine with Direct edit, Comments, Draw, and Tweaks.
→ Hand off to Claude Code via Share when you are ready to build for real.
→ Watch your token usage. The 4-step workflow protects your budget.
→ The 20% human touch still matters. Your taste is the product.
Claude Design is not the workflow. The workflow is what makes Claude Design work.
Set it up once. Use it forever.
LFG.
## 相关链接
- [Prajwal Tomar](https://x.com/PrajwalTomar_)
- [@PrajwalTomar_](https://x.com/PrajwalTomar_)
- [42K](https://x.com/PrajwalTomar_/status/2056347864822083809/analytics)
- [@ignytlabs](https://x.com/@ignytlabs)
- [claude.ai/design](http://claude.ai/design)
- [@ignytlabs](https://x.com/@ignytlabs)
- [@ignytlabs](https://x.com/@ignytlabs)
- [@ignytlabs](https://x.com/@ignytlabs)
- [claude.ai/design](http://claude.ai/design)
- [@ignytlabs](https://x.com/@ignytlabs)
- [@ignytlabs](https://x.com/@ignytlabs)
- [Upgrade to Premium](https://x.com/i/premium_sign_up)
- [8:15 PM · May 18, 2026](https://x.com/PrajwalTomar_/status/2056347864822083809)
- [42K Views](https://x.com/PrajwalTomar_/status/2056347864822083809/analytics)
- [View quotes](https://x.com/PrajwalTomar_/status/2056347864822083809/quotes)
---
*导出时间: 2026/5/19 09:32:57*
---
## 中文翻译
# 真正行之有效的 Claude 设计工作流
**作者**: Prajwal Tomar
**日期**: 2026-05-18T12:15:10.000Z
**来源**: [https://x.com/PrajwalTomar_/status/2056347864822083809](https://x.com/PrajwalTomar_/status/2056347864822083809)
---

大多数人仍然在打开 Figma。
有些人还在向网页设计师支付数千美元,只为了做一个需要两周才能交付的落地页。
但也有一小部分建造者刚刚弄清楚了如何在 10 分钟内从想法变成完全响应式、高保真的网站设计。
Claude Design 来了。网站的构建方式刚刚发生了改变。
我一直在 @ignytlabs 的实际项目中使用 Claude Design,我已经找到了一个精确的工作流程,能让你在第一次尝试时就得到成品级的、符合品牌调性的专业设计,而无需无休止的来回返工。
共有 4 个步骤。大多数人跳过了前三个步骤,却不知道结果为什么平庸。
以下是完整的拆解。

## Claude Design 到底是什么
在进入工作流程之前,先简单介绍一下背景。
Claude Design 位于你现有的 Claude 订阅之内,网址是 claude.ai/design。你需要至少一个 Pro 计划才能访问它。
它不仅仅是一个网站构建器。它可以制作:
→ 动画网站和落地页
→ 演示文稿和幻灯片
→ LinkedIn 轮播图和信息图表
→ 销售提案和单页文档
→ 入门指南和 PDF
→ 产品 UI 和应用设计
当你打开它时,你会看到四种模式:
→ Prototype(原型)- 线框图或高保真 UI
→ Slide deck(幻灯片)- 描述它,Claude 就会构建它
→ From template(从模板开始)- 从预置的示例开始
→ Other(其他)- 任何自定义内容
在 Prototype 模式下,你可以选择 Wireframe(线框图)用于粗略结构,或 High Fidelity(高保真)用于经过打磨的、准备精修的设计。
这就是工具。现在让我们看看如何真正使用它。

## 大多数人使用方式的问题
这就是“凭感觉设计”的样子。
你打开 Claude Design。输入类似“为我的 AI 代理公司建一个落地页”的内容。Claude 给了你一些东西。看起来还可以,但不太对劲。你再次提示。一次又一次。每次迭代都会消耗 Token。布局一直在变。文案很平庸。两小时后,你花掉了一半的每周 Token 配额,但你仍然对结果不满意。
这是大多数人使用 Claude Design 的最常见体验。
发生这种情况只有一个原因。
你要求 Claude 一次做出太多决定。颜色。字体。布局。文案。结构。所有这一切都在一个提示词中。
解决方法很简单。
在打开 Claude Design 之前,尽可能多地预先确定一切。
你预先定义得越多,Claude 需要猜测的就越少。Claude 猜测得越少,第一次输出就越好。第一次输出越好,你需要的迭代就越少。
这就是这个工作流程背后的全部原理。
## 第 1 步 - 始终先构建你的设计系统
这是每个人都跳过的步骤。这也是最重要的一个。
简单来说,什么是设计系统。
设计系统是你品牌的蓝图。你的特定颜色。你的字体。你的按钮外观。元素之间的间距。让某些东西看起来像是出自你的品牌,而不是随机的 AI 模板的整体风格。
如果没有设计系统,每次你在 Claude Design 中构建东西时,Claude 都会做出自己的风格选择。它可能看起来不错。但它看起来不像你。而且每个项目看起来都和上一次略有不同。
连接了设计系统后,你构建的所有内容都会自动符合品牌调性。每个落地页。每个演示文稿。每个轮播图。每次都保持一致。
在 @ignytlabs,我们在接触任何一个页面之前,都会为每个客户构建一个设计系统。这是我们承接的每个项目的基础。Claude Design 只是让这个过程变得快得多。
以下是构建方法:
前往 Design Systems 选项卡
在 Claude Design 的右侧面板中,点击 Design Systems 选项卡。点击 create new(新建)。给它起个名字。
描述你的品牌
使用这个提示词结构:
> Create a design system for [your brand name].
> [One sentence about what the brand does.]
> Brand personality: [3 words that describe the feel.]
> Primary color: [your main color]
> Accent color: [your secondary color]
> Font feel: [modern/classic/bold/minimal]
> Button style: [sharp/rounded/outlined]
> Mode: [dark first/light first]
对于 @ignytlabs,我使用了:
> Create a design system for IgnytLabs.
> We build AI powered products for startups and businesses.
> Brand personality: bold, clean, technical.
> Primary color: deep navy blue.
> Accent color: electric blue.
> Font feel: modern and professional.
> Button style: sharp not rounded.
> Mode: dark first.

审查和优化
Claude 生成你的设计系统,显示带有十六进制代码的品牌颜色、排版选择、按钮样式和间距规则。如果有任何偏差,点击 needs work(需要改进),给出反馈,它会更新。

将其连接到每个项目
每次你在 Claude Design 中开始新项目时,在输入任何提示之前选择你的设计系统。从那一刻起,Claude 构建的每个设计都会自动使用你的品牌。

## 第 2 步 - 为每个可重复的用例构建模板
一旦你有了设计系统,下一步就是模板。
模板预定义了特定类型设计的布局、格式和结构。你可以把它看作骨架,然后由你的设计系统为它穿上你的品牌外衣。
如果没有模板,每次你需要落地页、轮播图或幻灯片时,Claude 都必须从头开始弄清楚结构。有时它做对了。有时没有。无论哪种情况,你最终都要在布局上进行迭代,这是 Claude Design 中最大的 Token 浪费之一。
有了模板,结构已经决定了。Claude 只是用你的品牌和内容填充它。
以下是构建方法:
找到你喜欢的布局
进入 Claude Design 内的 Examples(示例)选项卡。浏览预构建的设计。截取任何你想使用的布局、部分或结构的屏幕截图。你也可以在 Dribbble、Framer 或 Behance 等网站上寻找灵感。
在 Claude Design 中构建模板
打开一个连接了你的设计系统的新项目。添加你的屏幕截图并说:
I want to create a template using these layouts.
Recreate them in our brand colors and visual identity.
Build it as a slide deck format so all layouts
are in one place. Use placeholders for copy.
Claude 会以你的品牌风格重现所有布局。你可以来回调整任何你想更改的内容。添加部分。删除部分。调整间距。

将其保存为模板
一旦你满意了,点击 Share(分享),然后点击 Duplicate as Template(复制为模板)。Claude Design 会将其保存到你的账户。
现在,每次你开始新项目时,你转到 From Template,选择它,连接你的设计系统,在你输入一个字的文案之前,你的结构和品牌就都自动应用了。
在 @ignytlabs,我们要为我们制作的每个交付物制作模板。落地页。案例研究。客户提案。入门指南。每一个都有我们在项目中重复使用的预先批准的结构。这就是我们要快的原因。

## 第 3 步 - 使用 Skills 预先定义你的文案
这是让整个工作流程从“好”变成“神级”的关键解锁。
这是在 Claude Design 中撰写文案的问题所在。
Claude Design 是一个设计工具。它不是为文案写作优化的。每次你在 Claude Design 中迭代文案时,你都在为写作任务消耗设计 Token。这既昂贵又低效。
解决方法是在打开 Claude Design 之前预先定义你的文案。
你可以通过 Claude Code 或 Claude 桌面版中的一个 Skill 来实现这一点。
Skill 是一个保存的工作流程,每次你调用它时 Claude 都会遵循它。你构建一次。你可以永远使用它。
以下是文案 Skill 的工作流程:
构建一次你的 Skill
在 Claude Code 或 Claude 桌面版中,创建一个知道以下内容的 Skill:
→ 你的品牌声音和语调
→ 你的模板布局以及哪些内容使用哪些布局
→ 你过去项目中喜欢的文案参考示例
在每次新设计之前运行 Skill
当你需要新设计时,首先运行该 Skill。给你正在构建的东西提供简报或背景。它会做两件事:
→ 决定每个部分使用哪些模板布局
→ 为每个部分撰写文案并提供变体供你选择
最后,它会给你一个完整的设计提示词。每个部分都映射到一个模板。每段文案都经过你的编写和批准。准备好直接粘贴到 Claude Design 中。

这就是你在第 3 步之后的提示词的样子。
粘贴到 Claude Design
打开 Claude Design。选择你的模板。连接你的设计系统。粘贴来自你的 Skill 的提示词。
因为结构已定义,品牌已定义,文案已定义,Claude Design 可以完全专注于执行。第一次输出就已经 90% 准备好了。你进行两三次小的调整就完成了。
这就是凭感觉设计和真正拥有系统之间的区别。
## 第 4 步 - 在 Claude Design 中构建
现在你实际上打开了 Claude Design。一切都已经设置好了。
以下是确切的顺序:
→ 前往 claude.ai/design
→ 点击 From Template
→ 选择你的模板
→ 连接你的设计系统
→ 将你的 Skill 提示词粘贴到聊天中
→ 回答任何澄清性问题或说“你来决定”
→ 审查输出
第一次返回的结果将显著好于任何冷启动的一次性提示词。结构是对的,因为你有一个模板。品牌是对的,因为你有一个设计系统。文案是对的,因为你的 Skill 撰写了它。
你不是从零开始。你正在完成某些在 Claude Design 生成单个像素之前就已经完成 70% 的东西。

这就是我只用一个提示词就得到的落地页。从那里,你可以使用不同的工具轻松地进一步完善它,添加动画并打磨整体设计。
进行微调
对于需要调整的任何内容,你有四个工具:
→ Direct edit(直接编辑)- 点击任何文本并手动更改
→ Comments(评论)- 点击特定元素并描述你想要更改的内容
→ Draw(绘画)- 直接在画布上草图,Claude 会解释它
→ Tweaks(调整)- 更改配色方案、深色/浅色模式、布局变体,无需提示
这四个工具的结合意味着你在几分钟内而不是几小时内从第一次输出到完成设计。

## 移交给 Claude Code
一旦你的设计完成,你不必就此止步。
点击右上角的 Share。选择 handoff to Claude Code(移交给 Claude Code)选项。复制命令。打开 Claude Code。粘贴它。
Claude Code 接管你的设计并将其转化为一个真正工作的应用程序。数据库。用户账户。支付处理。真正提交的表单。真实产品在设计之上需要的所有东西。
Claude Design 制作它。Claude Code 构建它。
这就是我们在 @ignytlabs 用于快速客户概念化的确切工作流程。客户描述他们想要的东西。我们运行 4 步工作流程,并在一小时内准备好高保真概念。他们批准它。我们将其移交给 Claude Code 进行构建。与旧的工作方式相比,速度差异是显著的。

## 需要注意的事项
在你运行之前,有几个诚实的警告。
Token 使用消耗得很快。
Claude Design 有自己独立的每周使用限制。它与你常规的 Claude 使用量不是同一个池。一个高保真设计可能会消耗你每周配额的很大一部分。在提示之前预先定义你的设计系统、模板和文案不仅仅是好的做法。这是你保护 Token 预算的方式。
它仍然是研究预览版。
你会遇到 Bug。文本重叠。某些布局上的奇怪渲染。它正在快速改进,但要带着现实的期望进入。
在提示之前预先建立一切。
如果你跳过第 1、2 和 3 步直接进入第 4 步,你最终将陷入无尽的迭代循环。该工作流程只有在遵循所有四个步骤时才有效。前三个步骤是让第 4 步快速的原因。
最后的 20% 仍然很重要。
Claude 可以快速帮你完成 80% 的路。剩下的 20% 是你的品味、你的判断力以及你对你品牌的理解发挥作用的地方。这 20% 是区分好的设计和伟大的设计的关键。不要跳过它。
在我最后的想法之前,快速致谢一下。
这个 4 步工作流程基于我在 YouTube 上看到的 Ben AI 制作的一个 Claude Design 视频。我在几个项目中测试了它,效果非常好。效果非常好,以至于它现在成为我们实际工作方式的一部分。所以非常感谢 Ben 把这些整合在一起。
## 这实际上意味着什么
这是我的诚实看法。
设计中的瓶颈从来不是创造力。它一直是生产。将某样东西从想法变成成品资产过去需要几天时间。向设计师下达简报。等待修订。来回修改文案。支付工作室时间费用。
对于任何愿意正确设置系统的人来说,这个瓶颈刚刚消失了。
一个拥有设计系统、一套模板和文案 Skill 的独立建造者,现在可以在一个下午内完成过去设计团队一周才能完成的工作。不是因为 AI 做了一切。而是因为 AI 处理了生产工作,而你专注于决策。
在 @ignytlabs,我们已经在我们的客户工作中看到了这一点。过去需要两周才能制作的概念现在一天内就准备好了。这种速度改变了我们要约、我们入职以及我们交付速度的一切。
正确设置了这个系统的建造者,其移动速度将让所有仍然采用旧方式的人感到不公平。
对于那些早期行动的建造者来说,2026 年将是不公平的。
## TLDR
→ 停止凭感觉设计。在提示之前预先建立一切。
→ 第 1 步:始终首先构建你的设计系统。这是基础。
→ 第 2 步:为每个可重复的用例构建模板。结构先于风格。
→ 第 3 步:使用 Skill 在打开 Claude Design 之前预先定义你的文案。
→ 第 4 步:现在打开 Claude Design。选择模板。连接设计系统。粘贴提示词。完成。
→ 使用 Direct edit、Comments、Draw 和 Tweaks 进行优化。
→ 准备好真正构建时,通过 Share 移交给 Claude Code。
→ 注意你的 Token 使用情况。4 步工作流程可以保护你的预算。
→ 最后 20% 的人工触感仍然很重要。你的品味就是产品。
Claude Design 不是工作流程。工作流程是让 Claude Design 发挥作用的东西。
设置一次。永远使用它。
LFG.
## 相关链接
- [Prajwal Tomar](https://x.com/PrajwalTomar_)
- [@PrajwalTomar_](https://x.com/PrajwalTomar_)
- [42K](https://x.com/PrajwalTomar_/status/2056347864822083809/analytics)
- [@ignytlabs](https://x.com/@ignytlabs)
- [claude.ai/design](http://claude.ai/design)
- [@ignytlabs](https://x.com/@ignytlabs)
- [@ignytlabs](https://x.com/@ignytlabs)
- [@ignytlabs](https://x.com/@ignytlabs)
- [claude.ai/design](http://claude.ai/design)
- [@ignytlabs](https://x.com/@ignytlabs)
- [@ignytlabs](https://x.com/@ignytlabs)
- [Upgrade to Prem](https://x.com/i/redirect?url=https%3A%2F%2Fx.com%2Fi%2Fflow%2Flogin%3Fredirect_after_login%3Dhttps%253A%252F%252Fclaude.ai%252Fpricing)