# Color Grading
**作者**: HyperFrames
**日期**: 2026-07-29T18:39:07.000Z
**来源**: [https://x.com/HyperFrames_/status/2082536413829235004](https://x.com/HyperFrames_/status/2082536413829235004)
---
# Day 24 of 30: Coding your color grade
For 23 days, every clip in this series went into the composition exactly the way the camera handed it over. Day 24 is where the footage gets treated. Color Grading gives HyperFrames a real grading suite: color wheels, RGB curves, hue curves, HSL selections, scopes, presets, and custom LUTs. It works on real <video> and <img> media, and it uses the exact same validated SDR/Rec.709 shader in preview and in the final render. What you see while you grade is what ships.
```
npx hyperframes media-treatment \
--project . \
--file compositions/interview.html \
--selector '#interview' \
--grading '{"preset":"clean-studio","intensity":0.85}' \
--apply --json
```
One command. Flat camera footage in, a finished look out.
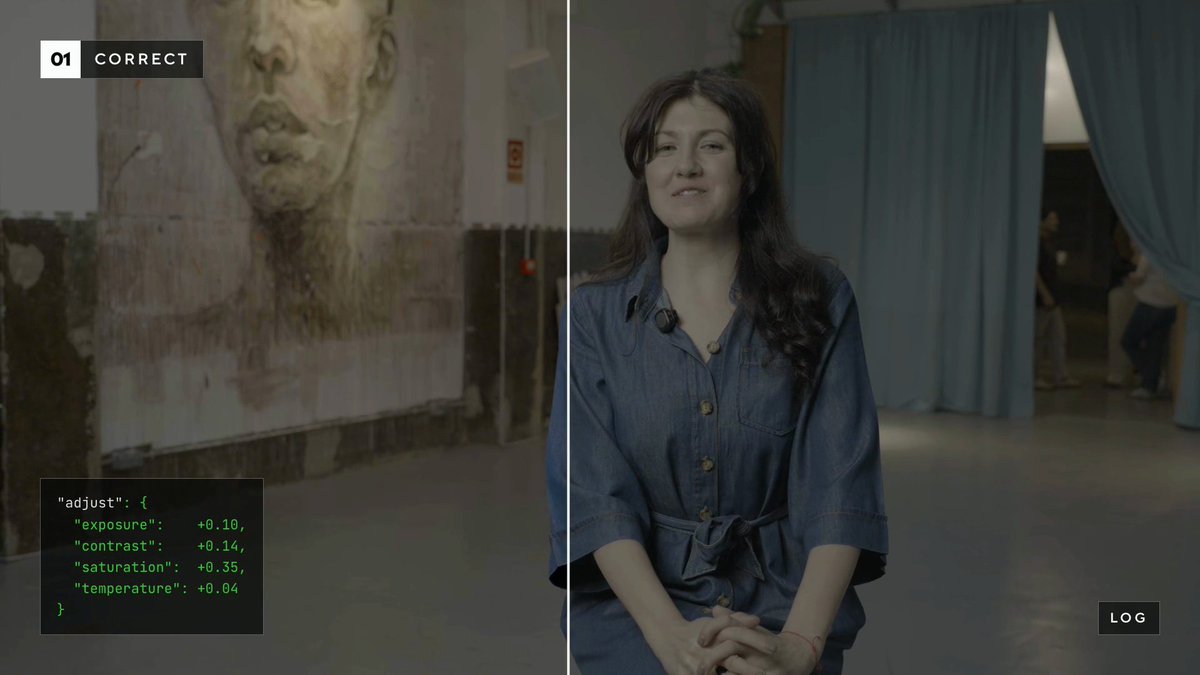
Mid-wipe in today's film: the same frame, flat log on the left, one adjust payload on the right.
## What it is
Color grading in HyperFrames is a pixel-level treatment that lives on the media element itself. Every stage of a professional grade is available, and each stage has a clear job:
The whole treatment is stored together on the selected element in one attribute: data-color-grading. The controls inside it will feel familiar to anyone who has opened DaVinci Resolve:
- Color wheels. Three wheels target broad tonal zones: shadows, midtones, and highlights. Hue and amount introduce color, and level changes the brightness of the same zone. Small amounts first.
- RGB curves. Master remaps overall luminance, and the red, green, and blue curves remap individual channels. Points are normalized [input, output] pairs. An S-curve adds contrast, lifting the lower-left raises shadows, and channel curves build split-tones or remove casts.
- Hue curves. Hue vs hue shifts a selected hue toward another, hue vs saturation changes saturation around a hue, and hue vs luma changes brightness around a hue. Points wrap around the color wheel.
- HSL color selections. A selection qualifies pixels by hue, saturation, and luma, then applies a correction only inside that matte. Cool an overly loud shirt, or protect skin from a heavy creative grade. Up to four ordered selections, and they are static qualifiers: no tracking, no rotoscoping.
- Scopes. Histogram, waveform, RGB parade, and vectorscope, all reading a captured frame with the current treatment applied. Grade by the scopes, not by your monitor's mood.
- Presets. Thirteen tested shader presets, from corrective (Neutral, Warm Daylight, Clean Studio, Skin Soft, Food Pop, Night Lift) through editorial (Muted Editorial, Vintage Wash, Soft Boost, Bright Pop, Deep Contrast) to monochrome (Mono Clean, Mono Fade). These are shader settings, not baked LUT files, so you can tune every one of them after applying.
- Custom LUTs. Project-local 3D .cube files up to LUT_3D_SIZE 64, with an intensity control. Rec.709 creative LUTs are the safest workflow.
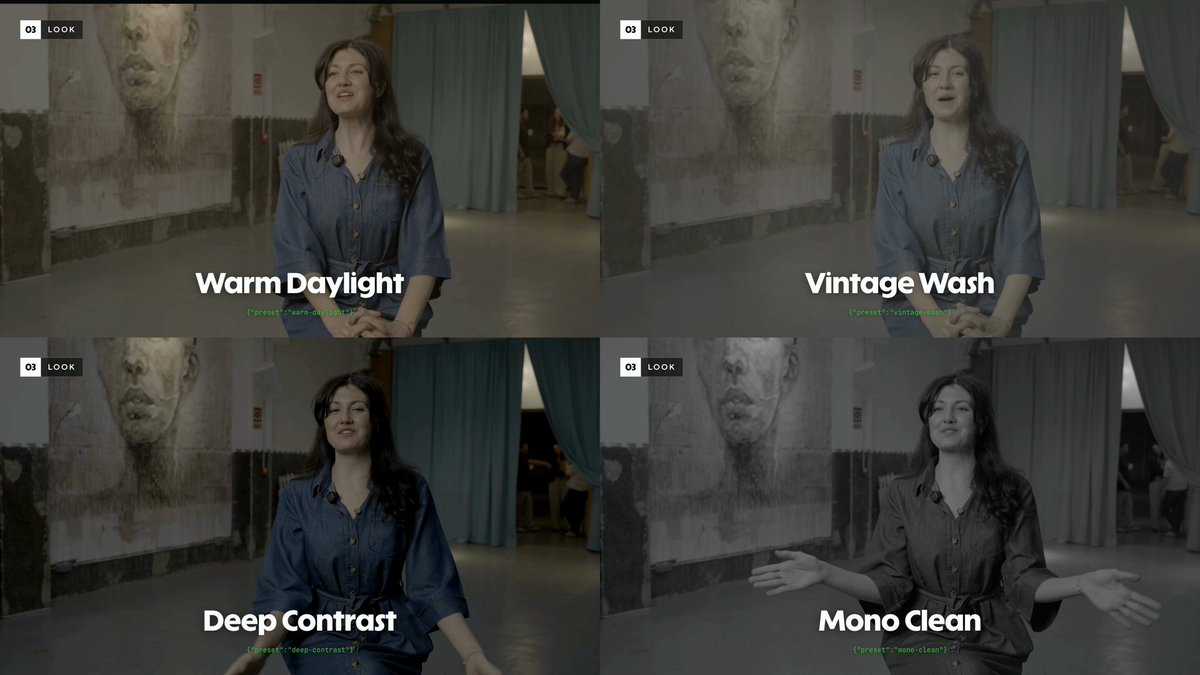
Four presets, one clip, zero re-edits: Warm Daylight, Vintage Wash, Deep Contrast, Mono Clean.
## How to implement it
You can use all of this without touching a line of code. Open your footage, tell the agent what feels wrong ("too dark", "too cold", "make it feel like film"), and the grade gets applied and verified for you. The code below is for anyone who wants direct control.
The easiest path is plain English. You do not need to name a single technical control: requests like "this interview feels too dark and cold" or "polish the footage without making it look filtered" route through the media-use skill, which inspects the source, applies a deterministic payload, and verifies the result.
When you want direct control, the CLI is the authoring surface. Analyze the source first:
```
npx hyperframes media-treatment \
--project . \
--file compositions/interview.html \
--selector '#interview' \
--analyze --json
```
Then apply one validated payload:
```
npx hyperframes media-treatment \
--project . \
--file compositions/interview.html \
--selector '#interview' \
--grading '{"adjust":{"highlights":-0.08,"shadows":0.06},"wheels":{"midtones":{"hue":32,"amount":0.05}}}' \
--apply --json
```
Everything persists into the composition as one readable attribute. This is the low-level contract the CLI and Studio both write:
```
<video
id="interview"
src="assets/interview.mp4"
data-start="0"
data-duration="6"
muted
playsinline
data-color-grading='{
"preset": "clean-studio",
"intensity": 0.85,
"adjust": { "exposure": 0.04, "highlights": -0.08, "shadows": 0.06 },
"wheels": {
"shadows": { "hue": 218, "amount": 0.04 },
"midtones": { "hue": 32, "amount": 0.05 },
"highlights": { "hue": 42, "amount": 0.03 }
},
"curves": { "master": [[0,0],[0.28,0.25],[0.72,0.76],[1,1]] },
"details": { "vignette": 0.05, "grain": 0.03 },
"colorSpace": "rec709"
}'
></video>
```
An external look drops in the same way. Point the contract at a project-local LUT and set how hard it hits:
```
{ "lut": { "src": "assets/luts/product-look.cube", "intensity": 0.7 } }
```
The contract rejects unknown keys and clamps every number to validated bounds, so a payload either applies cleanly or tells you why. Instead of memorizing bounds, query them:
```
npx hyperframes media-treatment --capabilities --json
npx hyperframes media-treatment --capability grading --json
npx hyperframes media-treatment --capability lut --json
```
## Field notes
- Correct first, grade second. Fix exposure, tonal balance, and white balance before reaching for a look. A preset on top of a bad exposure just makes a more confident mistake.
- Animate a wrapper, not the graded element. The visible pixels are drawn by a sibling WebGL canvas, so fading the <video> itself leaves the canvas behind. Wrap it and animate the wrapper: media and canvas move together.
- Project-local media is the reliable path. Remote media needs compatible CORS headers and crossorigin="anonymous" for pixel access. Local files just work.
- This is an SDR pipeline. Native HDR delivery bypasses the SDR grading canvas entirely. Tone-map the source to SDR when the grade must appear in the result, or use HDR Rendering to preserve the untreated HDR source.
- A LUT is only correct when its input color space matches the source. Camera LOG conversion LUTs load, but nothing identifies camera profiles for you. And never paste a .cube body into an agent prompt: those files are tens of thousands of numeric rows. Keep the file local.
- Do not overcook. Start from analysis or a tested preset, then add small, explainable adjustments. Ten unrelated curve and secondary values are impossible to review and easy to ruin.
## Where it's located
- Studio. Select any real <img> or <video> element and Color Grading opens in the Design panel: scopes, wheels, curves, selections, presets, and LUT loading, all in one place. Copy grade to re-applies a finished grade to the current file's media or every media element in the project.
- CLI. npx hyperframes media-treatment, with --analyze, --apply, --dry-run, and --clear.
- Docs. hyperframes.heygen.com/guides/color-grading
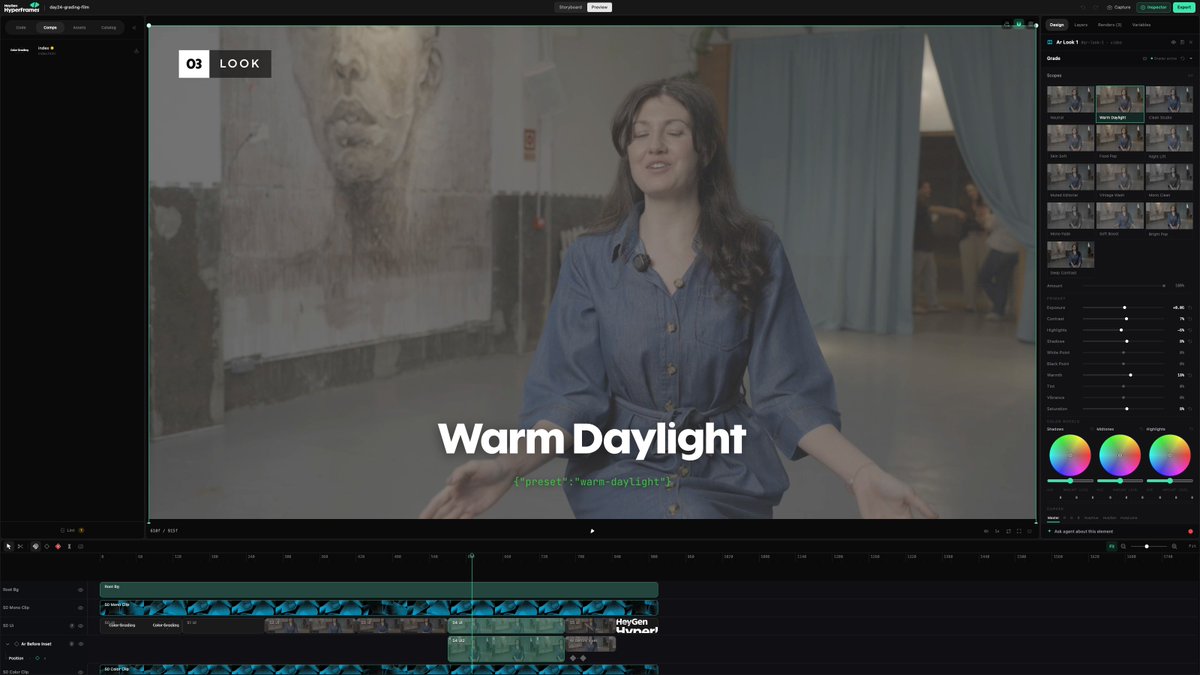
The Color Grading panel in Studio, open on today's footage: live preset previews, primary sliders carrying our real payload values, and the color wheels below.
## How we built today's video
Today's film grades itself. Every look on screen is a real data-color-grading payload on a real <video> element, and the film walks the pipeline in order: source, correct, grade, look, finish.
- The title sting is the feature performing. Two instances of the brand pattern play in perfect sync. The bottom one carries {"preset":"mono-fade"}, and the full-color instance above it is revealed by a clip-path wipe. The flood of color that reveals the title is literally the grade switching off.
- The correction came from measurement, not taste. The A-roll is a flat log interview. media-treatment --analyze read it first: average saturation 2.2 out of 255, mids sitting low, zero clip risk. The CORRECT payload answers those numbers.
- The before/after is two synced instances of the same clip. The corrected one sweeps across inside a clipped wrapper. Wrappers, not the video, get animated: the visible pixels live on a sibling WebGL canvas that follows its media.
- The four looks are pure presets at full intensity. We learned the merge rule the hard way: passing an adjust object alongside a preset expands it to every key, and those explicit values override the preset's own settings. Our saturation boost was quietly un-monoing Mono Clean. Pixel stats caught it: mono rendered at saturation 18.8 instead of 0.0. Presets got the clips to themselves, and mono went back to true black and white.
- The end card is one hue curve. The same cyan brand pattern from the open, pushed to Day 24 purple with a single hue-vs-hue point: 95 degrees of rotation centered on the HeyGen cyan. No recolor, no second asset.
## Output
Day 24 : 30 seconds, five grades.

⭐ If this series is useful, star the HyperFrames repo.
Color grading docs: hyperframes.heygen.com/guides/color-grading
Media effects (the stylize layer): hyperframes.heygen.com/guides/media-effects
HDR boundary: hyperframes.heygen.com/guides/hdr-rendering
Install the skills: npx skills add heygen-com/hyperframes
## 相关链接
- [HyperFrames](https://x.com/HyperFrames_)
- [@HyperFrames_](https://x.com/HyperFrames_)
- [2.1K](https://x.com/HyperFrames_/status/2082536413829235004/analytics)
- [hyperframes.heygen.com/guides/color-grading](https://hyperframes.heygen.com/guides/color-grading)
- [star the HyperFrames repo](https://github.com/heygen-com/hyperframes)
- [hyperframes.heygen.com/guides/color-grading](https://hyperframes.heygen.com/guides/color-grading)
- [hyperframes.heygen.com/guides/media-effects](https://hyperframes.heygen.com/guides/media-effects)
- [hyperframes.heygen.com/guides/hdr-rendering](https://hyperframes.heygen.com/guides/hdr-rendering)
- [Upgrade to Premium](https://x.com/i/premium_sign_up)
- [2:39 AM · Jul 30, 2026](https://x.com/HyperFrames_/status/2082536413829235004)
- [2,136 Views](https://x.com/HyperFrames_/status/2082536413829235004/analytics)
- [View quotes](https://x.com/HyperFrames_/status/2082536413829235004/quotes)
---
*导出时间: 2026/7/30 10:48:33*
---
## 中文翻译
# 调色
**作者**: HyperFrames
**日期**: 2026-07-29T18:39:07.000Z
**来源**: [https://x.com/HyperFrames_/status/2082536413829235004](https://x.com/HyperFrames_/status/2082536413829235004)
---

# 30天挑战第24天:编写你的调色方案
在过去的23天里,本系列中的每个片段都是按照相机输出的原始状态直接放入合成中的。第24天是素材进行处理的时候。调色功能为 HyperFrames 提供了一套真正的调色套件:色轮、RGB 曲线、色相曲线、HSL 选区、示波器、预设和自定义 LUT。它适用于真实的 `<video>` 和 `<img>` 媒体,并且在预览和最终渲染中使用完全相同的、经过验证的 SDR/Rec.709 着色器。你在调色时看到的,就是你最终得到的。
```
npx hyperframes media-treatment \
--project . \
--file compositions/interview.html \
--selector '#interview' \
--grading '{"preset":"clean-studio","intensity":0.85}' \
--apply --json
```
一条命令。输入平淡的相机原片,输出完成的风格。

今天视频中的划像对比:同一帧画面,左侧是平淡的 Log 原片,右侧是应用了一次调整后的效果。
## 它是什么
HyperFrames 中的调色是一种像素级的处理手段,它直接存在于媒体元素本身之上。专业调色的每个阶段都可用,每个阶段都有明确的职责:
整个处理方案作为一个属性 `data-color-grading` 存储在选定的元素上。其中的控制项对任何打开过 DaVinci Resolve 的人来说都会感到熟悉:
- 色轮。三个色轮针对宽泛的色调区域:阴影、中间调和高光。色相和数量引入颜色,而电平改变同一区域的亮度。请先使用少量调整。
- RGB 曲线。主曲线重映射整体亮度,红、绿、蓝曲线重映射各个通道。点是归一化的 [输入, 输出] 对。S 曲线增加对比度,提升左下角可以提亮阴影,通道曲线则可以构建分离色调或去除色偏。
- 色相曲线。色相对色相将选定色相向另一种偏移,色相对饱和度改变围绕色相的饱和度,色相对亮度改变围绕色相的亮度。点围绕色轮循环。
- HSL 颜色选区。选区通过色相、饱和度和亮度限定像素,然后仅在该遮罩内部应用校正。可以让一件过于鲜艳的衬衫变冷,或者保护肤色免受重度创意调色的影响。最多支持四个有序选区,且它们是静态限定器:无跟踪,无转描。
- 示波器。直方图、波形图、RGB 分量和矢量示波器,均读取应用了当前处理的捕获帧。依据示波器调色,而不是看显示器的心情。
- 预设。13 个经过测试的着色器预设,从校正类(Neutral 中性、Warm Daylight 暖日光、Clean Studio 干净工作室、Skin Soft 柔肤、Food Pop 食物提亮、Night Lift 夜间提亮)到编辑类(Muted Editorial 柔和编辑、Vintage Wash 复古冲洗、Soft Boost 柔和增强、Bright Pop 明亮跳跃、Deep Contrast 深度对比),再到单色类(Mono Clean 单色干净、Mono Fade 单色褪色)。这些是着色器设置,而不是烘培好的 LUT 文件,因此你可以在应用后微调每一个参数。
- 自定义 LUT。项目本地的 3D .cube 文件,最大支持 LUT_3D_SIZE 64,并带有强度控制。Rec.709 创意 LUT 是最安全的工作流程。

四种预设,一个片段,零次重剪:Warm Daylight 暖日光、Vintage Wash 复古冲洗、Deep Contrast 深度对比、Mono Clean 单色干净。
## 如何实现
你无需接触任何代码即可使用所有这些功能。打开你的素材,告诉代理哪里感觉不对(“太暗”、“太冷”、“让它看起来像电影”),调色方案就会自动应用并验证。下面的代码适用于想要直接控制的人。
最简单的途径是使用简单的英语。你不需要说出任何一个技术控制项的名称:“这段采访感觉太暗太冷”或“打磨素材但不要让它看起来像加了滤镜”这样的请求会通过 media-use 技能路由,它会检查源文件,应用确定的负载(payload),并验证结果。
当你想要直接控制时,CLI 就是创作界面。首先分析源文件:
```
npx hyperframes media-treatment \
--project . \
--file compositions/interview.html \
--selector '#interview' \
--analyze --json
```
然后应用一个经过验证的负载:
```
npx hyperframes media-treatment \
--project . \
--file compositions/interview.html \
--selector '#interview' \
--grading '{"adjust":{"highlights":-0.08,"shadows":0.06},"wheels":{"midtones":{"hue":32,"amount":0.05}}}' \
--apply --json
```
所有内容都会作为一个可读的属性持久化到合成中。这是 CLI 和 Studio 都写入的低层级约定:
```
<video
id="interview"
src="assets/interview.mp4"
data-start="0"
data-duration="6"
muted
playsinline
data-color-grading='{
"preset": "clean-studio",
"intensity": 0.85,
"adjust": { "exposure": 0.04, "highlights": -0.08, "shadows": 0.06 },
"wheels": {
"shadows": { "hue": 218, "amount": 0.04 },
"midtones": { "hue": 32, "amount": 0.05 },
"highlights": { "hue": 42, "amount": 0.03 }
},
"curves": { "master": [[0,0],[0.28,0.25],[0.72,0.76],[1,1]] },
"details": { "vignette": 0.05, "grain": 0.03 },
"colorSpace": "rec709"
}'
></video>
```
外部外观以同样的方式引入。将约定指向项目本地的 LUT 并设置其作用强度:
```
{ "lut": { "src": "assets/luts/product-look.cube", "intensity": 0.7 } }
```
该约定会拒绝未知的键并将每个数字限制在验证的边界内,因此负载要么干净地应用,要么告诉你原因。无需记忆边界,直接查询它们:
```
npx hyperframes media-treatment --capabilities --json
npx hyperframes media-treatment --capability grading --json
npx hyperframes media-treatment --capability lut --json
```
## 实战笔记
- 先校正,后调色。在追求风格之前,先修复曝光、色调平衡和白平衡。在糟糕的曝光之上套用预设只会让你犯下更自信的错误。
- 动画化包裹器,而不是被调色的元素。可见的像素是由同级 WebGL 画布绘制的,因此淡出 `<video>` 本身会把画布留在后面。将它包裹起来并动画化包裹器:媒体和画布会一起移动。
- 项目本地媒体是可靠的路径。远程媒体需要兼容的 CORS 头和 `crossorigin="anonymous"` 才能进行像素访问。本地文件则直接可用。
- 这是一个 SDR 流水线。原生 HDR 交付会完全绕过 SDR 调色画布。当调色必须出现在结果中时,将源文件色调映射至 SDR,或者使用 HDR 渲染来保留未经处理的 HDR 源。
- 只有当 LUT 的输入色彩空间与源文件匹配时,LUT 才是正确的。相机 LOG 转换 LUT 可以加载,但没有任何东西会为你识别相机配置文件。并且永远不要将 .cube 文件的内容粘贴到代理提示词中:这些文件包含数万行数字。请将文件保持在本地。
- 不要过度处理。从分析或经过测试的预设开始,然后添加微小的、可解释的调整。十个无关的曲线和次要值是不可能审查的,而且很容易搞砸。
## 它在哪里
- Studio。选择任何真实的 `<img>` 或 `<video>` 元素,调色面板就会在设计面板中打开:示波器、色轮、曲线、选区、预设和 LUT 加载,全部集于一处。复制调色(Copy grade)可以将完成的调色重新应用到当前文件的媒体或项目中的每个媒体元素。
- CLI。`npx hyperframes media-treatment`,带有 `--analyze`、`--apply`、`--dry-run` 和 `--clear` 选项。
- 文档。hyperframes.heygen.com/guides/color-grading

Studio 中的调色面板,打开今天的素材:实时预设预览,承载我们真实负载值的主滑块,以及下方的色轮。
## 我们如何制作今天的视频
今天的视频是自我调色的。屏幕上的每一个外观都是真实 `<video>` 元素上的真实 `data-color-grading` 负载,视频按顺序展示了流水线:源文件、校正、调色、风格、完成。
- 标题动画是该功能的展示。品牌图案的两个实例完美同步播放。底部的一个带有 `{"preset":"mono-fade"}`,而上方全彩实例通过 clip-path 划像揭示。揭示标题的色彩洪流实际上是调色关闭的效果。
- 校正来自测量,而不是品味。A-roll 是一段平淡的 Log 采访。`media-treatment --analyze` 首先读取了它:平均饱和度 255 分之 2.2,中间调偏低,零裁剪风险。CORRECT 负载回应了这些数值。
- 前后对比是同一片段的两个同步实例。校正后的那个在裁剪后的包裹器内扫过。动画化的是包裹器,而不是视频:可见的像素存在于跟随其媒体的同级 WebGL 画布上。
- 四种风格是纯预设且全强度的。我们通过惨痛的教训学到了合并规则:将 adjust 对象与预设一起传递会将其扩展到每个键,这些显式值会覆盖预设自己的设置。我们的饱和度提升在悄悄地让“Mono Clean”不再单色。像素统计发现了这一点:单色渲染的饱和度是 18.8 而不是 0.0。预设独占了片段,单色回到了真正的黑白。
- 结尾卡片只是一个色相曲线。开篇中相同的青色品牌图案,通过单个色相对色相点变成了第24天的紫色:以 HeyGen 青色为中心旋转 95 度。无需重新着色,无需第二个素材。
## 输出
第24天:30秒,5种调色。

⭐ 如果本系列对你有用,请给 HyperFrames 仓库点星。
调色文档:hyperframes.heygen.com/guides/color-grading
媒体效果(风格化层):hyperframes.heygen.com/guides/media-effects
HDR 边界:hyperframes.heygen.com/guides/hdr-rendering
安装技能:`npx skills add heygen-com/hyperframes`
## 相关链接
- [HyperFrames](https://x.com/HyperFrames_)
- [@HyperFrames_](https://x.com/HyperFrames_)
- [2.1K](https://x.com/HyperFrames_/status/2082536413829235004/analytics)
- [hyperframes.heygen.com/guides/color-grading](https://hyperframes.heygen.com/guides/color-grading)
- [star the HyperFrames repo](https://github.com/heygen-com/hyperframes)
- [hyperframes.heygen.com/guides/color-grading](https://hyperframes.heygen.com/guides/color-grading)
- [hyperframes.heygen.com/guides/media-effects](https://hyperframes.heygen.com/guides/media-effects)
- [hyperframes.heygen.com/guides/hdr-rendering](https://hyperframes.heygen.com/guides/hdr-rendering)
- [Upgrade to Premium](https://x.com/i/premium_sign_up)
- [2:39 AM · Jul 30, 2026](https://x.com/HyperFrames_/status/2082536413829235004)
- [2,136 Views](https://x.com/HyperFrames_/status/2082536413829235004/analytics)
- [View quotes](https://x.com/HyperFrames_/status/2082536413829235004/quotes)
---
*导出时间: 2026/7/30 10:48:33*