# Vibe code your first game with Codex [FULL COURSE]
**作者**: Meta Alchemist
**日期**: 2026-05-01T12:44:00.000Z
**来源**: [https://x.com/meta_alchemist/status/2050194525235425605](https://x.com/meta_alchemist/status/2050194525235425605)
---
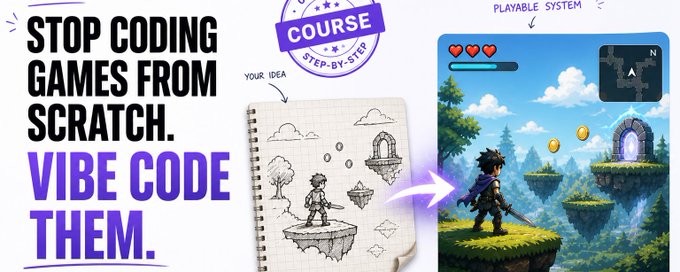
This is a visual-first workflow guide for turning AI-generated sketches, screenshots, and rough ideas into playable game systems.
And cool games that can become popular.
Most game ideas start visually.
A sketch.
A screenshot.
A mechanic in your head.
A messy little diagram on paper.
But most people still build games like this:
- open editor
- open blank file
- start coding from scratch
- hope the idea survives the translation
That’s where everything slows down.
And honestly, that’s where a lot of projects die. Even with big budgets.
Change one thing, add AI, great workflows, and bam, you can even build games solo. With Codex + GPT 5.5 + Image 2 combo, this is all possible.
All you need is:
- sketches
- screenshots
- UI mockups
- diagrams
- rough gameplay references
as the input layers.
Then Codex + GPT-5.5 + Image 2 help turn that input into code, systems, tools, UI, and playable loops.
This isn’t just a faster way to code.
It’s a shift in how games get built. And it will change gaming forever...
If you wanna build your own games too, with no game dev knowledge, design skillsets, or game dev experience, this guide is all you need to get started.
Get your coffee ready, and let's vibe on!
# What this course covers
This is not a “perfect prompt” guide.
This is a workflow.
You’ll learn:
- how to use visuals as instructions
- how to structure Codex prompts around images
- how to combine multiple references
- how to build systems through loops
- how to avoid the mistakes that make AI coding feel random
- how to think like a director instead of a prompt writer
The core idea is simple:
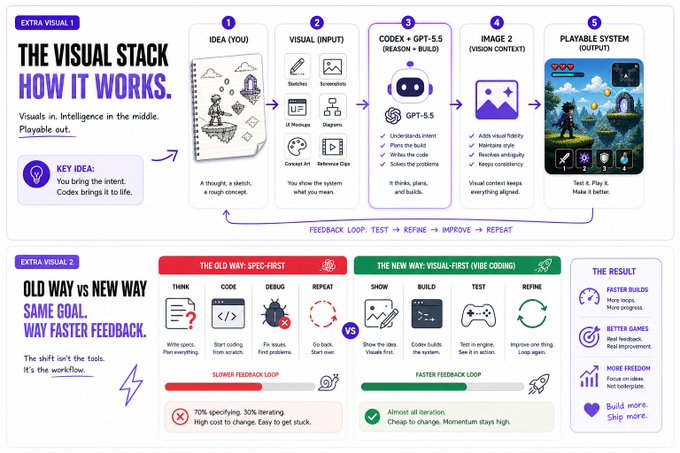
> Visuals are the interface. Codex is the engine. Image Gen 2 skill inside Codex is your designer. GPT 5.5 is your coder.
> That's the team. You & AI.
# MODULE 0: The Shift
The first thing to understand is not a tool.
It’s a reframe.
> Code is execution. Visuals are intent.
When your intent is clear, the build has direction.
When your intent is fuzzy, the output drifts, no matter how good the model is. So set clear goals.
A wall-jump described in text can miss the entire feel:
- the arc
- the input window
- the pause at the top
- the camera movement
- the responsiveness
But a rough sketch with arrows?
That carries the mechanic faster for AI to just get it more easily..
A prompted sketch can say more than 500 words of design notes.
And convey how you want the mechanics handled, as well as set the structure for storytelling.
Key idea
> Visuals are not just references.
> They are also instructions.
That’s the shift.
# MODULE 1: The Only Loop That Matters
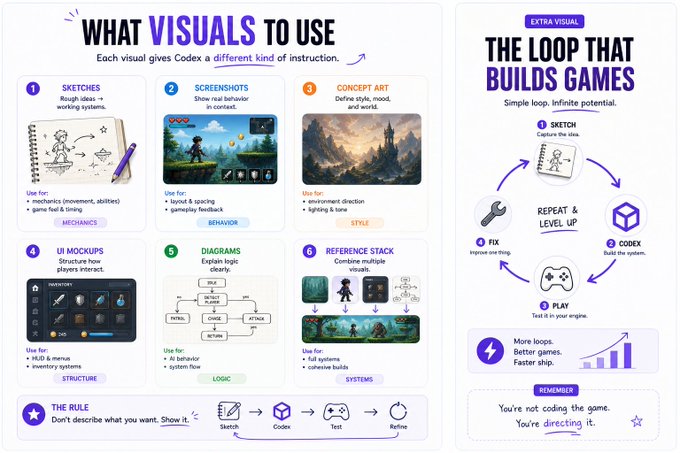
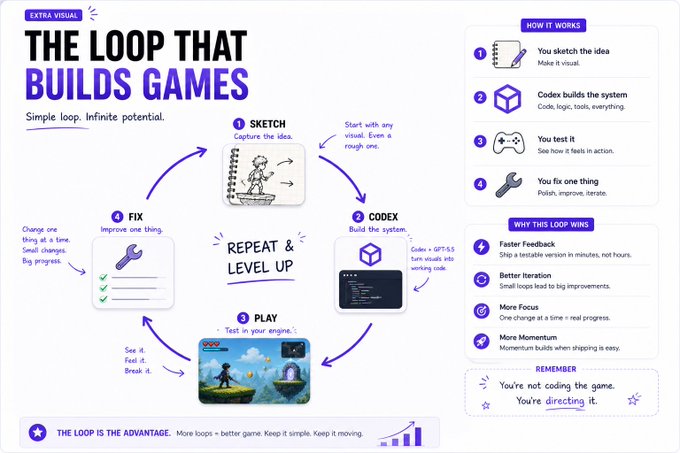
Every visual-first build collapses into four steps:
> Show → Build → Test → Refine
That’s it.
You don't need a perfect prompt.
Nor a perfect output.
The first build is supposed to be imperfect.
That’s the point.
It gives you something to react to and point at the AI.
Something to test.
Something to screenshot.
Something to improve.
Traditional game dev spends a lot of time specifying before building. Before AI for AAA studios, this meant over a year of pre-production work.
Now you can do all that in a few hours.
AI-generated visual-first development flips that.
You specify less upfront and iterate more, because iteration becomes cheaper.
Operator note
Speed doesn’t come from writing the perfect prompt, btw.
It comes from running more loops.
> One person trying to craft the perfect prompt will lose to someone running five fast iterations, and then once you start to perfect something it can then spill into the other visual styles really well.
Try this
Take one rough mechanic idea.
Sketch it badly.
Then ask Codex:
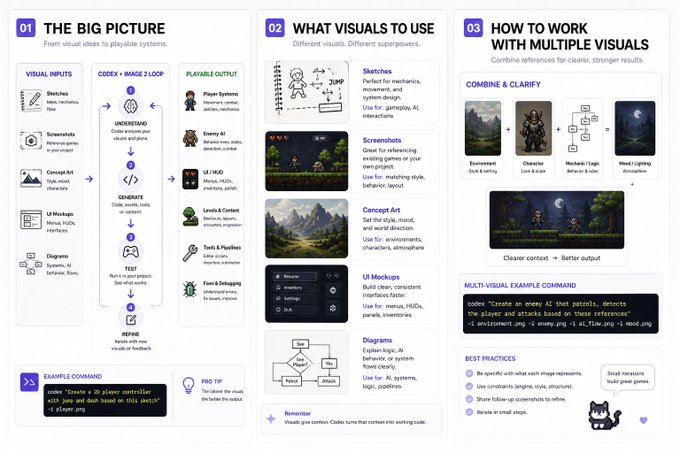
codex "Create a 2D player controller with jump and dash based on this sketch"
The goal is not perfection.
It's getting to a state of something you love to see, something that brings you joy and playfulness through movement and iteration.
# MODULE 2: What You Actually Feed It
Different visuals carry different signals.
That’s what makes this work.
Each type of visual gives Codex a different kind of instruction.
## Sketches
Best for:
- mechanics
- movement
- abilities
- rough systems
A sketch can define a dash arc, a jump path, or an enemy patrol route faster than paragraphs of explanation.
## Screenshots
Best for:
- layout
- behavior
- game feel
- references from your own project
Screenshots are especially useful after testing.
They show what happened, not just what you wanted.
## Concept art
Best for:
- mood
- tone
- lighting
- world direction
Some things are hard to describe in words.
Atmosphere is one of them.
Literally just show it instead.
## UI mockups
Best for:
- menus
- inventory
- HUD
- information hierarchy
UI is visual by nature.
Trying to describe it with text alone usually creates confusion.
## Diagrams
Best for:
- logic
- state machines
- AI behavior
- system flow
Enemy AI, progression systems, quests, and save the logic.
Diagrams are perfect for these.
Rule
> Show the system how to think.
> Don’t give it all the thinking.
> Guide the AI!
> That's how you'll get the best results.
# MODULE 3: Stacked Context
One image is enough to start.
Multiple images are where it gets powerful.
Most people use one visual and stop there. You want the AI to connect the dots, feel the story, understand where you want to take things...
Don't be afraid to stack layers of context on top of each other.
Use:
- one image for environment
- one image for character style
- one image for UI
- one diagram for logic
- one screenshot for game feel
Now Codex doesn't have to guess.
It starts assembling.
Example
Instead of:
codex "Create a forest enemy encounter"
Use:
codex Create a forest enemy encounter using these references, and give all these:
- environment for mood
- character for scale
- diagram for enemy behavior
- UI mockup for HUD layout
The more specific your context, the less generic the output.
Key idea
> More context = less hallucination, and exactly the direction you want to go for.
# MODULE 4: Prompt Patterns That Don’t Break
Good prompts are not clever.
They are just structured.
The goal is not to sound smart.
The goal is to remove guessing in the mind of AI, and let it dream around certain guardrails, not even guardrails, actually, but certain parameters.
These are the five patterns I’d use constantly.
## 1. Based on this
Use a visual as the source of truth.
codex "Based on this sketch, build the player movement system" -i movement.png
Best for:
- mechanics
- systems
- game feel
- code structure
## 2. Match this style
Let the image communicate the style instead of describing it.
codex "Build this inventory UI and match the visual style of this mockup"
Best for:
- UI
- menus
- HUD
- art direction
## 3. Explain then build
Make Codex reason before writing code.
codex "Explain how you would build this enemy AI system, then implement it"
Best for:
- complex systems
- AI behavior
- architecture
- debugging
This catches misunderstandings early. It will also think deeper.
## 4. Only change X
Control the blast radius.
codex "Only improve the dash responsiveness. Leave the rest of the movement system unchanged"
Best for:
- iteration
- refactoring
- bug fixes
- polishing
Without constraints, tools often “helpfully” change things you didn’t ask them to touch. Use hard constraints when you don't want drift.
## 5. Combine these inputs
Make multi-image use explicit.
codex "Combine these references into a single playable level prototype"
Best for:
- level design
- environment design
- systems + visuals
- prototypes
Simple rule
> Don’t make Codex guess.
> Show what you mean and constrain what it can touch.
> Upload the references that you create first for best results.
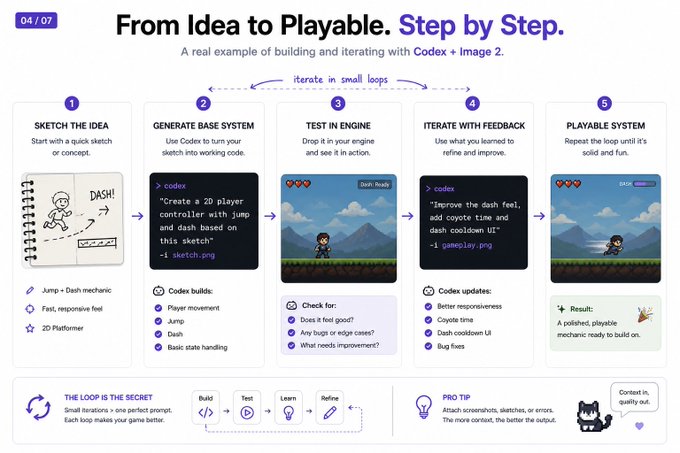
# MODULE 5: A Real Loop In Action
Here’s what this looks like when you actually build.
Let’s say you want a dash mechanic.
## 1) Show
Sketch the mechanic.
It can be ugly.
A character.
An arrow.
A dash direction.
Maybe a cooldown bar.
That’s enough.
P.S. You can literally sketch stuff on your phone if you want things to feel more yours. Or just prompt your sketches, that's cool too. Both works.
## 2) Build
Ask Codex to create the first version.
codex "Create a 2D player controller with jump, dash, cooldown, and basic state handling based on this sketch"
## 3) Test
Run it in your engine.
Don’t judge it yet.
Just watch.
Ask:
- does it feel responsive?
- does the dash go too far?
- does cooldown work?
- does it break near walls?
- does it feel fun?
## 4) Refine
Screenshot the result.
Then send it back.
codex "Improve the dash feel. Make it shorter, faster, and add coyote time. Keep the rest unchanged"
Then repeat.
That’s all you need in your system.
What used to take hours of setup can now become a few focused loops that generate the magic and storytelling via AI.
Not everything generated by AI needs to be slop; that's where systems like this shine.
Operator note
Every loop improves one dimension:
- feel
- timing
- UI
- bugs
- readability
- performance
Don’t change everything at once.
Pick one thing.
Improve it.
Loop again.
# MODULE 6: What You Can Build Today
This workflow is not just for player movement.
It will work across the whole game pipeline.
## Gameplay systems
Use visuals for:
- movement
- stamina
- combat
- abilities
- cooldowns
Example:
codex "Create a stamina + dash system based on this movement sketch"
## Enemy AI
Use diagrams for:
- patrol
- detection
- chase
- attack
- retreat
- state machines
Example:
codex "Create an enemy AI based on this behavior flow"
## UI / HUD
Use mockups for:
- inventory
- health bars
- menus
- ability slots
- dialogue boxes
Example:
codex "Build this inventory UI in Unity UI Toolkit"
## Level design
Use blockouts for:
- pacing
- room flow
- encounter placement
- spawn logic
- secrets
Example:
codex "Generate a level layout with 3 encounters based on this blockout"
## Tools & pipelines
Use Codex for boring-but-important work:
- editor scripts
- asset renamers
- import tools
- build helpers
- automation
Example:
codex "Write a Unity editor tool to batch rename assets"
## Debugging
Use screenshots for:
- errors
- broken UI
- unexpected behavior
- layout bugs
Example:
codex "Explain and fix this error"
Key idea
> If you can sketch it, screenshot it, or diagram it: you can start building it.
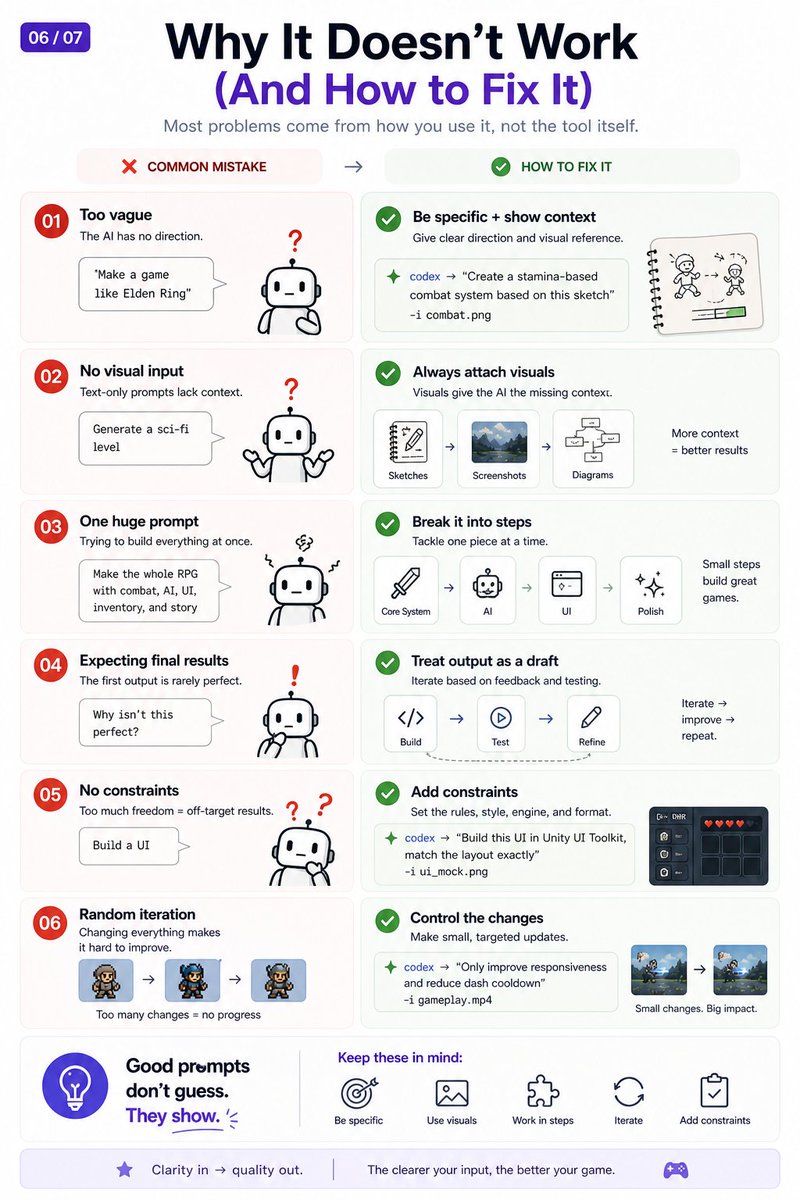
# MODULE 7: Why It Feels Like It Doesn’t Work
When this workflow fails, it usually isn’t because the tool is bad.
It’s because you skipped part of the loop.
These are the mistakes to avoid.
## Mistake 1: Being too vague
Bad:
codex "Build me a platformer"
Better:
codex "Build a 2D platformer controller based on this sketch. Include jump, dash, and wall slide, you can get inspired from these vibes, and here are the references"
## Mistake 2: No visual input
Text-only prompts force the model to invent everything.
Visuals reduce ambiguity.
Attach:
- sketch
- screenshot
- diagram
- mockup
## Mistake 3: One huge prompt
Bad:
> build the player, enemies, HUD, save system, inventory, story, economy, level design, and boss fight
Better:
- build movement
- test movement
- add enemy AI
- test AI
- add UI
- test UI
One system per loop.
## Mistake 4: Expecting final results
The first output is not the finished game.
It’s the first draft.
Treat it like clay.
Shape it.
## Mistake 5: No constraints
Bad:
codex "Improve this UI"
Better:
codex "Only update spacing and button hierarchy in here. Keep all the other UI functionality and component systems the same"
## Mistake 6: Random iteration
Don’t change five things at once.
Pick one target:
- responsiveness
- layout
- AI timing
- cooldown
- camera feel
- bug fix
Then loop.

# MODULE 8: The Real Mindset Shift
The most important question is not:
> “How do I prompt this?”
It’s:
> “What can I show?”
That one question changes everything.
You stop treating Codex like a magic code machine.
You start treating it like a developer that needs direction.
And good direction is visual.
## Old way
- start from nothing
- write a huge prompt
- hope for final output
- describe everything
- randomly iterate
## New way
- start from visuals
- build in steps
- test quickly
- show feedback
- control changes
# The Full Workflow
Here’s the whole system in one place:
1. Start with one visual
2. Ask Codex to build one system
3. Test it
4. Screenshot what happened
5. Refine one thing
6. Repeat
7. Stack systems over time
That’s visual-first game development.
Just:
> show → build → test → refine
# What to do first
Don’t start with a full game.
Start with one piece.
Pick:
- one mechanic
- one UI screen
- one enemy behavior
- one level room
- one tool
- one bug
Then create one visual.
A sketch is enough.
A screenshot is enough.
A messy diagram is enough.
Feed it into the loop.
# Final Thoughts
Building a game is fuckin fun.
They start messy. But if you know where you're heading and you can guide the AI via the loops and systems I mentioned in this course, you'll be crafting amazing stuff for sure.
Be ok with:
> Starting messy.
> Iterating until you love what you are seeing.
> That’s enough to begin.
> The rest gets built in the loop via the systems herein.
> In no time you'll actually be pretty good at vibe coding games.
# Closing Line
Vibe coding for game dev is here.
And it comes with infinite creative potential, dormant within you.
Use this guide a few times, and you will not believe what you will start creating. Remember: there are no limits, especially in the age of AGI!
## 相关链接
- [Meta Alchemist](https://x.com/meta_alchemist)
- [@meta_alchemist](https://x.com/meta_alchemist)
- [2.6K](https://x.com/meta_alchemist/status/2050194525235425605/analytics)
- [Upgrade to Premium](https://x.com/i/premium_sign_up)
- [8:44 PM · May 1, 2026](https://x.com/meta_alchemist/status/2050194525235425605)
- [2,645 Views](https://x.com/meta_alchemist/status/2050194525235425605/analytics)
- [View quotes](https://x.com/meta_alchemist/status/2050194525235425605/quotes)
---
*导出时间: 2026/5/1 22:12:50*
---
## 中文翻译
# 使用 Codex “氛围编程”你的第一个游戏 [完整教程]
**作者**: Meta Alchemist
**日期**: 2026-05-01T12:44:00.000Z
**来源**: [https://x.com/meta_alchemist/status/2050194525235425605](https://x.com/meta_alchemist/status/2050194525235425605)
---

这是一份以视觉为先的工作流程指南,用于将 AI 生成的草图、截图和粗略的想法转化为可玩的游戏系统。
以及那些能够成为热门的酷炫游戏。
大多数游戏创意都是从视觉开始的。
一张草图。
一张截图。
脑海中的一种机制。
纸上一张凌乱的小图。
但大多数人仍然像这样构建游戏:
- 打开编辑器
- 打开空白文件
- 从零开始写代码
- 祈祷创意能在转换中幸存
这就是一切变慢的地方。
老实说,这也是许多项目消亡的地方。即使拥有巨额预算也是如此。
改变一件事,加入 AI,配合优秀的工作流,砰,你甚至可以独自构建游戏。有了 Codex + GPT 5.5 + Image 2 的组合,这一切皆有可能。
你只需要:
- 草图
- 截图
- UI 原型图
- 图表
- 粗略的游戏玩法参考
作为输入层。
然后 Codex + GPT-5.5 + Image 2 帮助将这些输入转化为代码、系统、工具、UI 和可玩的循环。
这不仅仅是一种更快的编码方式。
这是游戏构建方式的转变。它将永远改变游戏......
如果你想也构建自己的游戏,却不需要游戏开发知识、设计技能或游戏开发经验,这份指南就是你入门所需的一切。
准备好咖啡,让我们开始享受这种氛围吧!

# 本课程涵盖的内容
这不是一份“完美提示词”指南。
这是一套工作流。
你将学到:
- 如何将视觉作为指令使用
- 如何围绕图像构建 Codex 提示词
- 如何组合多个参考
- 如何通过循环构建系统
- 如何避免让 AI 编码感觉随机随性的错误
- 如何像导演而不是像提示词写手那样思考
核心思想很简单:
> 视觉是界面。Codex 是引擎。Codex 内部的 Image Gen 2 技能是你的设计师。GPT 5.5 是你的程序员。
> 这就是团队。你与 AI。
# 模块 0:转变
首先需要理解的不是工具。
而是重构思维。
> 代码是执行。视觉是意图。
当你的意图清晰时,构建就有了方向。
当你的意图模糊时,无论模型多么强大,输出都会偏离。所以要设定清晰的目标。
用文字描述的蹬墙跳可能会错失整个感觉:
- 抛物线弧度
- 输入窗口
- 顶点的停顿
- 镜头运动
- 响应速度
但一张带箭头的粗略草图呢?
那能让 AI 更快地掌握机制。
一张提示生成的草图比 500 字的设计笔记更能说明问题。
并且能传达你希望如何处理机制,以及为叙事结构设定框架。
关键思想
> 视觉不仅仅是参考。
> 它们也是指令。
这就是转变。

# 模块 1:唯一重要的循环
每个以视觉为先的构建都归结为四个步骤:
> 展示 → 构建 → 测试 → 优化
仅此而已。
你不需要完美的提示词。
也不需要完美的输出。
第一次构建本该是不完美的。
这才是重点。
它给你一些可以反应并指向 AI 的东西。
一些可测试的东西。
一些可截图的东西。
一些可改进的东西。
传统的游戏开发在构建之前花费大量时间进行规格说明。在 AI 出现之前,对于 3A 工作室来说,这意味着超过一年的前期制作工作。
现在你可以在几个小时内完成所有这些工作。
AI 生成的视觉优先开发颠覆了这一点。
你在前期减少规格定义,增加迭代次数,因为迭代变得更廉价了。
操作员注
顺便说一句,速度并不是来自写出完美的提示词。
它来自于运行更多的循环。
> 一个试图精心雕琢完美提示词的人,会输给那个运行五次快速迭代的人,然后一旦你开始完善某个东西,它就能很好地溢出到其他视觉风格中。
试试这个
拿出一个粗略的机制想法。
画得很烂也没关系。
然后问 Codex:
codex “基于这张草图,创建一个带有跳跃和冲刺的 2D 玩家控制器”
目标不是完美。
而是达到一种你乐于见到的状态,一种通过运动和迭代给你带来快乐和趣味性的状态。
# 模块 2:你实际上该喂给它什么
不同的视觉图像承载着不同的信号。
这正是这种方法奏效的原因。
每种类型的视觉图像都给 Codex 提供不同种类的指令。
## 草图
最适用于:
- 机制
- 运动
- 能力
- 粗略的系统
一张草图定义冲刺弧度、跳跃路径或敌人巡逻路线的速度,比大段的解释文字要快得多。
## 截图
最适用于:
- 布局
- 行为
- 游戏手感
- 来自你自己项目的参考
截图在测试之后特别有用。
它们展示了实际发生的情况,而不仅仅是你想要的情况。
## 概念艺术
最适用于:
- 氛围
- 基调
- 灯光
- 世界观方向
有些东西很难用语言描述。
氛围就是其中之一。
直接展示它,别费口舌。
## UI 原型图
最适用于:
- 菜单
- 物品栏
- HUD
- 信息层级
UI 本质上是视觉化的。
试图仅用文字描述它通常会造成混乱。
## 图表
最适用于:
- 逻辑
- 状态机
- AI 行为
- 系统流程
敌人 AI、进度系统、任务和存档逻辑。
图表是这些内容的完美选择。
规则
> 向系统展示如何思考。
> 不要包办所有的思考。
> 引导 AI!
> 这就是获得最佳结果的方法。

# 模块 3:堆叠上下文
一张图片足以开始。
多张图片才是威力所在。
大多数人使用一张视觉图片后就止步不前了。你希望 AI 能串联线索、感受故事、理解你想把事物带向何方……
不要害怕将多层上下文堆叠在一起。
使用:
- 一张图片用于环境
- 一张图片用于角色风格
- 一张图片用于 UI
- 一张图表用于逻辑
- 一张截图用于游戏手感
现在 Codex 不需要猜测了。
它开始组装。
示例
不要只用:
codex “创建一个森林敌人遭遇战”
而是使用:
codex 使用这些参考创建一个森林敌人遭遇战,并提供以下所有内容:
- 环境图用于定氛围
- 角色图用于定比例
- 图表用于敌人行为
- UI 原型图用于 HUD 布局
你的上下文越具体,输出就越不大众化。
关键思想
> 更多上下文 = 更少幻觉,以及你想要的确切方向。

# 模块 4:不会出错的提示词模式
好的提示词并不聪明。
它们只是结构化。
目标不是听起来很智能。
目标是消除 AI 思维中的猜测,让它围绕某些护栏(甚至不是护栏,而是某些参数)进行发挥。
我会经常使用这五种模式。
## 1. 基于此
将视觉作为真理之源。
codex “基于此草图,构建玩家移动系统” -i movement.png
最适用于:
- 机制
- 系统
- 游戏手感
- 代码结构
## 2. 匹配此风格
让图像来传达风格,而不是用文字描述。
codex “构建这个物品栏 UI 并匹配此原型图的视觉风格”
最适用于:
- UI
- 菜单
- HUD
- 美术指导
## 3. 先解释再构建
让 Codex 在编写代码之前先进行推理。
codex “解释你将如何构建这个敌人 AI 系统,然后实现它”
最适用于:
- 复杂系统
- AI 行为
- 架构
- 调试
这可以尽早发现误解。它也会思考得更深入。
## 4. 仅更改 X
控制波及范围。
codex “仅提高冲刺的响应速度。保持移动系统的其余部分不变”
最适用于:
- 迭代
- 重构
- Bug 修复
- 打磨
如果没有约束,工具往往会“自作多情”地改变你没有要求它们触碰的部分。当你不想偏离时,请使用硬性约束。
## 5. 组合这些输入
明确使用多张图片。
codex “将这些参考组合成一个可玩的原型关卡”
最适用于:
- 关卡设计
- 环境设计
- 系统 + 视觉
- 原型
简单规则
> 别让 Codex 猜。
> 展示你的意思并约束它能触碰的部分。
> 首先上传你创建的参考资料以获得最佳效果。

# 模块 5:真实的循环实战
当你真正构建时,这看起来是这样的。
假设你想要一个冲刺机制。
## 1) 展示
画出机制的草图。
画得难看也没关系。
一个角色。
一个箭头。
冲刺方向。
也许还有一个冷却条。
这就够了。
P.S. 如果你希望东西感觉更像你自己的,你可以直接在手机上画草图。或者直接用提示词生成草图,这也挺酷。两种方法都行。
## 2) 构建
让 Codex 创建第一个版本。
codex “基于此草图,创建一个带有跳跃、冲刺、冷却和基本状态处理的 2D 玩家控制器”
## 3) 测试
在你的引擎中运行它。
先别评价它。
只管观察。
问自己:
- 它感觉有响应吗?
- 冲刺冲得太远了吗?
- 冷却起作用了吗?
- 在墙边会坏掉吗?
- 它感觉好玩吗?
## 4) 优化
截图结果。
然后发回给它。
codex “改进冲刺的手感。让它更短、更快,并添加土狼时间。保持其余部分不变”
然后重复。
这就是你的系统中需要的一切。
过去需要数小时设置的工作,现在可以变成几个专注的循环,通过 AI 产生魔力并讲述故事。
并非所有 AI 生成的东西都需要是垃圾;这正是此类系统大放异彩的地方。
操作员注
每个循环都会改善一个维度:
- 手感
- 时机
- UI
- Bug
- 可读性
- 性能
不要一次改变所有东西。
选一样东西。
改进它。
再次循环。

# 模块 6:你今天可以构建什么
这套工作流不仅限于玩家移动。
它适用于整个游戏管线。
## 游戏玩法系统
使用视觉图像来处理:
- 移动
- 体力
- 战斗
- 技能
- 冷却
示例:
codex “基于此移动草图,创建一个体力 + 冲刺系统”
## 敌人 AI
使用图表来处理:
- 巡逻
- 侦测
- 追击
- 攻击
- 撤退
- 状态机
示例:
codex “基于此行为流程创建敌人 AI”
## UI / HUD
使用原型图来处理:
- 物品栏
- 血条
- 菜单
- 技能栏
- 对话框
示例:
codex “在 Unity UI Toolkit 中构建此物品栏 UI”
## 关卡设计
使用白盒来处理:
- 节奏
- 房间流程
- 遭遇战布置
- 刷怪逻辑
- 秘密
示例:
codex “基于此白盒生成一个包含 3 个遭遇战的关卡布局”
## 工具与管线
使用 Codex 处理无聊但重要的工作:
- 编辑器脚本
- 资产重命名工具
- 导入工具
- 构建助手
- 自动化
示例:
codex “编写一个 Unity 编辑器工具来批量重命名资产”
## 调试
使用截图来处理:
- 错误
- 损坏的 UI
- 意外的行为
- 布局 Bug
示例:
codex “解释并修复此错误”
关键思想
> 如果你能画出它、截图它或画出它的图表:你就可以开始构建它。
# 模块 7:为什么感觉不管用
当这套工作流失败时,通常不是因为工具不好。
而是因为你跳过了循环的某个部分。
这些是需要避免的错误。
## 错误 1:太模糊
差:
codex “给我建一个平台跳跃游戏”
好:
codex “基于此草图构建一个 2D 平台跳跃控制器。包括跳跃、冲刺和蹬墙滑行,你可以从这些氛围中汲取灵感,这里是参考资料”
## 错误 2:没有视觉输入
纯文本提示词迫使模型凭空发明一切。
视觉图像能减少歧义。
附上:
- 草图
- 截图
- 图表
- 原型图
## 错误 3:一个巨大的提示词
差:
> 构建玩家、敌人、HUD、存档系统、物品栏、故事、经济、关卡设计和 Boss 战
好:
- 构建移动
- 测试移动
- 添加敌人 AI
- 测试 AI
- 添加 UI
- 测试 UI
每个循环只处理一个系统。
## 错误 4:期待最终结果
第一次输出不是成品游戏。
它是初稿。
把它当作粘土。
塑造它。
## 错误 5:没有约束
差:
codex “改进这个 UI”
好:
codex “仅更新这里的间距和按钮层级。保持所有其他 UI 功能和组件系统相同”
## 错误 6:随机迭代
不要一次改变五样东西。
选择一个目标:
- 响应性
- 布局
- AI 时机
- 冷却
- 镜头手感
- Bug 修复
然后循环。

# 模块 8:真正的思维转变
最重要的问题不是:
> “我该怎么提示这个?”
而是:
> “我能展示什么?”
那一个问题改变了一切。
你不再把 Codex 当作神奇的代码机器。
你开始把它当作一个需要方向的开发者。
而好的方向是视觉化的。
## 旧方式
- 从零开始
- 写一个巨大的提示词
- 期待最终输出
- 描述一切
- 随机迭代
## 新方式
- 从视觉开始
- 分步构建
- 快速测试
- 展示反馈
- 控制变更
# 完整工作流
这里有一整套系统:
1. 从一个视觉图像开始
2. 让 Codex 构建一个系统
3. 测试它
4. 截图发生的情况
5. 优化一个点
6. 重复
7. 随着时间推移堆叠系统
这就是以视觉为先的游戏开发。
就是:
> 展示 → 构建 → 测试 → 优化
# 首先做什么
不要从完整的游戏开始。
从一部分开始。
挑选:
- 一个机制
- 一个 UI 界面
- 一个敌人行为
- 一个关卡房间
- 一个工具
- 一个 Bug
然后创建一个视觉图像。
草图就够了。
截图就够了。
凌乱的图表也够了。
把它投入循环。
# 最后的想法
构建游戏真的很他妈好玩。
它们开始时都很乱。但如果你知道你要去哪里,并且你能通过本课程中提到的循环和系统引导 AI,你肯定会制作出令人惊叹的东西。
要能接受:
> 凌乱地开始。
> 迭代直到你喜欢你所看到的。
> 这就足以开始了。
> 其余部分通过这里的系统在循环中构建。
> 很快你就会真正相当擅长用氛围编程制作游戏。
# 结语
游戏开发的氛围编程时代已经到来。
它伴随着无限的创造潜力,潜藏在你体内。
多使用几次这份指南,你将不敢相信你会开始创造什么。记住:没有限制,尤其是在 AGI(通用人工智能)时代!
## 相关链接
- [Meta Alchemist](https://x.com/meta_alchemist)
- [@meta_alchemist](https://x.com/meta_alchemist)
- [2.6K](https://x.com/meta_alchemist/status/2050194525235425605/analytics)
- [Upgrade to Premium](https://x.com/i/premium_sign_up)
- [8:44 PM · May 1, 2026](https://x.com/meta_alchemist/status/2050194525235425605)
- [2,645 Views](https://x.com/meta_alchemist/status/2050194525235425605/analytics)
- [View quotes](https://x.com/meta_alchemist/status/2050194525235425605/quotes)
---
*导出时间: 2026/5/1 22:12:50*