# you should be NotebookLM maxxing.
**作者**: hoeem
**日期**: 2026-05-13T20:42:47.000Z
**来源**: [https://x.com/hooeem/status/2054652562867896520](https://x.com/hooeem/status/2054652562867896520)
---

Only 2.1% of people use NotebookLM vs Claude/ChatGPT and they're dominating you.
They're doing this with grounded knowledge and you can too with this full course.
You just opened a full course on NotebookLM, this means this article is extensive, very very very extensive. In fact, it's so extensive that if you had no clue about NotebookLM, or, you feel like you're a NotebookLM power user, you will still learn from this article with:
- it's in depth analysis
- 27 powerful use-cases I'm using
- my prompt library
- my master workflow
- optional guided course to mastery (at the end)
YES, IT IS A LOT.
YES, YOU WILL RETURN TO THIS ARTICLE.
YES, IT'S GOLD, LET'S BEGIN!!
# 1: WHAT IS NOTEBOOKLM?
NotebookLM is best understood as a source-grounded workspace, but but but... what does that mean?
You upload trusted material. NotebookLM helps you extract, organise, compare, synthesise and transform that material into structured outputs, so what should you use it for?
- extracting knowledge from uploaded sources
- building research matrices and data tables
- turning source sets into courses, guides and SOPs
- creating study systems from dense material
- producing Studio assets such as Audio Overviews, Video Overviews, Reports, Data Tables, Flashcards, Quizzes, Slide Decks, Infographics and Mind Maps
- creating reusable knowledge files for external AI assistants
- turning client, business or research material into polished deliverables
- transforming messy information into structured outputs that can be reused, taught, shared or exported
NotebookLM is powerful. It is source-grounded and citation-checkable. This grounding reduces hallucination risk and improves the output you get.
Think of it like this:
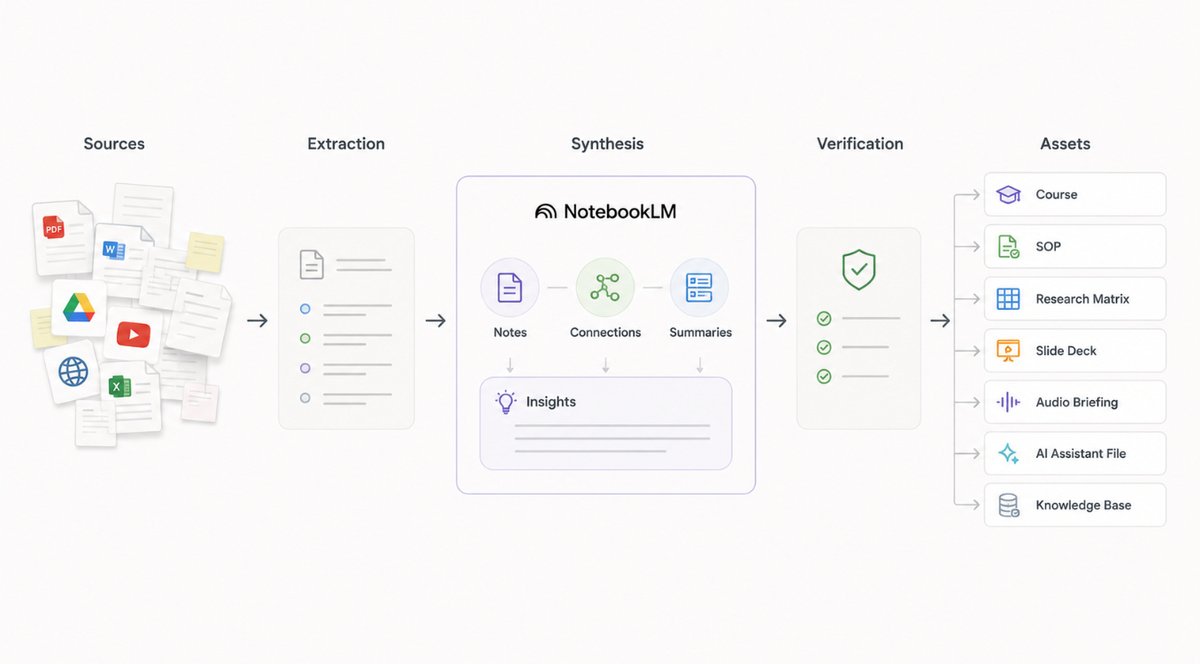
NotebookLM turns trusted source material into structured knowledge assets. Use it as a layered system:
- Input layer: upload trusted sources
- Reasoning layer: use Chat to extract, compare and synthesise
- Capture layer: save useful outputs as Notes
- Compounding layer: convert strong Notes back into Sources
- Asset layer: generate reports, tables, flashcards, quizzes, slide decks, audio, video, infographics and mind maps
- Deployment layer: export to Docs, Sheets, PDF, PPTX, Markdown, Notion, Obsidian or other systems
- Scaling layer: use Gemini, Claude, Custom GPTs, Zotero, Obsidian or Notion when the project exceeds NotebookLM’s native boundaries
This article is for:
- beginners who want to understand NotebookLM without treating it like a normal chatbot
- intermediate users who want repeatable workflows for study, research, writing, content and operations
- experts who want to build knowledge pipelines, course material, client deliverables, AI assistant files and long-term research assets
By the end, you should know how to turn uploaded sources into:
- knowledge bases
- courses
- deep dives
- guides
- research matrices
- study systems
- SOPs
- consulting reports
- slide decks
- audio briefings
- public notebooks
- content engines
- AI assistant knowledge files
- book outlines
- personal knowledge systems
# 2: HOW DOES IT WORK?
Before this article get's extremely useful we got to get through this slightly boring bit just so you know what it's doing, you can just scroll down if you're yawning at this bit and want to get to the juice, but the more you know about a tool the more you get from it.
NotebookLM has six working layers.
## Layer 1: Sources
Sources are the input layer.
These are the PDFs, documents, web pages, videos, audio files, spreadsheets, images or pasted text you upload.
They define the boundary of the notebook’s knowledge.
Bad sources create bad outputs.
Good sources create useful outputs.
Curated sources beat random dumps every time.
## Layer 2: Chat
Chat is the reasoning and synthesis layer.
This is where you ask questions, extract information, compare sources, test ideas and generate structured answers.
Use Chat for:
- source inventories
- extraction
- synthesis
- contradiction mapping
- claim audits
- outlines
- prompts
- checklists
- draft reports
- verification
Do not start with “summarise everything”. Start with inventory, extraction and structure.
## Layer 3: Notes
Notes are the capture layer.
They preserve valuable outputs so they do not disappear inside a long chat.
Use Notes for:
- saved outlines
- extracted frameworks
- source summaries
- module plans
- verified claims
- final drafts
- project decisions
A good Note is not just a saved answer.
It is reusable project memory.
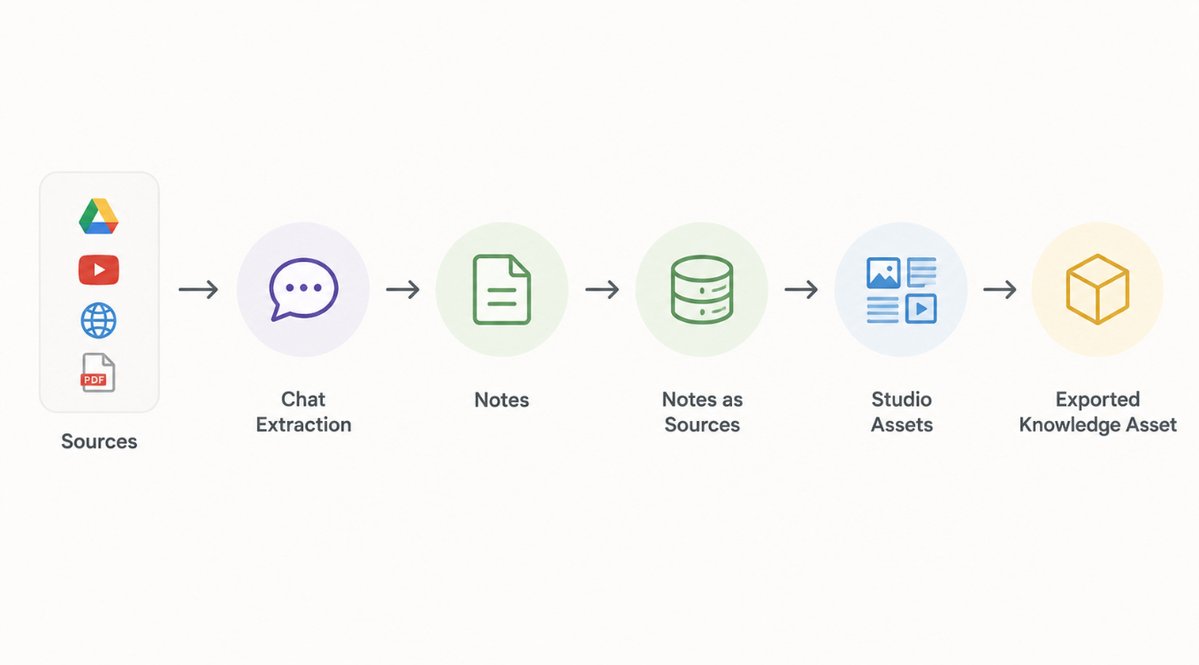
## Layer 4: Notes Converted Into Sources
This is the compounding layer.
It is one of the most powerful NotebookLM workflows.
You can save an answer as a Note, then convert that Note into a Source. This lets you build knowledge assets in stages.
Example:
1. Extract all frameworks.
2. Save the extraction as a Note.
3. Convert the Note into a Source.
4. Ask NotebookLM to build a course using that new framework-source as the structure.
That changes the whole game.
NotebookLM stops being a one-shot Q&A tool and becomes a staged knowledge-building system.
## Layer 5: Studio
Studio is the asset-generation layer.
It turns source-grounded material into outputs such as:
- Reports
- Data Tables
- Study Guides
- Flashcards
- Quizzes
- Mind Maps
- Audio Overviews
- Video Overviews
- Slide Decks
- Infographics
Studio is where NotebookLM becomes a production tool rather than a reading assistant.
But do not let Studio drive the strategy.
Extract first.
Synthesise second.
Generate assets third.
## Layer 6: Export and Deployment
Once the asset is built, move it to the right destination.
Use:
- Google Docs for reports and guides
- Google Sheets for tables and matrices
- PPTX or PDF for decks
- Markdown for Obsidian, Notion, Claude Projects or Custom GPTs
- MP3 for Audio Overviews
- public notebook links for client or audience sharing
- html
NotebookLM is excellent for synthesis.
It should not always be where you store this info... a personal wiki would be better!
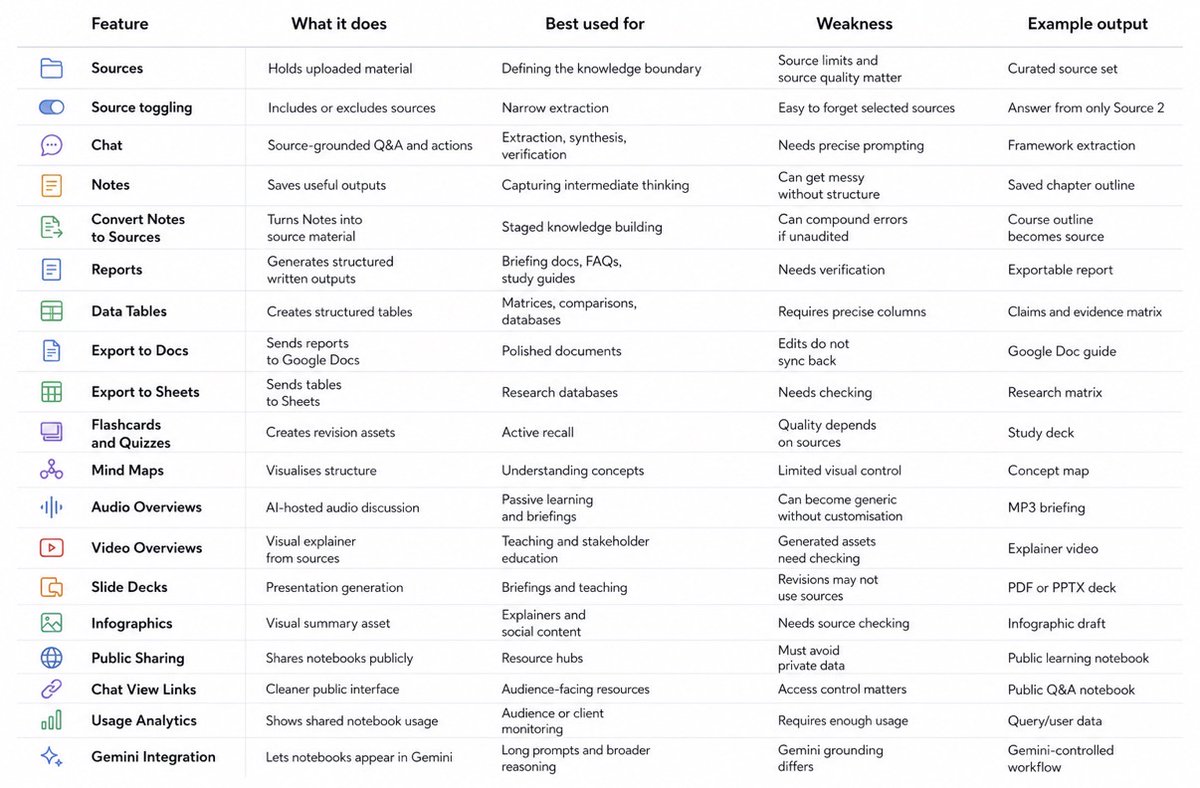
# 3: THE FEATURES
Use this table to decide what feature to use for each job.
# 4: SOURCE STRATEGY
NotebookLM output quality depends heavily on source quality.
Use the right source type for the right job.
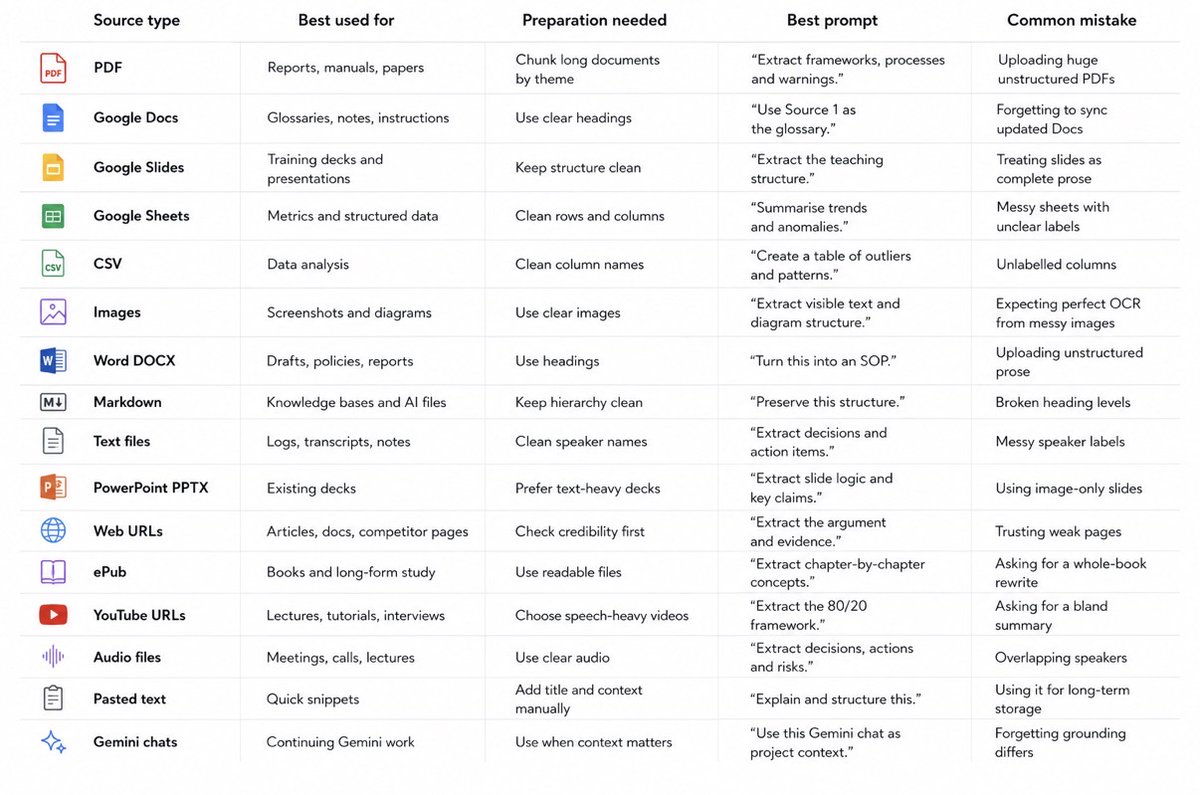
If your sources are weak then guess what else will be weak?
YOU GOT IT! The output.
# 5: THE USE-CASE LIBRARY
This section is the practical engine of the guide.
Each use case gives you:
- what the workflow is for
- best source types
- setup
- workflow
- paste-ready prompt
- expected output
- quality checks
- common mistakes
- advanced version
- final asset produced
you ready brother?
## Use Case 1: Build a Full Knowledge Base From Uploaded Sources
What this is for
Turning many uploaded sources into a reusable knowledge base that can become a guide, course, tutorial, operating manual, playbook, article series, slide deck or AI assistant file.
Best for
Researchers, creators, consultants, businesses, educators, experts and anyone building a serious long-term knowledge asset.
Source types to use
PDFs, Google Docs, web pages, YouTube transcripts, audio transcripts, ePubs, Markdown files, Google Slides, Google Sheets, CSV files and pasted notes.
Setup
1. Remove weak, outdated or irrelevant sources.
2. Rename files clearly.
3. Chunk very long documents by theme.
4. Create a glossary document if the topic uses specialist terminology.
5. Upload the glossary as Source 1.
6. Configure the notebook role as “Expert Knowledge Architect”.
7. Process sources in stages rather than asking for one giant output.
Workflow
1. Run a source inventory.
2. Extract source-by-source knowledge.
3. Create a theme map.
4. Create a concept map.
5. Create a framework map.
6. Create a process map.
7. Identify contradictions and gaps.
8. Build a modular knowledge base.
9. Save each module as a Note.
10. Convert strong Notes into Sources if useful.
11. Build the final guide, course or playbook from those Note-Sources.
12. Audit for source coverage and unsupported claims.
Paste-ready prompt:
```
Act as an Expert Knowledge Architect.
Create a complete knowledge base from the selected sources.
Work in this order:
1. Create a source inventory.
2. Extract key ideas, definitions, frameworks, processes, examples, warnings, tools and gaps.
3. Create a master theme map.
4. Create a concept map.
5. Create a framework map.
6. Create a process map.
7. Identify contradictions and missing information.
8. Build a modular knowledge base.
9. Add checklists, templates, prompts and practical exercises.
10. Finish with a source coverage and claim audit.
Write in British English.
Be comprehensive.
Do not invent unsupported examples.
Mark gaps clearly.
```
Expected output
A structured knowledge base with modules, definitions, frameworks, processes, examples, checklists, templates, prompts and a final audit.
Quality-control checks
- Did every source appear in the inventory?
- Did the output rely too heavily on one source?
- Were exact duplicates merged?
- Were non-identical related ideas preserved?
- Were unsupported inferences marked?
- Were gaps made explicit?
Common mistakes
- Asking for “summarise everything”
- Skipping the inventory stage
- Failing to save useful outputs as Notes
- Letting NotebookLM compress too much
- Treating the first answer as final
Advanced version
Use a staged Notes-to-Sources workflow:
1. Save the source inventory as a Note.
2. Save the framework map as a Note.
3. Save the module outline as a Note.
4. Convert the strongest Notes into Sources.
5. Ask NotebookLM to build the final knowledge base using the Note-Sources as structure and the original sources for evidence.
Final asset produced
A reusable knowledge base.
## Use Case 2: Turn Sources Into a Course
What this is for
Turning uploaded material into a structured course with modules, lessons, exercises, assessments and a final project.
Best for
Educators, creators, consultants, trainers, coaches, businesses and experts.
Source types to use
Training manuals, YouTube tutorials, lecture notes, PDFs, ePubs, Google Docs, Google Slides and process documents.
Setup
1. Upload sources that cover a complete subject or skill.
2. Create a glossary for important terms.
3. Configure the role as “Expert Curriculum Designer”.
4. Decide whether the course is for beginners, intermediates, experts or all three.
Workflow
1. Extract the core skill or subject.
2. Define the course promise.
3. Identify the target learner.
4. Create beginner, intermediate and advanced tracks.
5. Build modules in sequence.
6. Add lessons inside each module.
7. Add exercises, assessments and a final project.
8. Generate study guides, flashcards or quizzes.
9. Export the course structure to Docs.
Paste-ready prompt:
```
Act as an Expert Curriculum Designer.
Turn the selected sources into a complete course.
Include:
1. Course title
2. Course promise
3. Target learner
4. Beginner, intermediate and advanced tracks
5. Module structure
6. Lesson titles
7. Learning outcomes
8. Exercises
9. Assessments
10. Final project
11. Common mistakes
12. Required templates or worksheets
13. Suggested study schedule
Use only the selected sources.
Mark gaps where the sources do not provide enough material.
```
Expected output
A complete course blueprint with modules, lessons, exercises and assessments.
Quality-control checks
- Are exercises based on the source material?
- Does the course sequence make sense?
- Does it start beginner-friendly?
- Does it preserve expert depth?
- Are missing examples marked as gaps?
Common mistakes
- Letting the AI invent lessons outside the source material
- Making the course too broad
- Skipping assessments
- Creating passive lessons without exercises
Advanced version
Generate separate course assets:
- student workbook
- instructor guide
- slide deck outline
- quiz bank
- final project rubric
- Audio Overview per module
- public companion notebook
Final asset produced
A full course.
## Use Case 3: Create a Deep Dive or Long-Form Guide
What this is for
Turning scattered research into a serious written guide, essay, article, ebook chapter or technical explainer.
Best for
Writers, researchers, creators, founders, analysts, students and consultants.
Source types to use
PDFs, ePubs, articles, transcripts, reports, Google Docs and web pages.
Setup
1. Upload the relevant sources.
2. Decide the final reader.
3. Configure the AI as a “Senior Technical Writer” or “Expert Explainer”.
4. Build the guide section by section.
Workflow
1. Generate a thesis.
2. Generate an outline.
3. Map each section to supporting sources.
4. Draft one section at a time.
5. Audit claims.
6. Add examples and warnings.
7. Build a conclusion.
8. Export to Google Docs.
Paste-ready prompt:
```
Act as a Senior Technical Writer.
Create a long-form guide from the selected sources.
First produce:
1. Working title
2. Thesis
3. Target reader
4. Section-by-section outline
5. Main argument of each section
6. Supporting sources for each section
7. Contradictions or tensions to address
8. Gaps that need a second pass
Do not write the full guide yet.
First create the architecture.
```
Expected output
A strong guide outline with source support and argument flow.
Quality-control checks
- Is the thesis supported by the sources?
- Are sections logically ordered?
- Are claims grounded?
- Are contradictions addressed?
- Are examples included?
Common mistakes
- Asking for the full guide in one prompt
- Accepting a generic outline
- Not separating source-backed claims from synthesis
- Ignoring contradictions
Advanced version
Build section by section:
```
Write Section 1 only.
Use the agreed outline.
Use only the selected sources.
Include:
- clear explanation
- source-backed claims
- examples
- warnings
- practical steps
- gaps
- section summary
```
Final asset produced
A long-form guide or deep dive.
## Use Case 4: Build a Native Research Matrix or Data Table
What this is for
Turning messy sources into structured research databases.
Use this for:
- claim/evidence matrices
- literature review matrices
- competitor comparison tables
- glossary databases
- tool libraries
- contradiction maps
- source quality audits
- example banks
- quote banks
- framework libraries
- action item tables
Best for
Researchers, analysts, consultants, students, compliance teams and strategists.
Source types to use
PDFs, academic papers, reports, spreadsheets, CSV files, web pages and technical documents.
Setup
1. Upload sources.
2. Name sources clearly.
3. Decide the columns before generating the table.
4. Use Data Tables where possible.
5. Export to Sheets for analysis.
Workflow
1. Choose the table type.
2. Define exact columns.
3. Generate the table.
4. Audit empty cells.
5. Check citations.
6. Export to Sheets.
7. Use the table as a research database.
Paste-ready prompt:
```
Create a Data Table from all selected sources.
Use these columns:
1. Item
2. Category
3. Definition or description
4. Source-backed evidence
5. Practical implication
6. Example
7. Limitation or warning
8. Related concept
9. Confidence level
10. Gap or missing information
Rules:
- Only include information supported by the selected sources.
- Merge exact duplicates.
- Preserve different framings where they add nuance.
- Mark inferred points clearly.
- Leave a cell blank if the source does not provide the information.
```
Expected output
A clean, structured table that can be exported to Sheets.
Quality-control checks
- Are the columns useful?
- Are cells overfilled?
- Are unsupported claims marked?
- Are citations usable?
- Are exact duplicates merged?
Common mistakes
- Asking for “a table” without defining columns
- Making the table too wide
- Trusting inferred cells
- Not checking source coverage
Advanced version
Create separate tables for:
- frameworks
- claims
- contradictions
- definitions
- examples
- tools
- mistakes
- source quality
- implementation steps
Final asset produced
A research matrix or structured knowledge database.
## Use Case 5: Literature Review and Academic Research Workflow
What this is for
Processing academic papers to extract themes, compare methodologies, identify gaps and build a literature review.
Best for
Students, researchers, academics and analysts.
Source types to use
Academic PDFs, journal articles, research datasets, methodology papers and review articles.
Setup
1. Group papers by sub-topic.
2. Avoid uploading too many massive PDFs at once.
3. Use a citation manager outside NotebookLM.
4. Configure the role as “Post-Doctoral Researcher”.
Workflow
1. Upload a focused batch of papers.
2. Create a source audit table.
3. Extract research questions and methodologies.
4. Group papers by theme.
5. Identify consensus and dissent.
6. Compare methods.
7. Extract gaps.
8. Generate a literature review outline.
9. Export to Docs and cite properly using your citation manager.
Paste-ready prompt:
```
Act as a post-doctoral researcher.
Conduct a literature review of the selected papers.
Include:
1. Major thematic clusters
2. Consensus view in each cluster
3. Dissenting papers or opposing findings
4. Methodologies used
5. Methodological weaknesses
6. Key evidence
7. Research gaps
8. Suggested research questions
9. Literature review outline
Use source-backed claims only.
Mark inferred synthesis clearly.
```
Expected output
A thematic literature review outline with methodology comparison and gap analysis.
Quality-control checks
- Did the AI confuse correlation and causation?
- Did it overstate consensus?
- Did it correctly identify methodologies?
- Did it create fake research gaps?
- Are citations manually checked?
Common mistakes
- Treating NotebookLM as a citation manager
- Uploading too many papers at once
- Asking for a finished dissertation chapter immediately
- Ignoring methodological differences
Advanced version
Create:
- methodology matrix
- evidence quality table
- contradiction map
- research gap table
- thesis chapter outline
- oral defence question bank
Final asset produced
A literature review outline and research matrix.
## Use Case 6: Exam Revision and Active Learning System
What this is for
Turning passive study material into active recall, quizzes, flashcards, Socratic tutoring and revision plans.
Best for
Students, exam candidates, professional learners and anyone studying dense material.
Source types to use
Lecture slides, textbook PDFs, previous exam papers, notes, YouTube lectures and study guides.
Setup
1. Upload materials for one module or topic at a time.
2. Configure NotebookLM as a “Strict Socratic Tutor”.
3. Generate study guides, flashcards and quizzes.
4. Use Chat for active recall.
Workflow
1. Upload study material.
2. Ask for a concept map.
3. Generate a study guide.
4. Generate flashcards or quizzes.
5. Run Socratic test mode.
6. Track weak areas.
7. Generate a revision plan.
8. Repeat weekly.
Paste-ready prompt:
```
Act as a strict Socratic tutor.
Test me on the selected sources one question at a time.
Rules:
- Ask one question.
- Wait for my answer.
- Grade my answer against the sources.
- Explain what I got right.
- Explain what I missed.
- Give a hint before giving the full answer.
- Track my weak areas.
- At the end, create a revision plan based on my mistakes.
```
Expected output
A study system with tests, flashcards, weak-area tracking and revision guidance.
Quality-control checks
- Are quiz answers source-backed?
- Are weak areas tracked accurately?
- Are questions too easy?
- Are explanations beginner-friendly?
Common mistakes
- Reading summaries passively
- Asking only for notes
- Not testing recall
- Not reviewing mistakes
Advanced version:
```
Create three levels of questions from the selected sources:
1. Beginner recall questions
2. Intermediate application questions
3. Expert-level exam questions that expose shallow understanding
Include answers, explanation and source support.
```
Final asset produced
An active learning system.
## Use Case 7: YouTube, Podcast and Transcript Repurposing
What this is for
Turning long videos, podcasts and transcripts into structured content assets.
Best for
Creators, newsletter writers, marketers, researchers and educators.
Source types to use
YouTube URLs, podcast transcripts, audio files and pasted transcripts.
Setup
1. Upload transcript or URL.
2. Select only relevant sources.
3. Decide the output format.
4. Configure the role as “Content Strategist”.
Workflow
1. Extract key ideas.
2. Extract frameworks.
3. Extract stories and examples.
4. Extract hooks and memorable phrases.
5. Build content angles.
6. Create a newsletter, thread, article or carousel.
7. Fact-check claims against the transcript.
Paste-ready prompt:
```
Analyse this transcript.
Extract:
1. Core thesis
2. Key ideas
3. Frameworks
4. Examples
5. Stories
6. Warnings
7. Strong quotes
8. Content hooks
9. Contrarian angles
10. Practical takeaways
Then turn the strongest ideas into:
- one newsletter outline
- one X thread
- one LinkedIn post
- one short-form video script
- one infographic prompt
```
Expected output
A repurposing pack from one source.
Quality-control checks
- Did it invent points the speaker did not say?
- Did it preserve the speaker’s meaning?
- Are hooks accurate?
- Are claims checkable?
Common mistakes
- Asking for a generic summary
- Losing the best examples
- Over-polishing until the output sounds generic
- Not extracting hooks separately
Advanced version
Upload your best-performing content analytics alongside transcripts and ask NotebookLM to identify patterns in hooks, topics and structure.
Final asset produced
A content repurposing pack.
## Use Case 8: Business SOP and Operations Manual Creation
What this is for
Turning messy operational knowledge into SOPs, manuals, checklists and training materials.
Best for
Founders, agencies, operations managers, consultants and teams.
Source types to use
Meeting transcripts, call recordings, voice notes, policy docs, internal manuals, Google Docs and screenshots.
Setup
1. Upload the messy source material.
2. Upload your SOP template.
3. Configure the role as “Operations Architect”.
4. Ask for missing steps and risks.
Workflow
1. Extract the raw process.
2. Identify required tools.
3. Identify owners and inputs.
4. Turn the process into an SOP.
5. Add QA checks.
6. Add troubleshooting.
7. Add a checklist.
8. Export to Docs or Notion.
Paste-ready prompt:
```
Turn the selected source material into a formal Standard Operating Procedure.
Use this structure:
1. SOP title
2. Purpose
3. When to use this SOP
4. Owner
5. Required tools
6. Required inputs
7. Step-by-step process
8. Quality standard
9. Common failure points
10. Troubleshooting
11. Escalation rules
12. Final checklist
Do not invent missing steps.
If a step is unclear, mark it as a gap.
```
Expected output
A clean SOP based on messy source material.
Quality-control checks
- Are steps in the correct order?
- Are missing tools flagged?
- Are handoffs clear?
- Are QA standards measurable?
Common mistakes
- Not uploading an SOP template
- Letting the AI invent missing operational details
- Skipping QA and escalation rules
- Not reviewing with the person who actually does the task
Advanced version
Turn multiple SOPs into a full operations manual.
Final asset produced
An SOP or operations manual.
## Use Case 9: Meeting Notes, Calls and Voice Notes Workflow
What this is for
Extracting decisions, action items, project briefs, risks and follow-ups from conversations.
Best for
Project managers, executives, consultants, teams and freelancers.
Source types to use
Audio files, Zoom transcripts, call transcripts, voice notes and meeting notes.
Setup
1. Upload meeting audio or transcript.
2. Upload any prior project brief.
3. Configure the role as “Project Manager”.
4. Make speaker labels as clean as possible.
Workflow
1. Upload transcript.
2. Extract summary.
3. Extract decisions.
4. Extract action items.
5. Extract risks and open questions.
6. Draft follow-up email.
7. Save as a Note.
8. Convert recurring meeting Notes into a project Source.
Paste-ready prompt:
```
Analyse this meeting transcript.
Provide:
1. 3-sentence executive summary
2. Key decisions made
3. Action item table with owner and deadline
4. Risks raised
5. Open questions
6. Dependencies
7. Follow-up email draft
8. Project brief update
If the transcript does not clearly assign an owner or deadline, mark it as unclear.
```
Expected output
A meeting brief, action table and follow-up email.
Quality-control checks
- Did it confuse speakers?
- Are deadlines real or inferred?
- Are action owners correct?
- Are sensitive details safe to share?
Common mistakes
- Trusting messy speaker labels
- Not checking action items
- Uploading sensitive material without policy clearance
- Failing to save the output
Advanced version
Build a project notebook where each meeting summary becomes a Source, creating a rolling project memory.
Final asset produced
Meeting brief and project action log.
## Use Case 10: Client Deliverables and Consulting Workflow
What this is for
Turning client materials into audit reports, strategy memos, proposals, presentations and implementation plans.
Best for
Consultants, agencies, coaches, freelancers and advisors.
Source types to use
Discovery calls, questionnaires, sales pages, analytics exports, competitor URLs, reports and internal docs.
Setup
1. Create one notebook per client.
2. Never mix client data.
3. Upload client materials.
4. Upload your report template.
5. Configure the role as “Strategy Consultant”.
Workflow
1. Extract the client problem.
2. Extract client goals.
3. Identify contradictions.
4. Audit current materials.
5. Compare against best practices from uploaded sources.
6. Build recommendations.
7. Create a strategy memo.
8. Create a slide outline.
9. Verify all client quotes.
Paste-ready prompt:
```
Act as a Strategy Consultant.
Review the selected client materials.
Create an audit report with:
1. Client context
2. Stated goals
3. Current strategy
4. Main problems
5. Blind spots
6. Contradictions in the client’s own material
7. Opportunities
8. Recommended implementation roadmap
9. Risks
10. Next steps
Use specific source-backed evidence.
Do not invent client facts.
```
Expected output
A consulting memo or audit report.
Quality-control checks
- Are client quotes accurate?
- Did the AI overstate findings?
- Are recommendations tied to evidence?
- Is confidential material protected?
Common mistakes
- Mixing clients in one notebook
- Creating generic advice
- Not verifying quotes
- Letting AI invent client context
Advanced version
Create a client-facing notebook with safe materials, FAQs, slide deck, audio briefing and usage analytics.
Final asset produced
Client audit report or proposal deck.
## Use Case 11: Content Creator Research Engine
What this is for
Building a research vault that turns source material into articles, newsletters, scripts, posts, hooks and visual ideas.
Best for
Newsletter writers, X creators, YouTubers, LinkedIn creators, analysts and educators.
Source types to use
Articles, YouTube transcripts, books, voice memos, competitor content, analytics CSVs and research PDFs.
Setup
1. Create one notebook per content pillar.
2. Upload high-quality evergreen sources.
3. Upload your own notes and drafts.
4. Configure the role as “Content Strategist”.
Workflow
1. Extract core ideas.
2. Extract hooks.
3. Extract narrative structures.
4. Extract examples.
5. Generate angles.
6. Generate article outlines.
7. Generate posts.
8. Generate visual concepts.
9. Fact-check claims.
10. Save reusable frameworks.
Paste-ready prompt:
```
Act as a Content Strategist.
Review the selected sources and create a content engine.
Extract:
1. Strongest ideas
2. Best hooks
3. Contrarian angles
4. Examples and stories
5. Useful frameworks
6. Common mistakes
7. Audience pain points
8. Content angles
9. Newsletter ideas
10. X/Twitter thread ideas
11. LinkedIn post ideas
12. Visual infographic concepts
Preserve source accuracy.
Avoid generic content.
```
Expected output
A content strategy pack.
Quality-control checks
- Does it sound generic?
- Are hooks grounded in the source?
- Are examples real?
- Are claims fact-checkable?
Common mistakes
- Asking it to “write viral content”
- Forgetting to extract structure first
- Losing your own voice
- Publishing unverified claims
Advanced version
Upload top-performing content analytics and ask NotebookLM to reverse-engineer the patterns.
Final asset produced
A content engine.
## Use Case 12: Slide Deck and Presentation Workflow
What this is for
Turning sources into presentation outlines, storyboards and decks.
Best for
Executives, educators, consultants, sales teams, researchers and trainers.
Source types to use
Reports, project briefs, slides, PDFs, data tables and strategy docs.
Setup
1. Upload sources.
2. Build a source-backed slide outline in Chat first.
3. Verify claims before generating the deck.
4. Use Slide Deck generation as a draft/storyboard tool.
5. Revise wording and layout carefully.
Critical rule
Do not assume slide revisions use sources.
Use Chat first to build and verify a source-backed outline. Then generate the slide deck. After revisions, manually verify facts again.
Workflow
1. Create slide outline in Chat.
2. Verify claims.
3. Save outline as Note.
4. Generate Slide Deck.
5. Revise for clarity and design.
6. Export to PPTX or PDF.
7. Manually check numbers and claims.
Paste-ready prompt for Chat:
```
Create a source-backed slide deck outline.
For each slide include:
1. Slide title
2. Core message
3. Source-backed bullet points
4. Supporting source name
5. Any numbers or claims requiring manual verification
6. Suggested visual
7. Speaker note
Do not create the slide deck yet.
First produce the verified outline.
```
Revision prompt:
```
Revise the slide deck for clarity and presentation quality.
Only revise:
- wording
- layout
- visual hierarchy
- slide flow
- audience clarity
Do not introduce new factual claims.
Do not add new statistics.
Do not change numerical claims unless I provide the corrected numbers manually.
```
Expected output
A verified slide outline and exportable presentation.
Quality-control checks
- Are numbers correct?
- Are slides too text-heavy?
- Was the outline verified first?
- Did revisions introduce new claims?
Common mistakes
- Generating the deck before verifying the outline
- Trying to fix facts and design at the same time
- Assuming generated slides are final
- Not checking numerical claims
Advanced version
Upload brand guidelines and ask NotebookLM to adapt tone and speaker notes. Still verify all facts manually.
Final asset produced
Presentation deck.
## Use Case 13: Audio Overview and Podcast Workflow
What this is for
Turning source material into a customised audio briefing, debate, explainer or study session.
Best for
Students, executives, creators, commuters, auditory learners and educators.
Source types to use
Reports, papers, transcripts, YouTube videos, notes and course material.
Setup
1. Select only relevant sources.
2. Use the customisation or pencil option where available.
3. Specify format, audience, tone and objective.
4. Avoid default generation for serious work.
Workflow
1. Choose source scope.
2. Select Audio Overview.
3. Customise.
4. Choose format: brief, deep dive, debate, critique, beginner explainer or expert briefing.
5. Generate audio.
6. Listen and verify.
7. Download audible if useful.
Paste-ready prompt:
```
Format this Audio Overview as a Debate.
Focus only on the failure modes of the methodology in the selected sources.
Host A should defend the methodology.
Host B should act as a sceptic and ask practical questions.
Do not summarise the whole notebook.
Focus on:
- risks
- limitations
- trade-offs
- implementation mistakes
- how to avoid failure
```
Expected output
A useful audio discussion based on selected sources.
Quality-control checks
- Did it become too generic?
- Did the hosts invent points?
- Is the source scope too broad?
- Does the tone match the objective?
Common mistakes
- Leaving all sources selected
- Clicking default generate
- Not customising the host roles
- Treating audio as verified truth
Advanced version
Turn Audio Overview into a content pipeline:
1. Generate MP3.
2. Transcribe it externally if needed.
3. Extract clips, posts or summaries.
4. Use it as a study or training asset.
Final asset produced
Audio briefing or podcast.
## Use Case 14: Visual Thinking Workflow
What this is for
Turning dense material into visual structures.
Best for
Visual learners, educators, strategists, creators, trainers and researchers.
Source types to use
Reports, textbooks, transcripts, diagrams, slides and long-form guides.
Setup
1. Select a focused source set.
2. Decide the visual output.
3. Use Mind Maps, Infographics, slide outlines or diagram prompts.
Workflow
1. Extract the hierarchy.
2. Generate a Mind Map.
3. Generate an infographic concept.
4. Generate process diagrams in text.
5. Use output as a visual brief.
Paste-ready prompt:
```
Review the selected sources.
Create a visual thinking map with:
1. Central concept
2. Main branches
3. Sub-branches
4. Dependencies
5. Sequence of ideas
6. Contradictions or tensions
7. Suggested diagram formats
8. Suggested infographic structure
Output as Markdown.
```
Expected output
A concept map, process map or infographic brief.
Quality-control checks
- Is the hierarchy accurate?
- Are relationships invented?
- Is the map too cluttered?
- Are dependencies correct?
Common mistakes
- Visualising too many sources at once
- Asking for a pretty output before extracting structure
- Trusting diagrams without checking source logic
Advanced version
Turn the visual map into:
- infographic prompt
- slide deck structure
- teaching diagram
- process flow
- comparison chart
Final asset produced
Visual map or infographic plan.
## Use Case 15: Source Audit and Verification Workflow
What this is for
Checking whether sources are credible, current, useful, contradictory or weak.
Best for
Researchers, journalists, analysts, consultants, students and compliance teams.
Source types to use
All source types.
Setup
Run this before synthesis.
Workflow
1. Inventory sources.
2. Check dates and authors.
3. Rate usefulness.
4. Identify weak sources.
5. Identify contradictions.
6. Delete low-signal sources.
7. Run a claim audit after output generation.
Paste-ready prompt:
```
Conduct a rigorous Source Audit.
Create a table with:
1. Source name
2. Source type
3. Publication date if available
4. Author or organisation if available
5. Core thesis
6. Usefulness rating
7. Potential bias or weakness
8. What this source is best used for
9. Whether it should be kept, removed or used cautiously
Then identify any contradictions between sources.
```
Expected output
A source quality report.
Quality-control checks
- Are dates actually present?
- Did the AI infer missing metadata?
- Are weak sources removed?
- Are contradictions real?
Common mistakes
- Skipping source audit
- Trusting every uploaded URL
- Keeping old or weak material
- Not checking contradictions
Advanced version
Run a full claim audit after every major output.
Final asset produced
Source audit report.
## Use Case 16: Large Project and Multi-Notebook Workflow
What this is for
Managing projects that exceed one notebook.
Best for
PhD projects, books, enterprise knowledge bases, research teams and large content systems.
Source types to use
Large source libraries, PDFs, books, transcripts, reports and project docs.
Setup
1. Accept that one notebook should not contain everything.
2. Split sources by theme, project, audience or output.
3. Use external storage for permanent memory.
Workflow
1. Create themed notebooks.
2. Process each notebook separately.
3. Generate Bridge Summaries.
4. Export Bridge Summaries.
5. Store in Obsidian, Notion, Docs or Zotero.
6. Use Gemini for cross-notebook work if needed.
7. Bring final drafts back into NotebookLM for verification.
Paste-ready prompt:
```
Create a Bridge Summary for this notebook.
The summary must represent the most important knowledge from all selected sources.
Include:
1. Core topic
2. Main themes
3. Key frameworks
4. Important evidence
5. Contradictions
6. Gaps
7. Useful examples
8. Recommended next-step questions
9. Source list
This Bridge Summary will be exported into an external knowledge base.
Make it dense and portable.
```
Expected output
A dense summary that can stand in for the notebook externally.
Quality-control checks
- Did it include all major sources?
- Are source names preserved?
- Are important gaps included?
- Is it portable outside NotebookLM?
Common mistakes
- Combining huge PDFs to bypass source limits
- Making one giant notebook
- Failing to export summaries
- Losing citation context outside NotebookLM
Advanced version
Build a network:
- NotebookLM for source-grounded synthesis
- Zotero for papers
- Obsidian or Notion for permanent knowledge
- Gemini for cross-notebook orchestration
Final asset produced
Cross-notebook knowledge system.
## Use Case 17: NotebookLM and Gemini Workflow
What this is for
Combining NotebookLM’s source-grounded workspace with Gemini’s long-prompt, broader reasoning and execution abilities.
Best for
Power users, creators, developers, strategists, educators and researchers.
Source types to use
NotebookLM outputs, reports, Gemini chats, Google Docs and exported notes.
Setup
1. Use NotebookLM for source-grounded extraction.
2. Export or pass the output into Gemini.
3. Use Gemini for long-form generation or broader execution.
4. Bring final output back into NotebookLM for verification where needed.
Workflow
1. Extract in NotebookLM.
2. Save or export extraction.
3. Use Gemini to turn the extraction into a guide, course, code brief, ebook or playbook.
4. Audit Gemini output against NotebookLM sources.
5. Return to NotebookLM for Studio assets.
Paste-ready Gemini prompt:
```
You are working from a NotebookLM extraction.
Your job is to turn the extracted source-grounded material into a final knowledge asset.
Rules:
- Do not restart extraction.
- Do not invent unsupported claims.
- Separate source-backed material, synthesis and inference.
- Preserve all high-signal frameworks, examples, tactics and warnings.
- Write in British English.
- Structure the output as a practical playbook.
Build:
1. Executive overview
2. Core mental model
3. Feature-to-outcome map
4. Use-case library
5. Prompt library
6. Source-type strategy
7. Verification system
8. Recommended notebook architectures
9. Final knowledge asset pipeline
10. Final audit
```
Expected output
A long-form guide, course, playbook or expanded deliverable.
Quality-control checks
- Did Gemini add unsupported web knowledge?
- Are claims still traceable?
- Did it change the meaning of the source material?
- Does it need to be re-checked against NotebookLM?
Common mistakes
- Using Gemini as the extractor instead of NotebookLM
- Forgetting Gemini grounding differs
- Letting Gemini invent examples
- Not bringing the final output back for verification
Advanced version
Use Gemini for:
- coding
- long-prompt editing
- ebook restructuring
- article generation
- schema or website creation
- broad creative expansion
Use NotebookLM for:
- source extraction
- verification
- Studio outputs
- citation checking
Final asset produced
Gemini-expanded knowledge asset.
## Use Case 18: Custom AI Assistant or GPT Knowledge File Creation
What this is for
Turning NotebookLM outputs into a structured knowledge file for Custom GPTs, Claude Projects or other AI assistants.
Best for
AI builders, operations teams, creators, consultants and educators.
Source types to use
SOPs, transcripts, manuals, expert notes, frameworks, examples and style guides.
Setup
1. Upload expert source material.
2. Extract decision rules.
3. Extract terminology.
4. Extract workflows.
5. Export as Markdown or JSON.
Workflow
1. Extract domain overview.
2. Extract key terms.
3. Extract frameworks.
4. Extract workflows.
5. Extract examples.
6. Extract hard rules.
7. Extract answer style.
8. Create an AI assistant knowledge file.
9. Test with sample prompts.
Paste-ready prompt:
```
Create an AI Assistant Knowledge File from the selected sources.
Include:
1. Assistant role
2. Domain overview
3. Target user
4. Key terminology
5. Core principles
6. Frameworks
7. Workflows
8. Decision rules
9. Examples
10. Mistakes to avoid
11. Answer style guidance
12. Boundaries
13. Uncertainty rules
14. Required output formats
Write in clean Markdown.
Make it suitable for uploading into a Custom GPT or Claude Project.
```
Expected output
A structured AI assistant file.
Quality-control checks
- Are rules deterministic?
- Are examples source-backed?
- Are boundaries clear?
- Does the assistant know when to say “not enough information”?
Common mistakes
- Uploading raw notes instead of structured knowledge
- Making instructions too vague
- Forgetting examples
- Not defining output formats
Advanced version
Create:
- Markdown knowledge file
- JSON profile
- prompt instructions
- test cases
- evaluation checklist
Final asset produced
AI assistant knowledge file.
## Use Case 19: Book, Ebook or Long-Form Content Workflow
What this is for
Using NotebookLM as a research and structure engine for books, ebooks and long-form content.
Best for
Authors, creators, academics, educators and newsletter writers.
Source types to use
ePubs, book notes, interviews, transcripts, drafts, research papers and outlines.
Setup
1. Upload research sources.
2. Upload draft material.
3. Configure the role as “Senior Editor”.
4. Work chapter by chapter.
Workflow
1. Extract thesis.
2. Extract book arguments.
3. Build chapter map.
4. Assign evidence to chapters.
5. Identify gaps.
6. Draft chapter outlines.
7. Generate exercises or workbook material.
8. Build companion assets.
Paste-ready prompt:
```
Act as a Senior Editor.
Use the selected sources to create a book architecture.
Include:
1. Book title options
2. Core thesis
3. Target reader
4. Chapter-by-chapter outline
5. Main argument of each chapter
6. Supporting source material
7. Examples to include
8. Gaps in the source material
9. Exercises or workbook ideas
10. Promotional content angles
```
Expected output
A book structure with evidence and chapter logic.
Quality-control checks
- Is the argument coherent?
- Are chapters too repetitive?
- Are examples real?
- Does the book have progression?
Common mistakes
- Asking NotebookLM to ghostwrite the whole book
- Using too many unrelated sources
- Skipping the thesis stage
- Not checking narrative flow
Advanced version
Generate:
- companion workbook
- chapter exercises
- course version
- article series
- launch content
- AI assistant version
Final asset produced
Book outline and research bank.
# OKAY X IS BEING WEIRD.
# it won’t let me save anymore.
# there’s going to have to be a part two.
# i’ll tag it below this article.
# UPDATE HERE IT IS:
> **hoeem@hooeem**: [原文链接](https://x.com/hooeem/status/2054663669712081403)
>
## 相关链接
- [hoeem](https://x.com/hooeem)
- [@hooeem](https://x.com/hooeem)
- [52K](https://x.com/hooeem/status/2054652562867896520/analytics)
- [12h](https://x.com/hooeem/status/2054663669712081403)
- [7.7K](https://x.com/hooeem/status/2054663669712081403/analytics)
- [Upgrade to Premium](https://x.com/i/premium_sign_up)
- [3:58 AM · May 14, 2026](https://x.com/hooeem/status/2054652562867896520)
- [52.7K Views](https://x.com/hooeem/status/2054652562867896520/analytics)
- [View quotes](https://x.com/hooeem/status/2054652562867896520/quotes)
---
*导出时间: 2026/5/14 16:43:32*
---
## 中文翻译
# 你应该把 NotebookLM 发挥到极致。
**作者**: hoeem
**日期**: 2026-05-13T20:42:47.000Z
**来源**: [https://x.com/hooeem/status/2054652562867896520](https://x.com/hooeem/status/2054652562867896520)
---

只有 2.1% 的人使用 NotebookLM 而非 Claude/ChatGPT,而他们正在碾压你。
他们利用基于知识的 grounded(有依据)能力做到了这一点,你也可以通过这个完整的课程做到这一点。
你刚刚打开了一门关于 NotebookLM 的完整课程,这意味着这篇文章非常详尽,非常非常非常详尽。事实上,它是如此详尽,以至于如果你对 NotebookLM 一无所知,或者,你觉得自己已经是 NotebookLM 的资深用户,你仍然会从这篇文章中学到东西,包括:
- 它的深度分析
- 我正在使用的 27 个强大用例
- 我的提示词库
- 我的主工作流
- 可选的精通指导课程(在文末)
是的,内容很多。
是的,你会反复回到这篇文章。
是的,这简直是金矿,让我们开始吧!!
# 1: 什么是 NOTEBOOKLM?
最好将 NotebookLM 理解为一个基于来源的工作空间,但是,但是,但是……这意味着什么呢?
你上传可信的材料。NotebookLM 帮助你提取、整理、比较、综合并将这些材料转化为结构化输出,那么你应该用它来做什么?
- 从上传的来源中提取知识
- 构建研究矩阵和数据表
- 将来源集转化为课程、指南和标准作业程序(SOP)
- 从密集材料中创建学习系统
- 制作工作室资产,如音频概览、视频概览、报告、数据表、抽认卡、测验、幻灯片、信息图和思维导图
- 为外部 AI 助手创建可重用的知识文件
- 将客户、业务或研究材料转化为精美的交付物
- 将杂乱的信息转化为可重用、可教学、可共享或可导出的结构化输出
NotebookLM 非常强大。它是基于来源的并且可以验证引用。这种基于来源的特性降低了幻觉风险,并提高了你获得的输出质量。
这样想:

NotebookLM 将可信的来源材料转化为结构化的知识资产。将其作为一个分层系统使用:
- 输入层:上传可信来源
- 推理层:使用聊天来提取、比较和综合
- 捕获层:将有用的输出保存为笔记
- 复利层:将强有力的笔记转化回来源
- 资产层:生成报告、表格、抽认卡、测验、幻灯片、音频、视频、信息图和思维导图
- 部署层:导出到 Docs、Sheets、PDF、PPTX、Markdown、Notion、Obsidian 或其他系统
- 扩展层:当项目超出 NotebookLM 的原生边界时,使用 Gemini、Claude、自定义 GPTs、Zotero、Obsidian 或 Notion
这篇文章适用于:
- 想要理解 NotebookLM 而不将其视为普通聊天机器人的初学者
- 想要为学习、研究、写作、内容和运营建立可重复工作流的中级用户
- 想要构建知识管道、课程材料、客户交付物、AI 助手文件和长期研究资产的专家
读完本文后,你应该知道如何将上传的来源转化为:
- 知识库
- 课程
- 深度研究
- 指南
- 研究矩阵
- 学习系统
- 标准作业程序(SOP)
- 咨询报告
- 幻灯片组
- 音频简报
- 公开笔记本
- 内容引擎
- AI 助手知识文件
- 书籍大纲
- 个人知识系统
# 2: 它是如何工作的?
在本文变得极其有用之前,我们必须通过这个稍微枯燥的部分,只是为了让你知道它在做什么,如果你看到这部分在打哈欠并想直接进入“干货”,你可以向下滚动,但你对该工具了解得越多,你从中获得的收益就越多。
NotebookLM 有六个工作层。
## 第 1 层:来源
来源是输入层。
这些是你上传的 PDF、文档、网页、视频、音频文件、电子表格、图像或粘贴的文本。
它们定义了笔记本知识的边界。
糟糕的来源产生糟糕的输出。
好的来源产生有用的输出。
精心策划的来源每次都能击败随机堆砌。
## 第 2 层:聊天
聊天是推理和综合层。
在这里你可以提问、提取信息、比较来源、测试想法并生成结构化的答案。
使用聊天进行:
- 来源清单
- 提取
- 综合
- 矛盾映射
- 声明审计
- 大纲
- 提示词
- 检查清单
- 报告草稿
- 验证
不要以“总结一切”开始。从清单、提取和结构开始。
## 第 3 层:笔记
笔记是捕获层。
它们保存有价值的输出,以免其消失在长长的聊天记录中。
使用笔记进行:
- 保存的大纲
- 提取的框架
- 来源摘要
- 模块计划
- 验证过的声明
- 最终草稿
- 项目决策
一个好的笔记不仅仅是一个保存的答案。
它是可重用的项目记忆。
## 第 4 层:转化为来源的笔记
这是复利层。
这是 NotebookLM 最强大的工作流程之一。
你可以将答案保存为笔记,然后将该笔记转化为来源。这让你可以分阶段构建知识资产。
示例:
1. 提取所有框架。
2. 将提取内容保存为笔记。
3. 将笔记转化为来源。
4. 要求 NotebookLM 使用该新的框架来源作为结构来构建课程。
这改变了整个游戏规则。
NotebookLM 不再是一次性问答工具,而变成了分阶段的知识构建系统。
## 第 5 层:工作室
工作室是资产生成层。
它将基于来源的材料转化为以下输出:
- 报告
- 数据表
- 学习指南
- 抽认卡
- 测验
- 思维导图
- 音频概览
- 视频概览
- 幻灯片组
- 信息图
工作室是 NotebookLM 成为生产工具而非阅读助手的地方。
但不要让工作室主导策略。
先提取。
其次综合。
第三生成资产。
## 第 6 层:导出和部署
一旦资产构建完成,将其移动到正确的目的地。
使用:
- Google Docs 用于报告和指南
- Google Sheets 用于表格和矩阵
- PPTX 或 PDF 用于幻灯片
- Markdown 用于 Obsidian、Notion、Claude Projects 或自定义 GPTs
- MP3 用于音频概览
- 公开笔记本链接用于与客户或受众分享
- html
NotebookLM 非常适合综合。
它不应该是你总是存储这些信息的地方……个人维基会更好!

# 3: 功能
使用此表来决定为每项工作使用什么功能。

# 4: 来源策略
NotebookLM 的输出质量在很大程度上取决于来源质量。
为正确的工作使用正确的来源类型。

如果你的来源很弱,那么猜猜还有什么会很弱?
你猜对了!输出。
# 5: 用例库
本节是指南的实用引擎。
每个用例都为你提供:
- 工作流程的用途
- 最佳来源类型
- 设置
- 工作流
- 可即用的提示词
- 预期输出
- 质量检查
- 常见错误
- 高级版本
- 生成的最终资产
准备好了吗兄弟?
## 用例 1:从上传的来源构建完整的知识库
用途
将许多上传的来源转化为可重用的知识库,该知识库可以成为指南、课程、教程、操作手册、剧本、文章系列、幻灯片组或 AI 助手文件。
最适合
研究人员、创作者、顾问、企业、教育工作者、专家以及任何正在构建严肃长期知识资产的人。
使用的来源类型
PDF、Google Docs、网页、YouTube 文字记录、音频文字记录、ePubs、Markdown 文件、Google 幻灯片、Google Sheets、CSV 文件和粘贴的笔记。
设置
1. 移除薄弱、过时或不相关的来源。
2. 清晰地重命名文件。
3. 按主题分割非常长的文档。
4. 如果主题使用专业术语,请创建词汇表文档。
5. 将词汇表作为来源 1 上传。
6. 将笔记本角色配置为“专家知识架构师”。
7. 分阶段处理来源,而不是要求一个巨大的输出。
工作流
1. 运行来源清单。
2. 逐个来源地提取知识。
3. 创建主题图。
4. 创建概念图。
5. 创建框架图。
6. 创建流程图。
7. 识别矛盾和空白。
8. 构建模块化知识库。
9. 将每个模块保存为笔记。
10. 如果有用,将强有力的笔记转化为来源。
11. 根据这些笔记来源构建最终指南、课程或剧本。
12. 审计来源覆盖范围和无支持的声明。
可即用的提示词:
```
扮演专家知识架构师。
从选定的来源创建一个完整的知识库。
按此顺序工作:
1. 创建来源清单。
2. 提取关键想法、定义、框架、流程、示例、警告、工具和空白。
3. 创建主主题图。
4. 创建概念图。
5. 创建框架图。
6. 创建流程图。
7. 识别矛盾和缺失信息。
8. 构建模块化知识库。
9. 添加检查清单、模板、提示词和练习。
10. 以来源覆盖范围和声明审计结束。
使用英式英语书写。
要全面。
不要发明无支持的示例。
清楚地标记空白。
```
预期输出
一个包含模块、定义、框架、流程、示例、检查清单、模板、提示词和最终审计的结构化知识库。
质量控制检查
- 每个来源都出现在清单中了吗?
- 输出是否过度依赖某一个来源?
- 精确的重复项是否已合并?
- 不完全相同的相关想法是否被保留了?
- 无支持的推论是否被标记了?
- 空白是否被明确指出了?
常见错误
- 要求“总结一切”
- 跳过清单阶段
- 未能将有用的输出保存为笔记
- 让 NotebookLM 压缩得太多
- 将第一个答案视为最终答案
高级版本
使用分阶段的笔记转来源工作流:
1. 将来源清单保存为笔记。
2. 将框架图保存为笔记。
3. 将模块大纲保存为笔记。
4. 将最有力的笔记转化为来源。
5. 要求 NotebookLM 使用笔记来源作为结构,并使用原始来源作为证据来构建最终知识库。
生成的最终资产
一个可重用的知识库。
## 用例 2:将来源转化为课程
用途
将上传的材料转化为具有模块、课程、练习、评估和最终项目的结构化课程。
最适合
教育工作者、创作者、顾问、培训师、教练、企业和专家。
使用的来源类型
培训手册、YouTube 教程、讲座笔记、PDF、ePubs、Google Docs、Google 幻灯片和流程文档。
设置
1. 上传涵盖完整主题或技能的来源。
2. 为重要术语创建词汇表。
3. 将角色配置为“专家课程设计师”。
4. 决定课程是针对初学者、中级者、专家还是针对所有人。
工作流
1. 提取核心技能或主题。
2. 定义课程承诺。
3. 确定目标学习者。
4. 创建初级、中级和高级轨道。
5. 按顺序构建模块。
6. 在每个模块内添加课程。
7. 添加练习、评估和最终项目。
8. 生成学习指南、抽认卡或测验。
9. 将课程结构导出到 Docs。
可即用的提示词:
```
扮演专家课程设计师。
将选定的来源转化为完整的课程。
包括:
1. 课程标题
2. 课程承诺
3. 目标学习者
4. 初级、中级和高级轨道
5. 模块结构
6. 课程标题
7. 学习成果
8. 练习
9. 评估
10. 最终项目
11. 常见错误
12. 所需模板或工作表
13. 建议的学习时间表
仅使用选定的来源。
标记来源未提供足够材料的空白。
```
预期输出
一个包含模块、课程、练习和评估的完整课程蓝图。
质量控制检查
- 练习是否基于来源材料?
- 课程顺序是否合理?
- 是否对初学者友好?
- 是否保留了专家深度?
- 缺失的示例是否被标记为空白?
常见错误
- 让 AI 在来源材料之外发明课程
- 让课程过于宽泛
- 跳过评估
- 创建没有练习的被动课程
高级版本
生成单独的课程资产:
- 学生练习册
- 讲师指南
- 幻灯片组大纲
- 测验库
- 最终项目评分标准
- 每个模块的音频概览
- 公共配套笔记本
生成的最终资产
一个完整的课程。
## 用例 3:创建深度研究或长篇指南
用途
将分散的研究转化为严肃的书面指南、文章、文章、电子书章节或技术解释。
最适合
作家、研究人员、创作者、创始人、分析师、学生和顾问。
使用的来源类型
PDF、ePubs、文章、文字记录、报告、Google Docs 和网页。
设置
1. 上传相关来源。
2. 决定最终读者。
3. 将 AI 配置为“高级技术作家”或“专家讲解员”。
4. 逐节构建指南。
工作流
1. 生成论题。
2. 生成大纲。
3. 将每个部分映射到支持的来源。
4. 一次起草一个部分。
5. 审计声明。
6. 添加示例和警告。
7. 构建结论。
8. 导出到 Google Docs。
可即用的提示词:
```
扮演高级技术作家。
从选定的来源创建长篇指南。
首先制作:
1. 工作标题
2. 论题
3. 目标读者
4. 逐节大纲
5. 每个部分的主要论点
6. 每个部分的支持来源
7. 需要解决的矛盾或张力
8. 需要第二轮的空白
还不要写完整的指南。
首先创建架构。
```
预期输出
一个具有来源支持和论证流程的强力指南大纲。
质量控制检查
- 论题是否得到来源的支持?
- 部分是否符合逻辑顺序?
- 声明是否有依据?
- 是否解决了矛盾?
- 是否包含了示例?
常见错误
- 在一个提示词中要求完整的指南
- 接受通用大纲
- 不区分有来源支持的声明和综合内容
- 忽略矛盾
高级版本
逐节构建:
```
仅编写第 1 部分。
使用商定的大纲。
仅使用选定的来源。
包括:
- 清晰的解释
- 有来源支持的声明
- 示例
- 警告
- 实用步骤
- 空白
- 本节摘要
```
生成的最终资产
一份长篇指南或深度研究。
## 用例 4:构建原生研究矩阵或数据表
用途
将杂乱的来源转化为结构化研究数据库。
将其用于:
- 声明/证据矩阵
- 文献综述矩阵
- 竞争对手比较表
- 词汇表数据库
- 工具库
- 矛盾图
- 来源质量审计
- 示例库
- 引用语库
- 框架库
- 行动项表
最适合
研究人员、分析师、顾问、学生、合规团队和战略家。
使用的来源类型
PDF、学术论文、报告、电子表格、CSV 文件、网页和技术文档。
设置
1. 上传来源。
2. 清晰地命名来源。
3. 在生成表格之前决定列。
4. 尽可能使用数据表。
5. 导出到 Sheets 进行分析。
工作流
1. 选择表格类型。
2. 定义精确的列。
3. 生成表格。
4. 审计空单元格。
5. 检查引用。
6. 导出到 Sheets。
7. 将表格用作研究数据库。
可即用的提示词:
```
从所有选定的来源创建数据表。
使用这些列:
1. 项目
2. 类别
3. 定义或描述
4. 有来源支持的证据
5. 实际含义
6. 示例
7. 限制或警告
8. 相关概念
9. 置信度水平
10. 空白或缺失信息
规则:
- 仅包含选定来源支持的信息。
- 合并精确的重复项。
- 保留增加细微差别的不同框架。
- 清楚地标记推断点。
- 如果来源未提供信息,则将单元格留空。
```
预期输出